Original Link: https://www.anandtech.com/show/7752/msi-x79agd45-plus-review-building-up
MSI X79A-GD45 Plus Review: Building Up
by Ian Cutress on February 14, 2014 10:00 AM EST- Posted in
- Intel
- MSI
- Motherboards
- X79
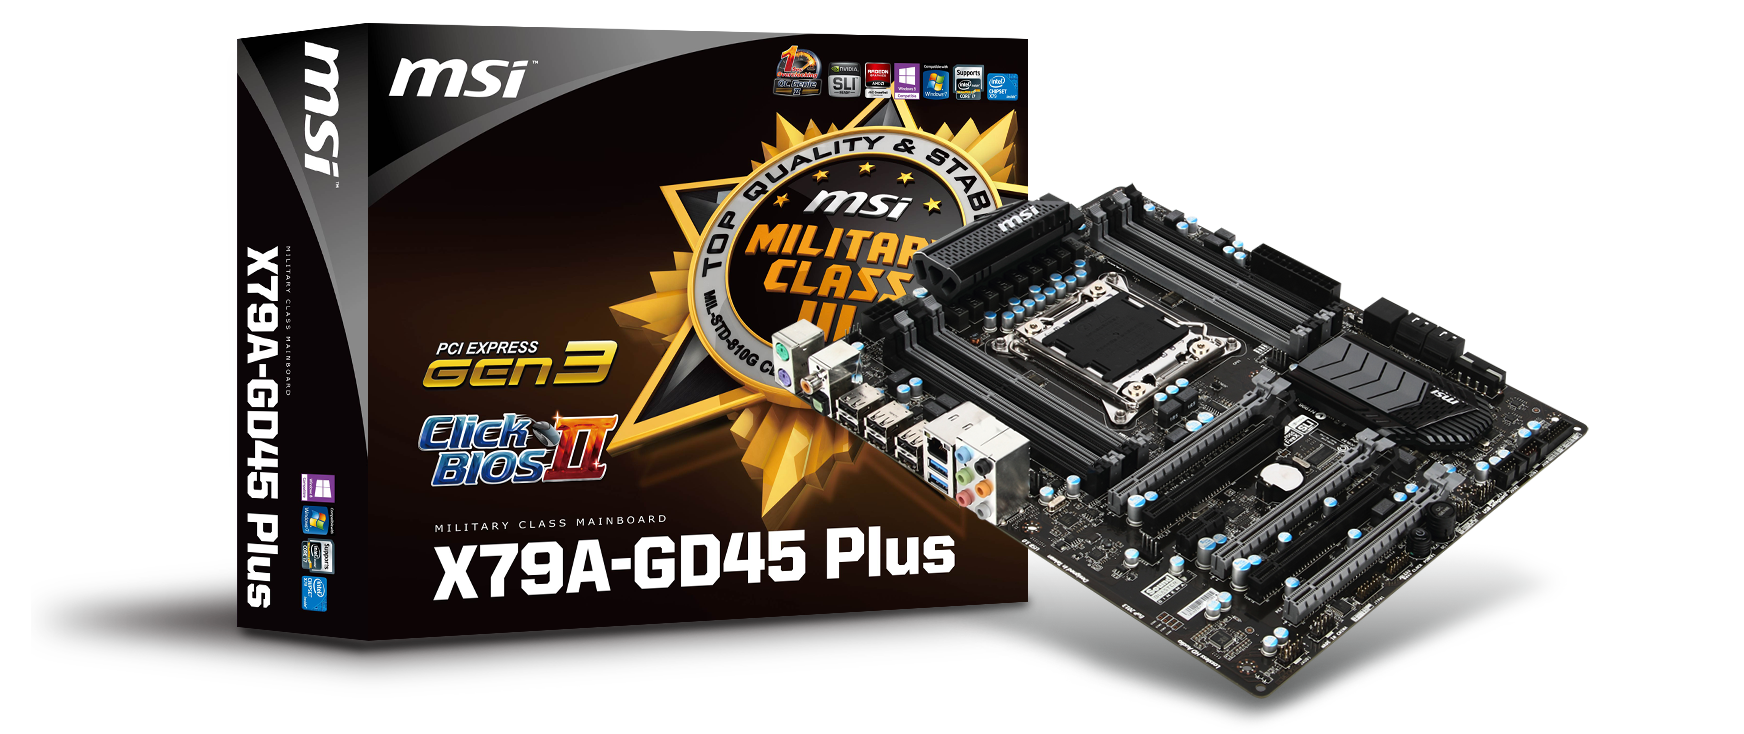
Breaking into the X79 game at this late stage is a rough business. The major action was at the Sandy Bridge-E launch, and the Ivy Bridge-E release was a minor bump in comparison. Due to the lack of a new chipset, only a few motherboard vendors put a new product onto the market for the IVB-E launch. One of them was MSI, with the slightly non-conventional X79A-GD45 Plus, which we are reviewing today.
MSI X79A-GD45 Plus Overview
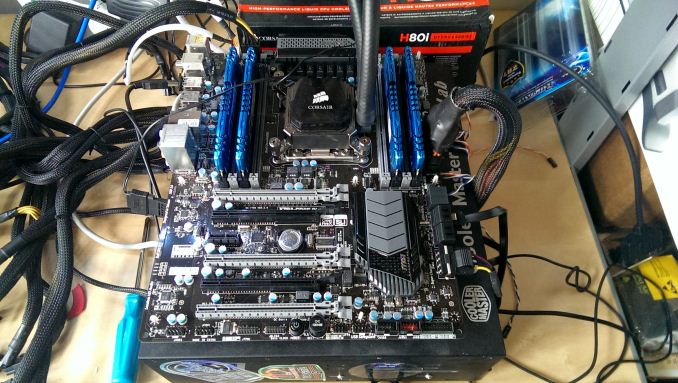
When pulling the MSI Z79A-GD45 Plus out of its box, I was a little surprised, if I am honest. Typically with X79 motherboards we see a layout conducive to a 4-way GPU allocation, and there really is only one way of doing that unless you extend out the motherboard. With the GD45 Plus, MSI has modified it at least for 3-way PCIe allocation, similar to most mainstream (Z77/Z87) PCIe layouts. The argument for this might be on the side of ‘the first GPU always gets one slot of airflow’ when using a dual slot GPU, but even in dual GPU layouts on other X79 motherboards, the GPU still has space there. The other element is that MSI are going more for additional PCIe cards rather than GPUs, and so the odd PCIe lane layout might benefit this. The reason why the first PCIe slot is shifted down one to accommodate this layout is due to the large number of resistors on the top of the motherboard, which seems slightly abnormal.
On the hardware side of things, MSI has gone somewhat minimal, especially when there are no extra SATA 6 Gbps ports, no WiFi and only one network port. The focus is almost more on the look of the motherboard, which in black and grey can be rather soothing. Audio comes in at the base Realtek ALC892, which is pretty much the low end standard for the Ivy Bridge-E platform, and this is paired with an Intel NIC, rather than anything Atheros Killer based as seen on other products in MSI’s spectrum.
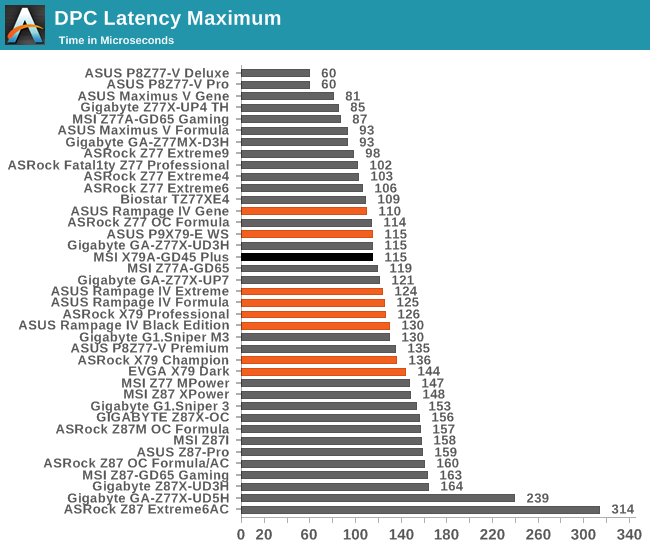
For our benchmarking suite, the X79A-GD65 Plus does rather well, given that it uses MultiCore Acceleration when XMP is applied (adjusts all multipliers up to the top turbo limit no matter the loading). The DPC Latency is lower than any Haswell motherboard we have tested, although the audio selection (ALC892 + Sound Blaster) gave a lower SNR than most of the other motherboards we have tested. Boot time is quite long (18.3 seconds with two GPUs), and our rather bad CPU struggled past 4.4 GHz in terms of overclocking, which is almost along the lines of the other X79 motherboards we have tested.
For the extra features, such as software and BIOS usability, MSI gets big thumbs up for their continuing use and execution of Live Update 5, which configures the latest BIOS and drivers from the internet into the system. The new Control Center software we saw for Z87 is used in this new X79 model, although the option to stick the voltage straight to 1.8 volts in the OS is still a bad option to have available to users. The big feature of the BIOS we liked for Z87, the fan control settings, is not present in the BIOS here, and while MSI now give help hints on the BIOS options, users have to navigate and click to find them – not particularly useful if, like me, the main method of BIOS navigation is via the keyboard. The overclocking options in the BIOS are still a bit of a mess as well, with no clear order or segregation.
It might sound like I am being a bit harsh on the MSI X79A-GD65 Plus, and although it has problems which are more derived from issues and the design stage, it never required adjusting during actual testing. The question then comes around to whether $250 is the right price for a product of this nature. Back when X79 was brought into the market, we tested MSI’s Big Bang XPower II, a high end product that despite the novelty heatsinks created enough of an impact in my testing at the time to get an award. The X79A-GD45 Plus has fewer features and options as the BBXP2 (as seen in the price difference, $250 vs. $450+), and serves the cheaper end of the LGA2011 market.
Visual Inspection
As mentioned, pulling the motherboard out of the box is a rather pleasurable experience in terms of aesthetics. MSI has made it simple and tidy, with a lack of obvious tracing around the motherboard. This comes back into their styling shift that occurred around Z77 to make the more expensive product lines presentable, which in terms of sales (so I am told, but cannot verify) has worked in the gaming market.
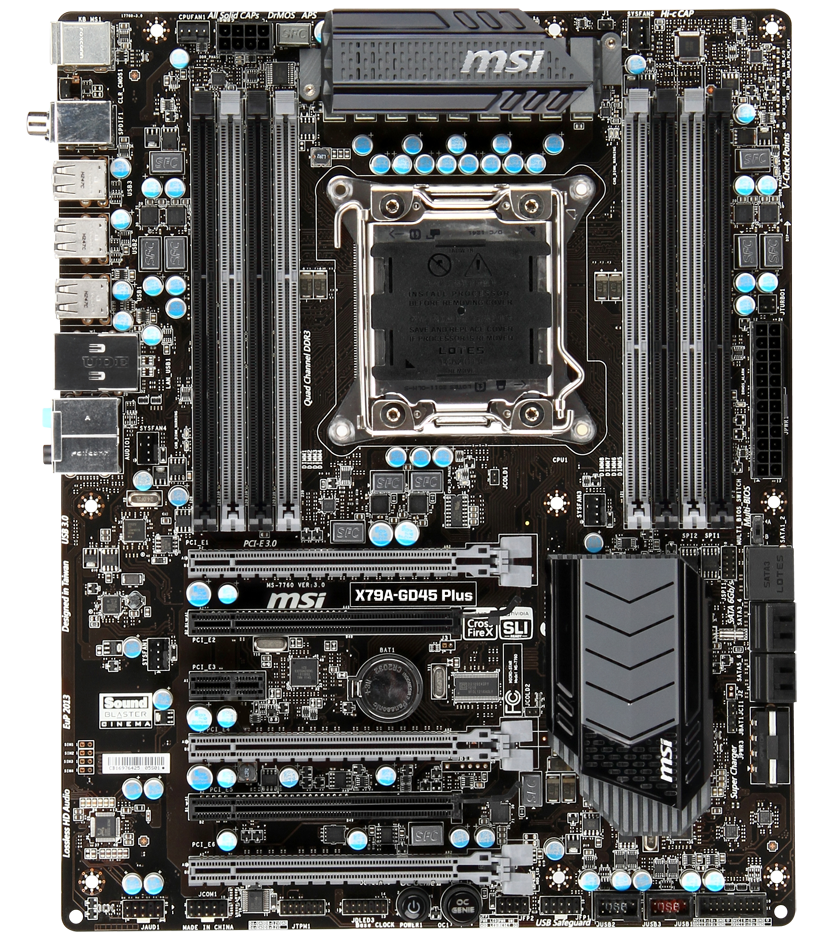
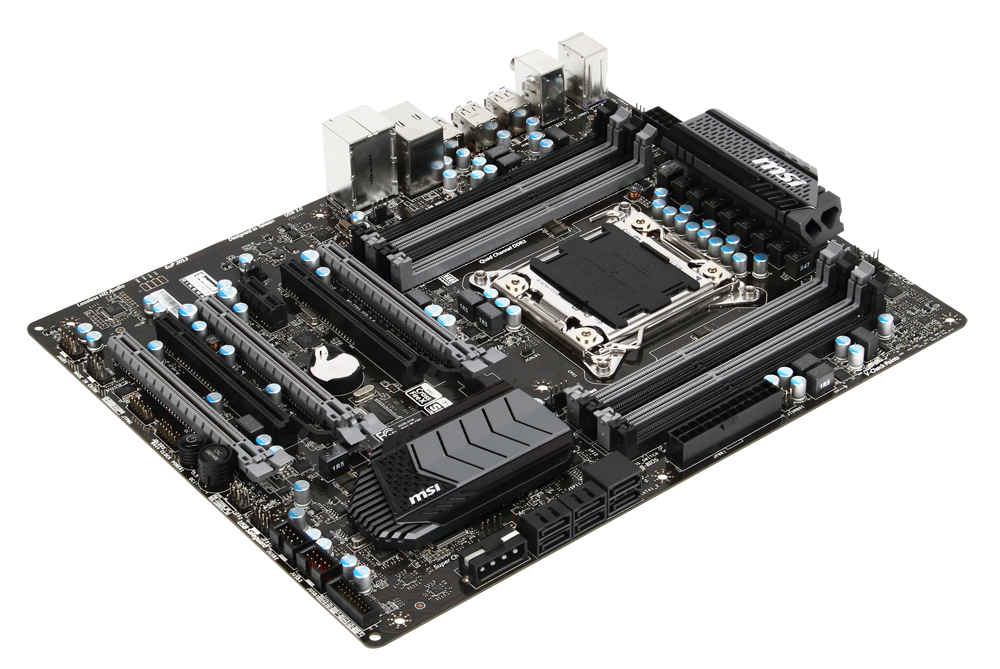
The position of the socket is slightly lower than most X79 motherboards we have reviewed, and as such so are the memory slots. This removes the first PCIe slot on the motherboard, but could arguably result in more airflow for the heatsink at the top. The heatsink covers an 8-phase solution, and requires a single 8-pin 12V CPU power connector. Using a contactless IR thermometer gave a full load temperature delta of 15ºC in this area over idle temperatures interestingly enough.
Around the socket are four of the motherboards fan headers, all four-pin, essentially one at each corner of the socket. The first is near the 8-pin 12V CPU power connector, with a second on the top right at the other side of the power delivery heatsink. Below the socket to the right yields a third, while to the left of the DRAM sockets behind the audio jacks is a fourth. The final fan header on board is a 4-pin found near the audio codec on the left hand side of the motherboard, which puts it in prime location to be unused should a large GPU be put in the first slot. I used MSI’s GTX 770 Lightning in the first PCIe slot and was unable to then place a fan into that header.
Aside from the larger than normal gap at the top of the motherboard, the rest comes in standard for a base X79 product with MSI styling. Moving clockwise around the board and we get the 24-pin ATX power connector, a Multi-BIOS switch, two SATA 6 Gbps ports, four SATA 3 Gbps ports and then a 4-pin molex connector. This connector is designed to provide extra power to the PCIe slots (of which a user could populate five with single slot GPUs), and while normally I would be frustrated by the use of a 4-pin molex, it is at right angles to the motherboard here meaning it does not get in the way or require being placed over components depending on PSU layout in a case. What users may notice here is the lack of any additional SATA 6 Gbps controllers, which are a common sight on X79 motherboards in order to bulk up the credentials.
As the chipset heatsink only has to deal with the chipset, it remains unattached to any other heatsink on board. Along the bottom of the motherboard are the normal array of headers and buttons – a front panel audio header, a COM header, a TPM header, a JDLED3 header for MSI’s Voice Genie hardware (that never made proper retail in 2011), a power button, an OC Genie button, a front panel header, two USB 2.0 headers and a USB 3.0 header.
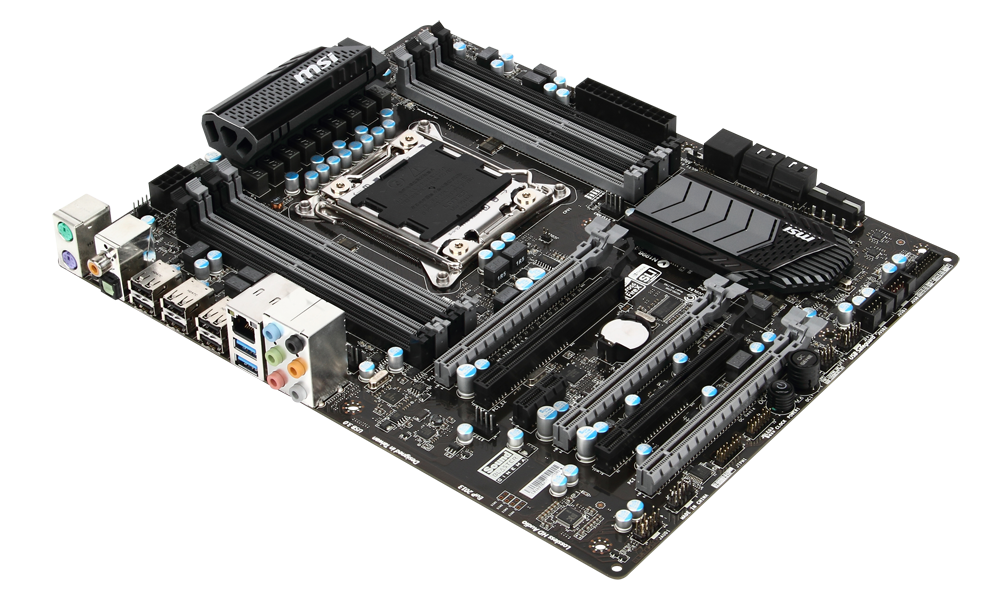
The motherboard’s PCIe layout is designed to accommodate a number of different and esoteric X79 setups. As socket 2011 CPUs have 40 lanes, these are usually offered in an x16/x16/x8 combination. This is what MSI does with the grey PCIe slots, with the full length black ones underneath splitting the x16 into x8/x8 when occupied. To the left of the PCIe slots is our audio codec, where the Realtek ALC892 is in use. There is no serious attempt to bolster the audio output quality here, unlike Z87 motherboards in this price range.
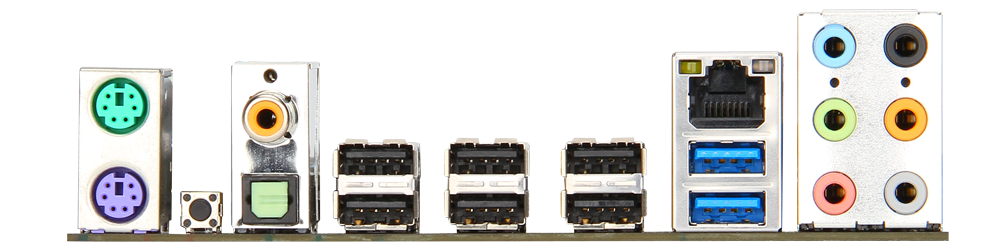
The rear IO is as basic as X79 gets, with two PS/2 connectors, a Clear_CMOS button, SPDIF outputs, six USB 2.0 ports, two USB 3.0 ports, an Intel 82579V network connection and the audio jacks.
Board Features
| MSI X79A-GD45 Plus | |
| Price | Link |
| Size | ATX |
| CPU Interface | LGA-2011 |
| Chipset | Intel X79 |
| Memory Slots |
Eight DDR3 DIMM slots supporting up to 64 GB Up to Quad Channel, 1333-2400 MHz |
| Video Outputs | None |
| Onboard LAN | Intel 82579V |
| Onboard Audio | Realtek ALC892 |
| Expansion Slots |
3 x PCIe 3.0 x16 (x16/x16/x8) 2 x PCIe 3.0 x8 1 x PCIe 2.0 x1 |
| Onboard SATA/RAID |
2 x SATA 6 Gbps (PCH), RAID 0, 1, 5, 10 4 x SATA 3 Gbps (PCH), RAID 0, 1, 5, 10 |
| USB 3.0 | 4 x USB 3.0 (NEC D720202) [2 rear, 1 header] |
| Onboard |
2 x SATA 6 Gbps 4 x SATA 3 Gbps 1 x USB 3.0 Header 2 x USB 2.0 Headers 5 x Fan Headers 1 x COM Header 1 x TPM Header 1 x Clear_CMOS Jumper 1 x Power Button 1 x OC Genie button 1 x MultiBIOS Switch 1 x Voice Genie Header (JDLED3) 1 x MultiConnect Panel Connector |
| Power Connectors |
1 x 24-pin ATX Power Connector 1 x 8-pin CPU Power Connector 1 x 4-pin Molex VGA Power Connector |
| Fan Headers |
1 x CPU 4 x SYS |
| IO Panel |
1 x PS/2 Keyboard Port 1 x PS/2 Mouse Port 1 x Clear_CMOS Button 1 x Coaxial SPDIF output 1 x Optical SPDIF output 1 x Ethernet Port (Intel 82579V) 6 x USB 2.0 Ports 2 x USB 3.0 Ports (NEC) Audio Jacks (Realtek ALC892) |
| Warranty Period | 3 Years |
| Product Page | Link |
The downside of investing in an X79 setup is that the motherboard costs more, and the equivalent priced Z87 motherboard can have a lot more features. Part of this comes back to the age of the X79 chipset, but for example, a $200 Z87 motherboard can have six SATA 6 Gbps ports, 6 USB 3.0 ports, 802.11ac WiFi, power/reset buttons, two-digit debug LED, bolstered audio, overclocking features and so on. For users that want to jump onto one of the cheaper X79 motherboards that are new (I fully admit it would be cheaper to buy second hand), MSI aim to get you covered by using Realtek ALC892 controller rather than more expensive alternatives. Perhaps another $5 could be saved by forgoing that Sound Blaster Cinema license too.
MSI X79A-GD45 Plus BIOS
With Z87, MSI had upgraded the BIOS system on those motherboards and we rather liked the new design of fan controls in the BIOS. The X79A-GD45 Plus, as of BIOS V17.7, unfortunately did not have these new improvements, and is similar to that encountered with the Z77A-GD65 which we reviewed previously:
MSI's graphical BIOS was the result of an internal design competition - given various intricacies and factors in the final designs, the one that came 3rd went on to be the graphical interface we see today. Over the past few generations, I have been either critical of MSI with their P67 'BIOS games' (explained to me later as more of a technical showcase), or appreciative of their X79 revision. Do not get me wrong, the BIOS is well designed and easy to use - it is just that it could perhaps be easier, especially for overclocking.
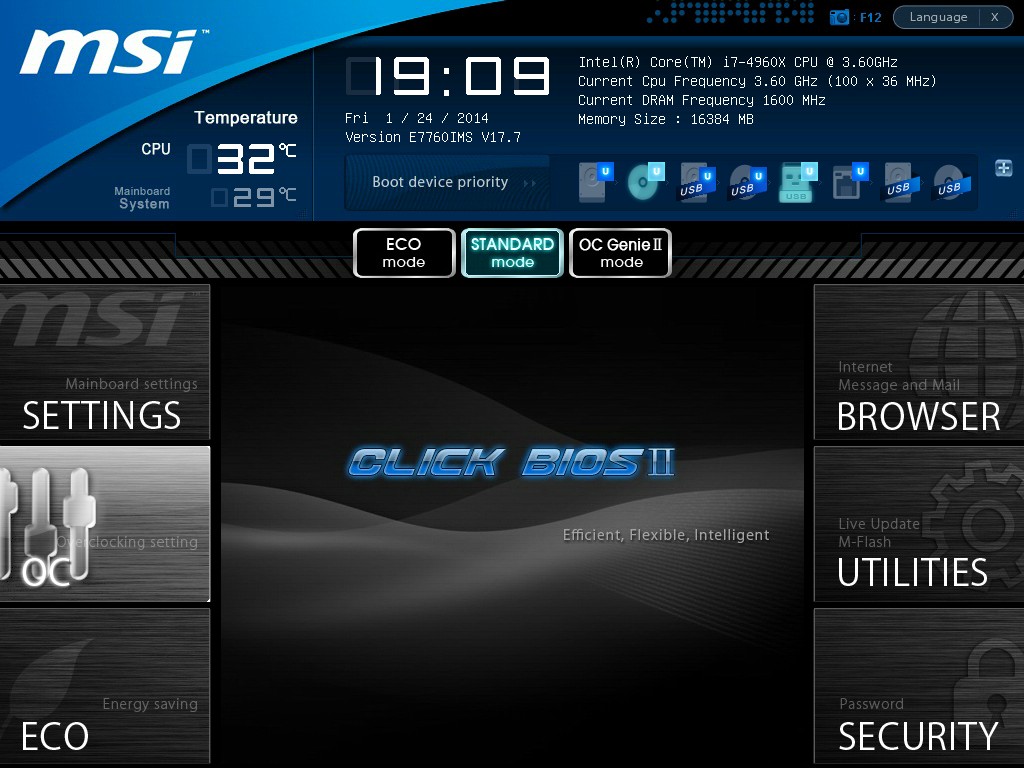
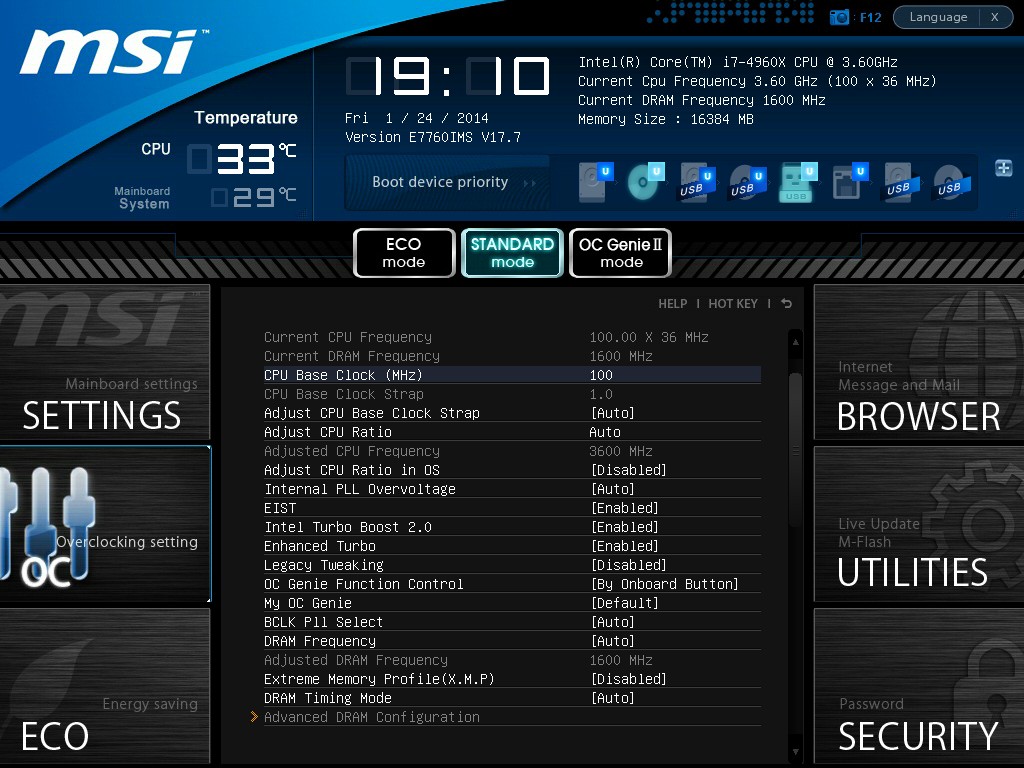
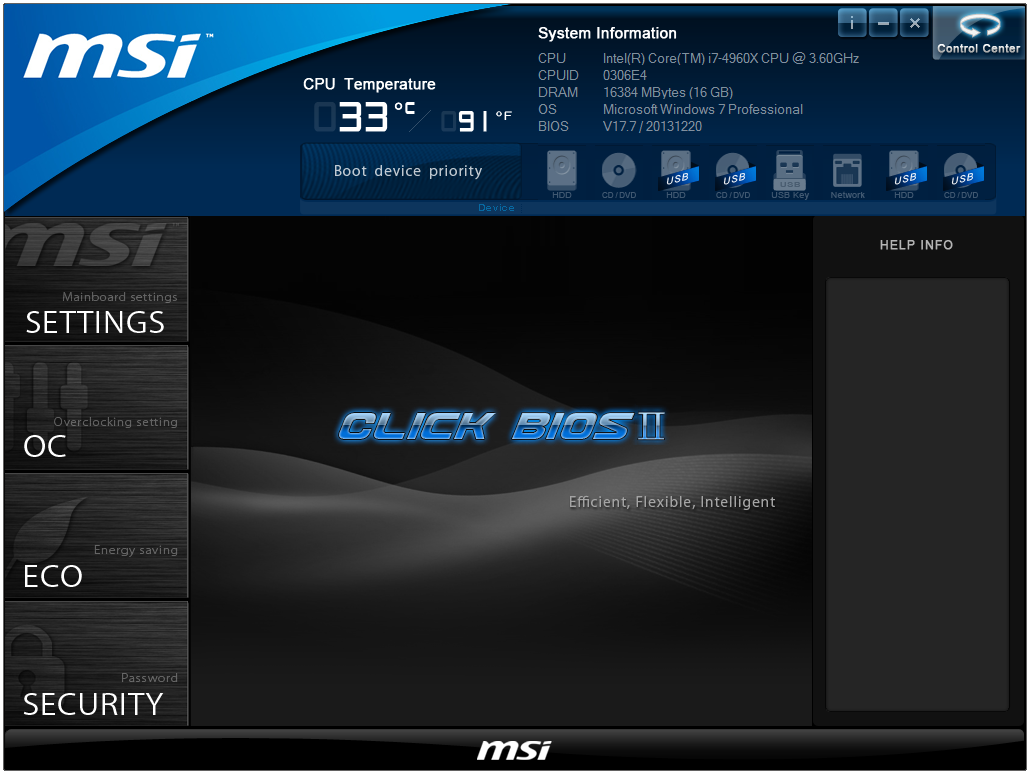
The front page is good - we have CPU and system temperatures, CPU model, and speed, memory speed, memory size, BIOS version, and a boot order at the top. What is great about this is that the top bar (and side navigation tools) are persistent throughout the BIOS, never once disappearing. This layout is beneficial if we ever get an increase in BIOS resolution in the future so more information can be put into the center console.
The first set of menus are the ‘Settings’ options that offer the system status and Advanced features such as controller options, fan controls and boot settings. Most of it is straight forward, although MSI choose to have PCIe Gen 3.0 disabled by default in these menus, and the fan controls do leave a lot to be desired:
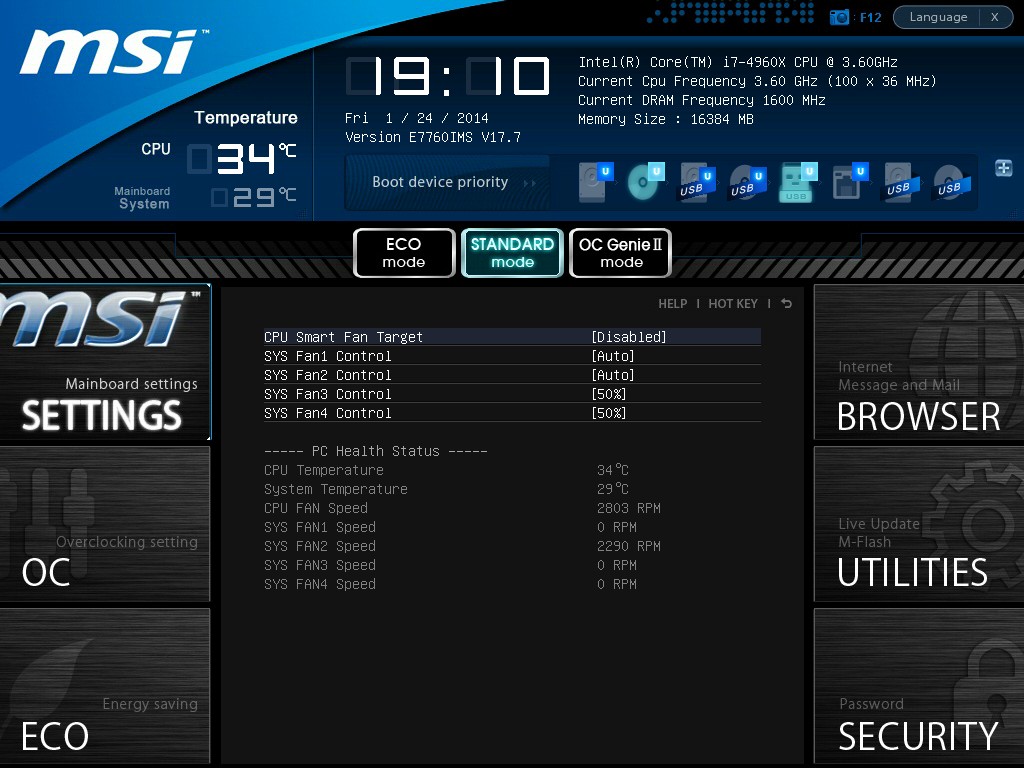
Users have a very limited range to work with, either due to the controllers themselves or the BIOS not opening up the options. The newer type of fan controls, as seen on Z87, should be in this BIOS. We also have fast boot options for Windows 8 users.
At this point I would like to interject with a suggestion: MSI need to put the path of which menu a user is currently in. From the screenshot above it is relatively difficult to ascertain the path taken, and it would be helpful if that path was listed somewhere on the screen. For example, the fan controls are in ‘Settings -> Advanced -> Hardware Monitor’.
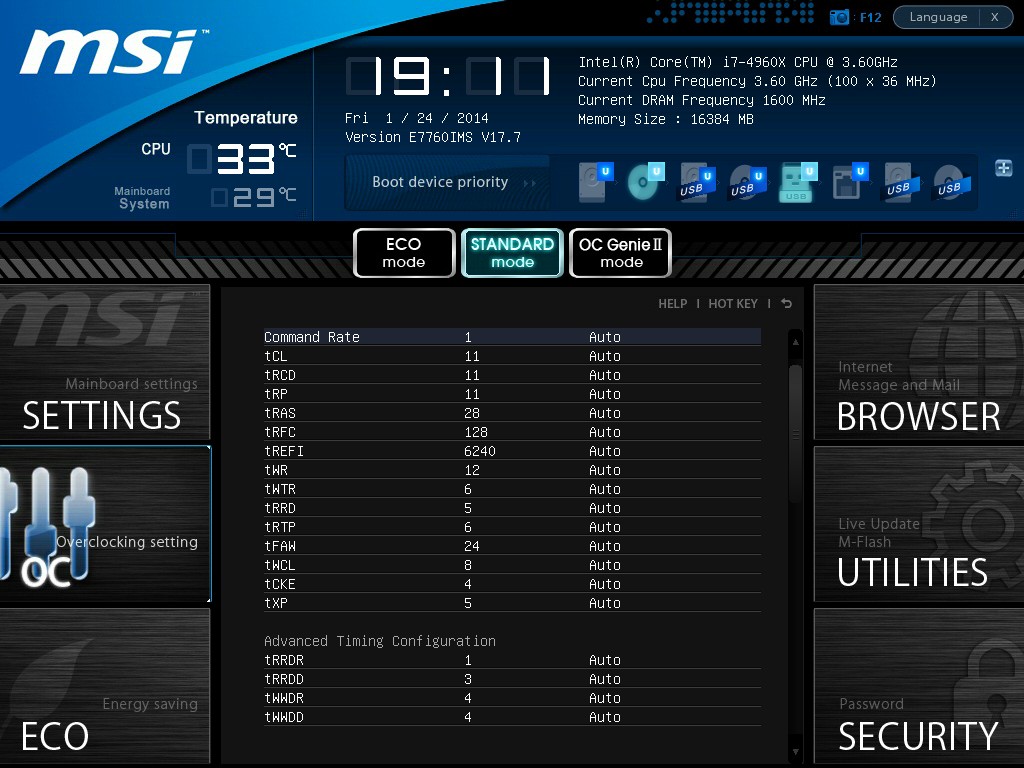
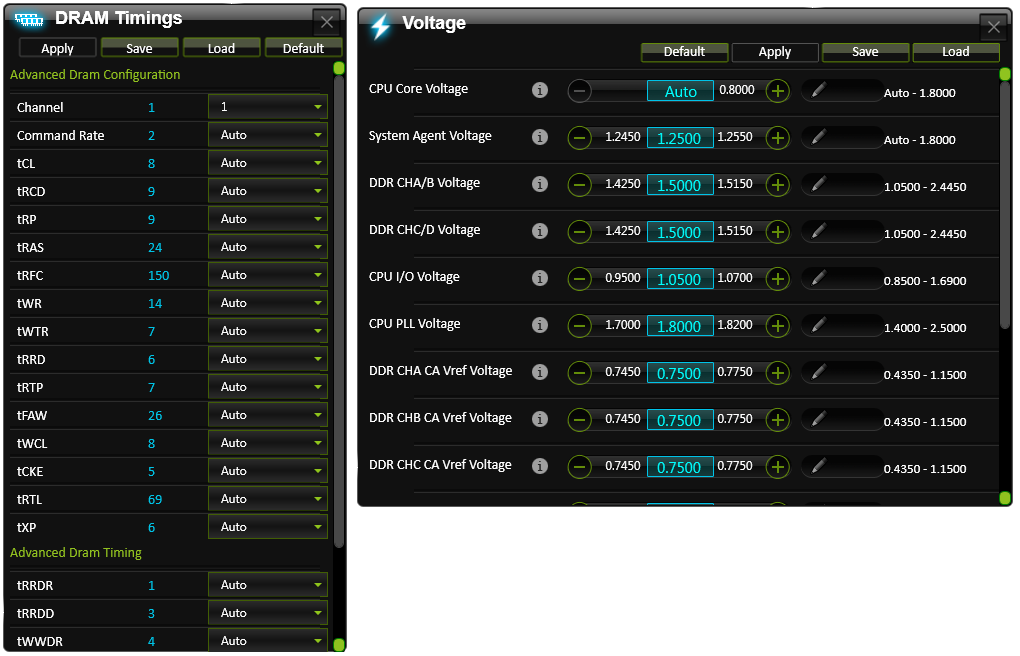
A constant level on anguish on MSI BIOSes of late is the layout of the OC menu. Every overclock option seems to be jumbled into one menu, rather than separated out and organized into similar settings that might be relevant (e.g. a DRAM menu would have DRAM speed, XMP setting, voltages, load line calibrations and subtimings). Other manufacturers do this better, and I am surprised MSI has not picked up on this yet. As it stands, users have to move up and click the ‘Help’ option in order to get information as to what each setting does, rather than an onscreen display showing this automatically. Some of the issue here might be in MSI’s BIOS resolution, but I feel a lot could be the design being verbose with a lot of negative space.
The OC options are identical to other MSI layouts, with roughly CPU options at the top, then DRAM, voltages and a mêlée of CPU power options intermixed. There are sub-menus for DRAM timings, hybrid power settings and OC profiles. This links back in with the need for organization – either headers to separate the options or individual menus.
There is also additional scope here for automatic overclock options. The OC Genie overclock option is just a single set of values pre-programmed, and although the user can configure this on the fly, it might be helpful to give a range of pre-sets for a user to apply to the OC Genie button.
Elsewhere in the BIOS are power saving options, BIOS flashing utilities and security options.


MSI X79A-GD45 Plus Software
On the software side, the package for the X79A-GD45 almost mirrors that as seen on the Z87 side, and is almost identical to the Z87-GD65 Gaming we have reviewed previously, albeit without the Gaming software stack:
The stalwart of the package, Live Update 5, is still present in all its glory. So far in terms of auto-update packages, MSI’s was the first to reach an echelon worthy of an update package that informs the user and applies the updates. Other manufacturers are now getting into the groove, but MSI has that initial advantage.
In terms of the new, Command Center gets a fresh update. The new Command Center is a visual uplift from the old version, giving the user more control and a better experience in order to adjust the system – this includes a better visual of the fan controls as well.
However we start at the installation disk and not much has changed here. The interface has two main options at the top (Driver, Utility) which expand into several options below and a ‘Total Installer’ button. This button opens up a menu whereby the user can select/deselect options (such as Norton Antivirus) to install. I am beginning to get to a position where the Driver CD on loading should be showing information about the current setup as detected, such as CPU/motherboard numbers. This way we can verify the hardware we are dealing with without loading additional programs or opening up the case. Perhaps this is something easily implementable to think about for the future.
MSI Suite
The main aim for most motherboard manufacturers is to make a single interface that users can access all of the relevant manufacturer software. For ASUS this is AI Suite, for GIGABYTE this is EasyTune, ASRock has A-Tuning and MSI has MSI Suite. Designed to be somewhat out of the way, MSI Suite uses a small top-of-the-screen menu with icons.
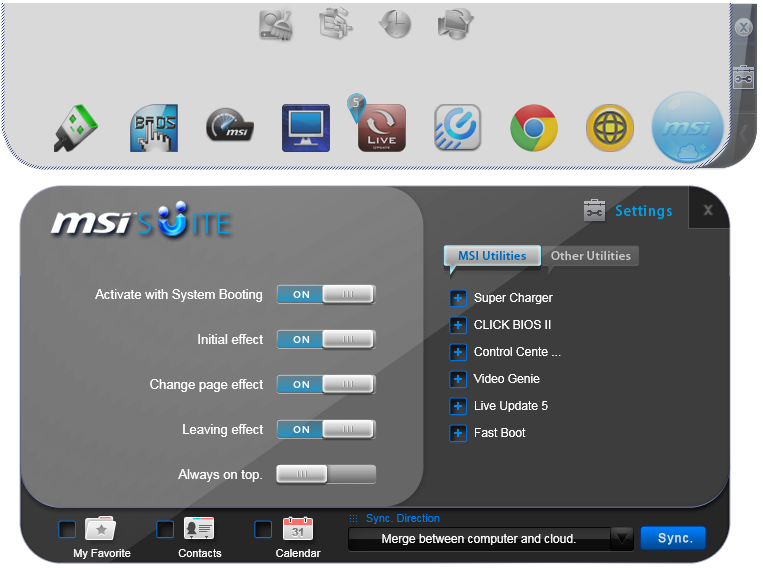
These icons can be adjusted, and as shown above some like Live Update will actually notify the user if something needs their attention.
MSI Live Update 5
The big plus in the MSI package is from Live Update 5 (LU5). With LU5 the system will connect to the internet, detect the current platform, get a list of available software on the MSI servers, and then compare this to the software it can detect on the system. If there is a discrepancy in the version, it offers a download. Alongside the software available, the system also checks BIOS versions against the latest available on the servers. The only issue for me is that the program does not tell you the size of the download until you are actually downloading it, which could be an issue for limited bandwidth users if they end up downloading 200 MB of audio drivers rather than 5 MB of other software.

MSI Video Genie
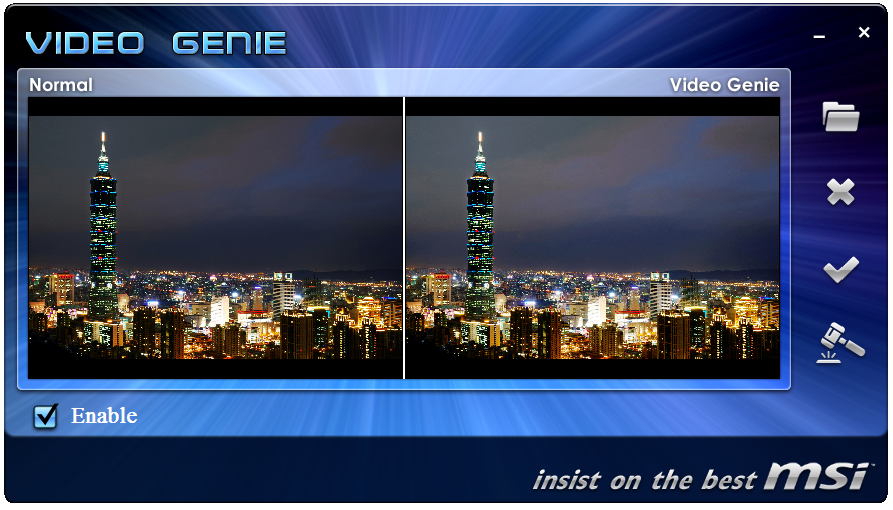
The Video Genie software is a software tool designed by MSI to adjust the monitor settings on the fly for various on-screen visuals. Thus in a dark scene on a film it will attempt to provide more focus by making the screen contrast higher, or as shown below will attempt to adjust the screen for a more ‘lively’ feel. This type of feature is arguably a software replacement for some of the more hardware based solutions.
MSI Fast Boot
With motherboards now allowing for hardware enhancements to improve POST time to Windows 8, it can be difficult for users to get into the BIOS if the system bypasses the ‘Press F2 to enter BIOS’. For overclockers the solution is easy with ‘Go2BIOS’ buttons now being implemented on MSI motherboards. However if the system is in a case, there has to be a software solution, and MSI provide Fast Boot for this, with a Go2BIOS option.
Sound Blaster Cinema
As part of the drive to better audio solutions on motherboards, along with MSI’s Audio Boost, we have access to Sound Blaster Cinema software. This is a relatively simple interface designed to apply automatic EQ settings for 5.1 surround setups for films. Unfortunately it upset our audio testing a fair bit and had to be disabled for the benchmark.
MSI Click BIOS
In a continual effort to get users more used to the BIOS, MSI has for the last few generations included a utility that tries to mimic at least the look of the BIOS in case the user decides to go exploring.
The only criticisms are that most of the options are only officially changed when the system is reset, and due to the choice of font, everything seems rather spaced out in the options:

There is plenty of scope here to make software that works and works well. At this point in time, aesthetically, MSI Click BIOS still feels like it is a work in progress.
MSI Control Center
Another tool for users to adjust settings is Control Center.

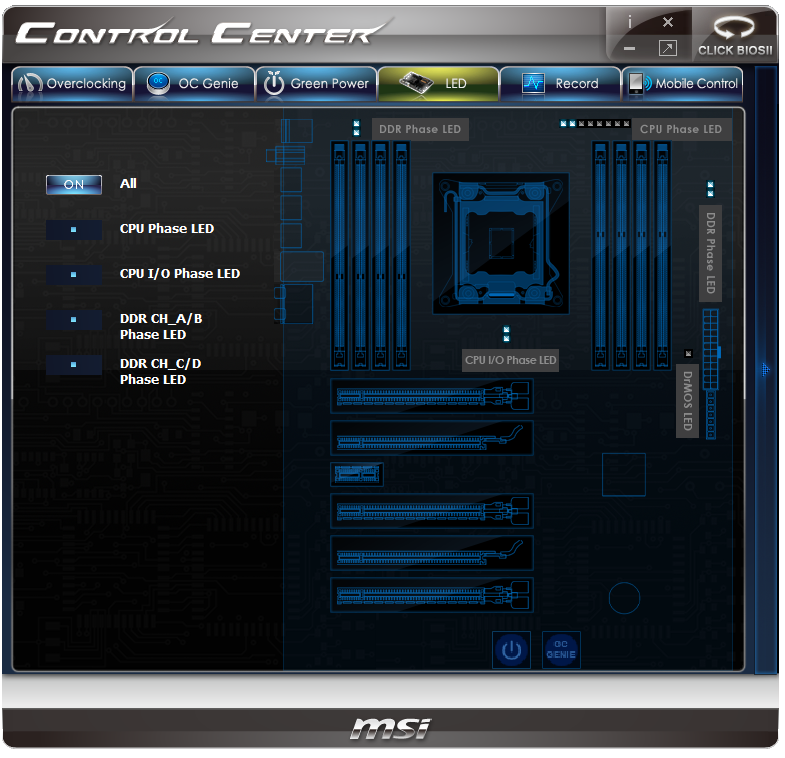
Control Center pre-dates Command Center, but as MSI has configured both for X79, both are available. They both give the same options regarding overclocking and power, although Control Center is linked in with Click BIOS II via the top menu, and can turn the LEDs off on the motherboard if needed.

MSI Command Center
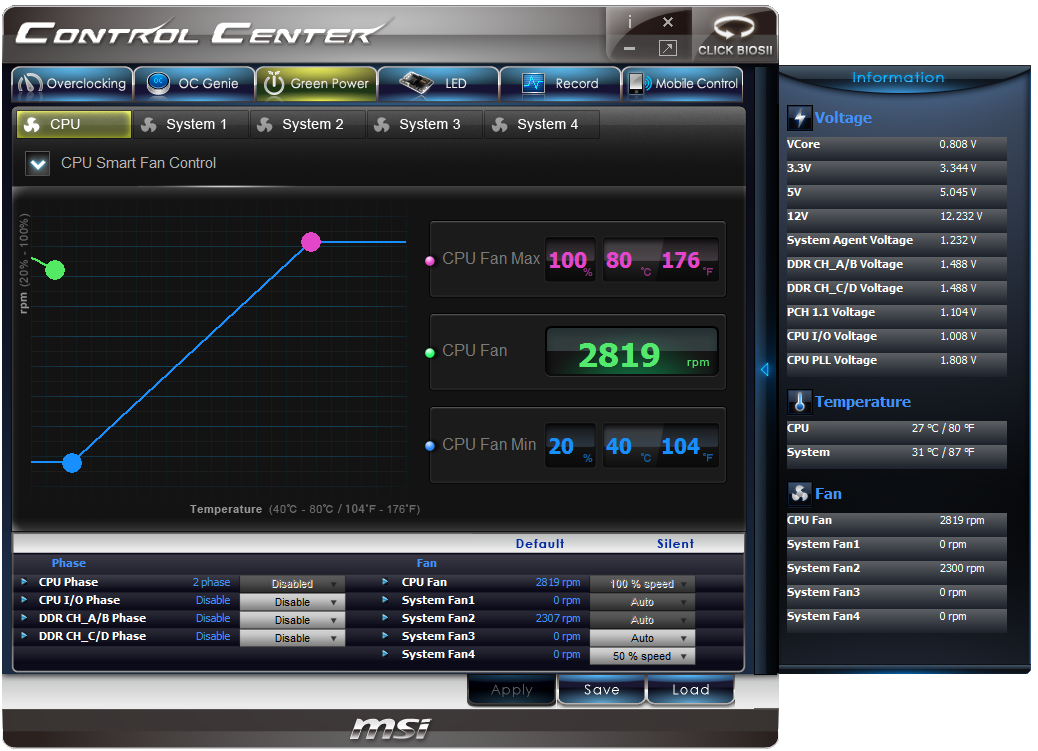
The last piece of the MSI software stack is our upgraded version of Command Center. Previous iterations were fairly complex with lots of information in a large interface (a bit like XTU) but visually did not disrupt the user experience. The new version of CC is of a similar ilk, however the settings are divided up to be easier to handle. For example, here is the first screen giving simple overclock and fan control options:
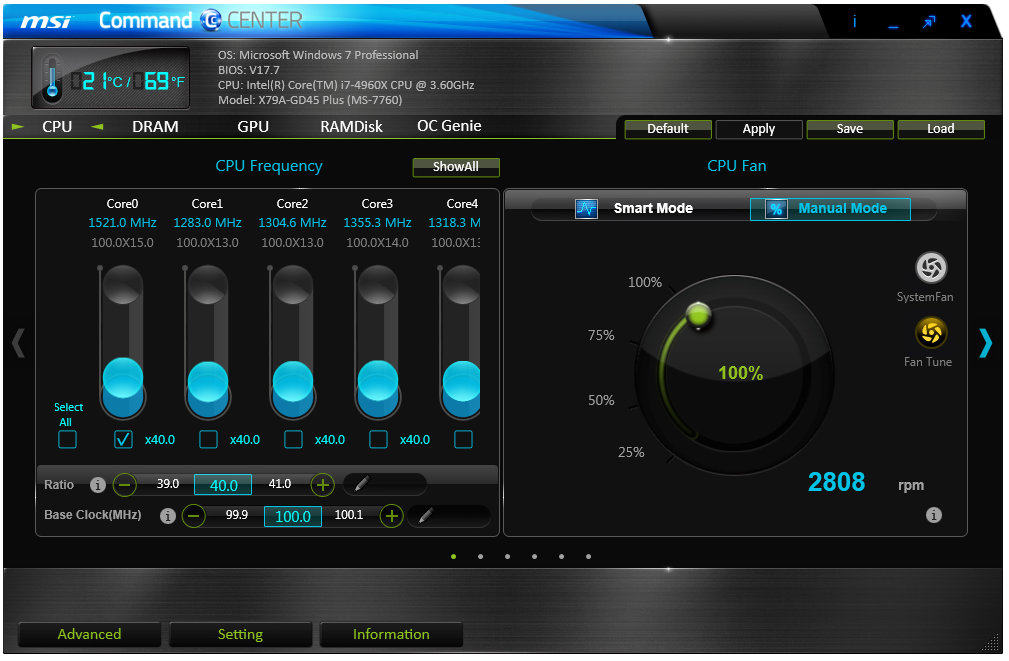
MSI has tried to split up the various sections of CPU/DRAM/GPU into menus, however users can navigate left and right – this puts CC in the firing line for an upgraded smartphone app in the future. With CC users can adjust fan controls, overclocks and voltages. Rather alarmingly Control Center allows users to apply 1.8 volts to their CPU immediately:
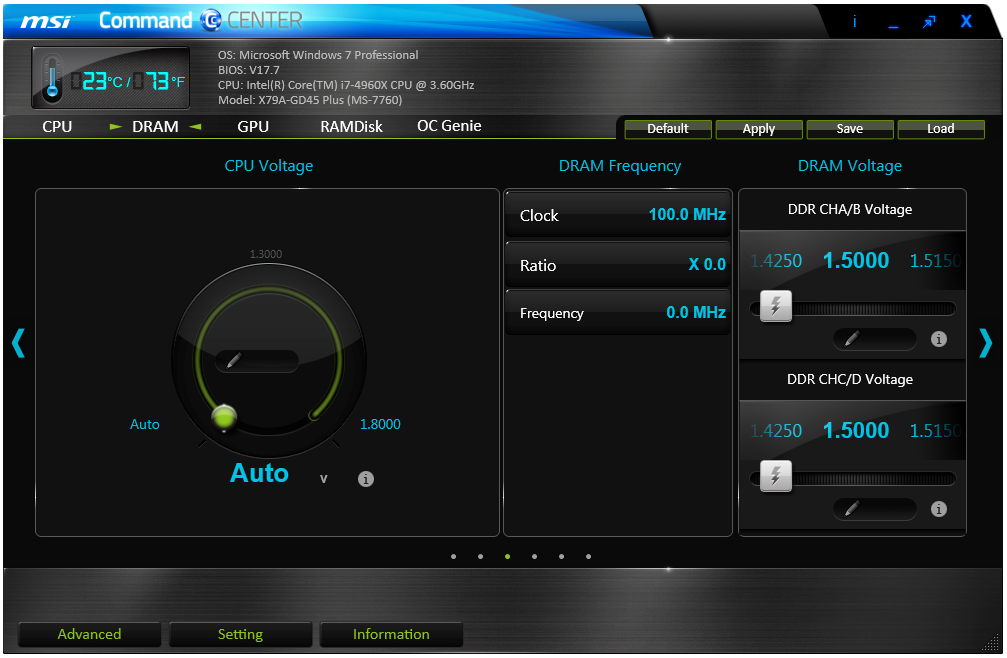
This is a large oversight. It would have been better for MSI to have an easy/advanced mode, where the advanced mode would allow voltages only extreme overclockers on sub-zero cooling would use.
A new element to CC is the addition of RAMDisk software, similar to ASRock’s XFast RAM:
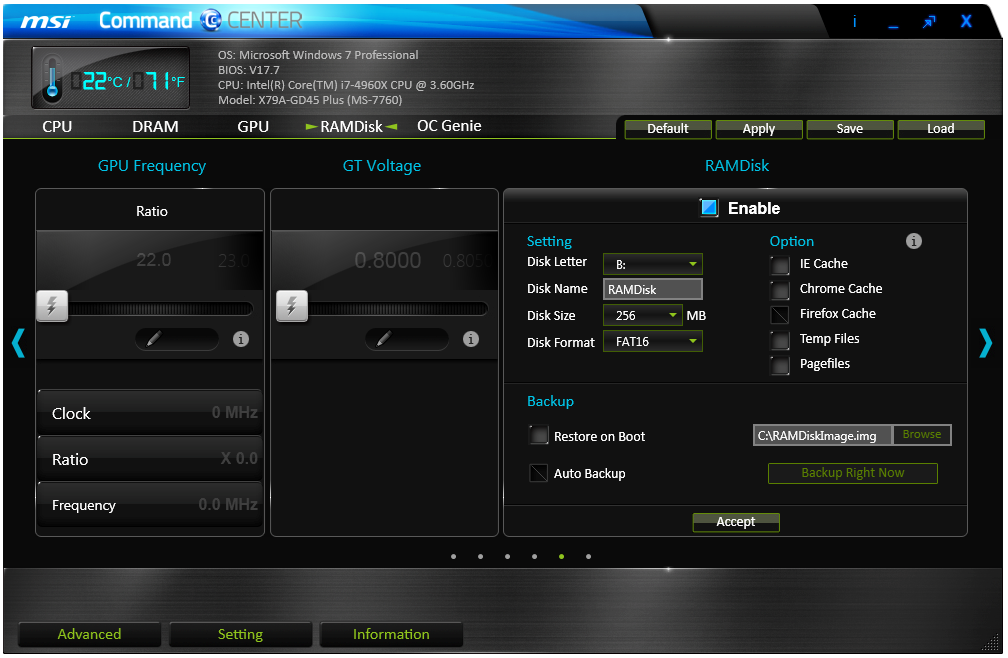
If a user has a large pool of memory to use, any amount could be used to open up a RAM Disk and use it as a cache for some of the more readily used programs, such as web browsers, temp files or even page files.
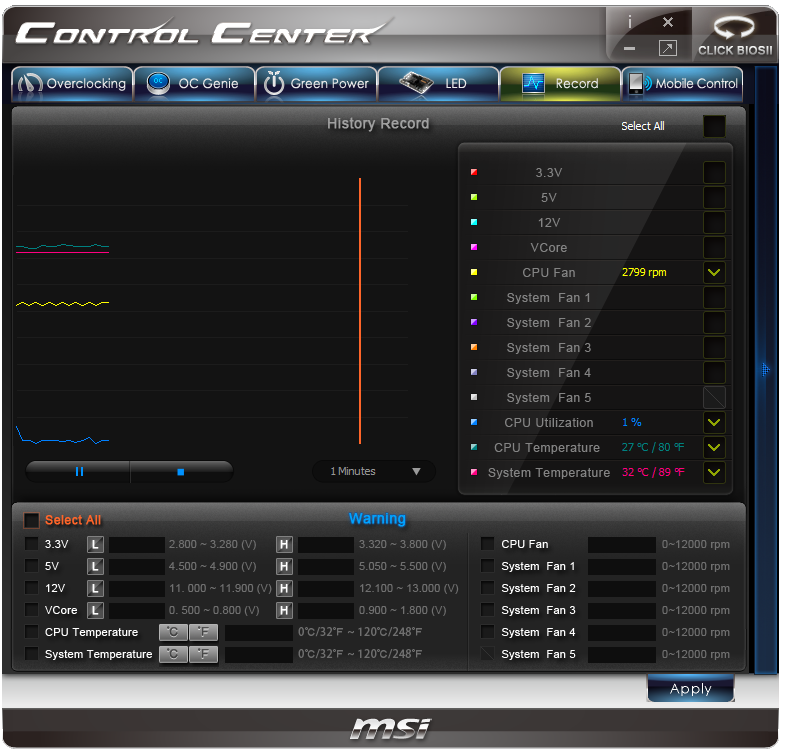
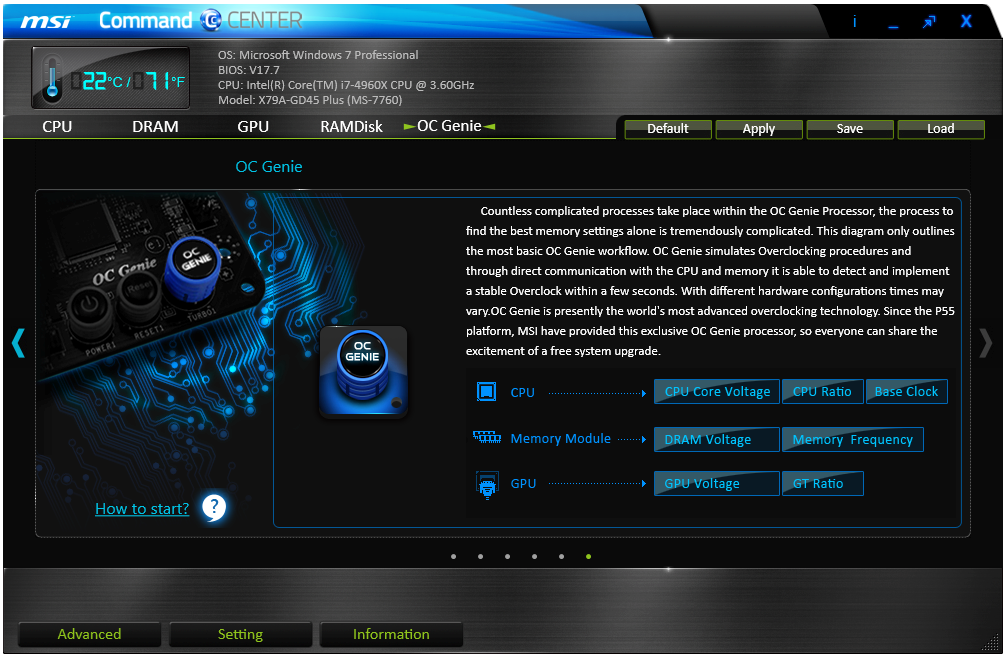
Also available through CC is OC Genie, monitoring tools and an alert tool in case various values fall outside safe limits.


MSI X79A-GD45 Plus In The Box
A $250 package in the Z87 arena would/should be numerate in its extras and offer the user something extra. In the X79 space, $250 is rather low on the radar – not the lowest, but there are motherboards that cost over $500 that go all out on the feature set. There is scope for MSI to do something good here.
With the X79A-GD45 Plus we get:
Rear IO Panel
Driver DVD
Manuals
Six SATA Cables
Flexi SLI Bridge
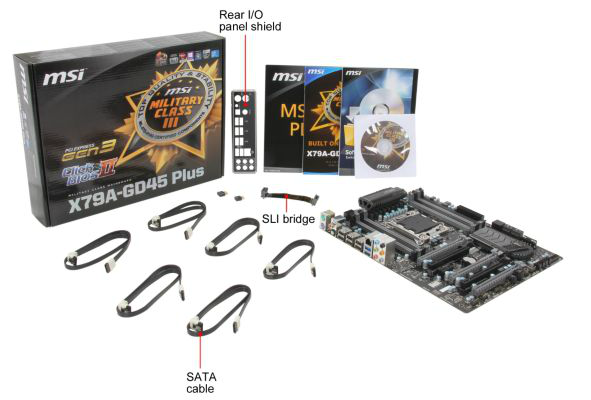
Along the line of few additional controllers on board, the MSI package also lacks any significant additions. Having a full complement of SATA cables is probably a good thing, although having a second SLI cable for multi-GPU allocations might help, given X79 is the focus for >2 GPU setups.
MSI X79A-GD45 Plus Overclocking
Experience with MSI X79A-GD45 Plus
To begin with, all was not well with the X79A-GD45 Plus. The OC Genie button does not seem to do anything from default. The motherboard, when XMP is applied, gives MultiCore Turbo (top turbo when all cores are loaded), and it seems OC Genie does the same thing when XMP is not applied. I expected at least a 4.2 GHz jump here when I tested.
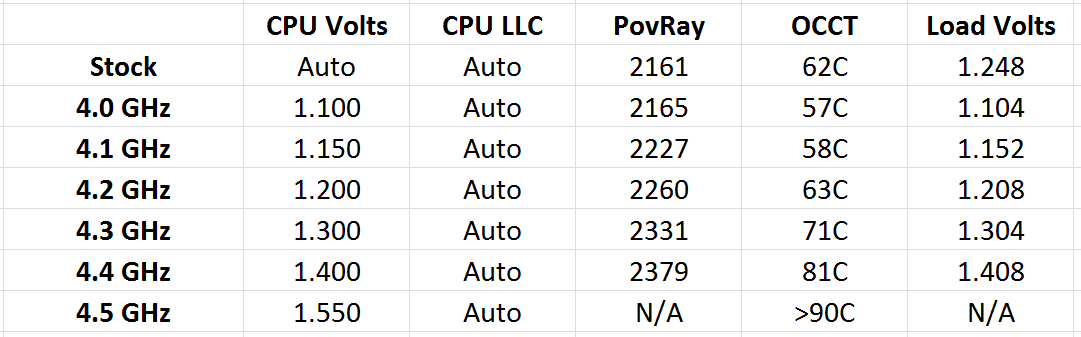
For manual overclocking, our main limiting factor here is more our Ivy Bridge-E CPU sample than anything else. Like the other Ivy Bridge-E refresh motherboards we have reviewed, our limit was around 4.4 – 4.5 GHz, the main issue being OCCT stability before the temperature of the CPU rose above suitable levels.
Methodology:
Our standard overclocking methodology is as follows. We select the automatic overclock options and test for stability with PovRay and OCCT to simulate high-end workloads. These stability tests aim to catch any immediate causes for memory or CPU errors.
For manual overclocks, based on the information gathered from previous testing, starts off at a nominal voltage and CPU multiplier, and the multiplier is increased until the stability tests are failed. The CPU voltage is increased gradually until the stability tests are passed, and the process repeated until the motherboard reduces the multiplier automatically (due to safety protocol) or the CPU temperature reaches a stupidly high level (100ºC+). Our test bed is not in a case, which should push overclocks higher with fresher (cooler) air.
Manual Overclock:
Our overclock results were as follows:
2014 Test Setup
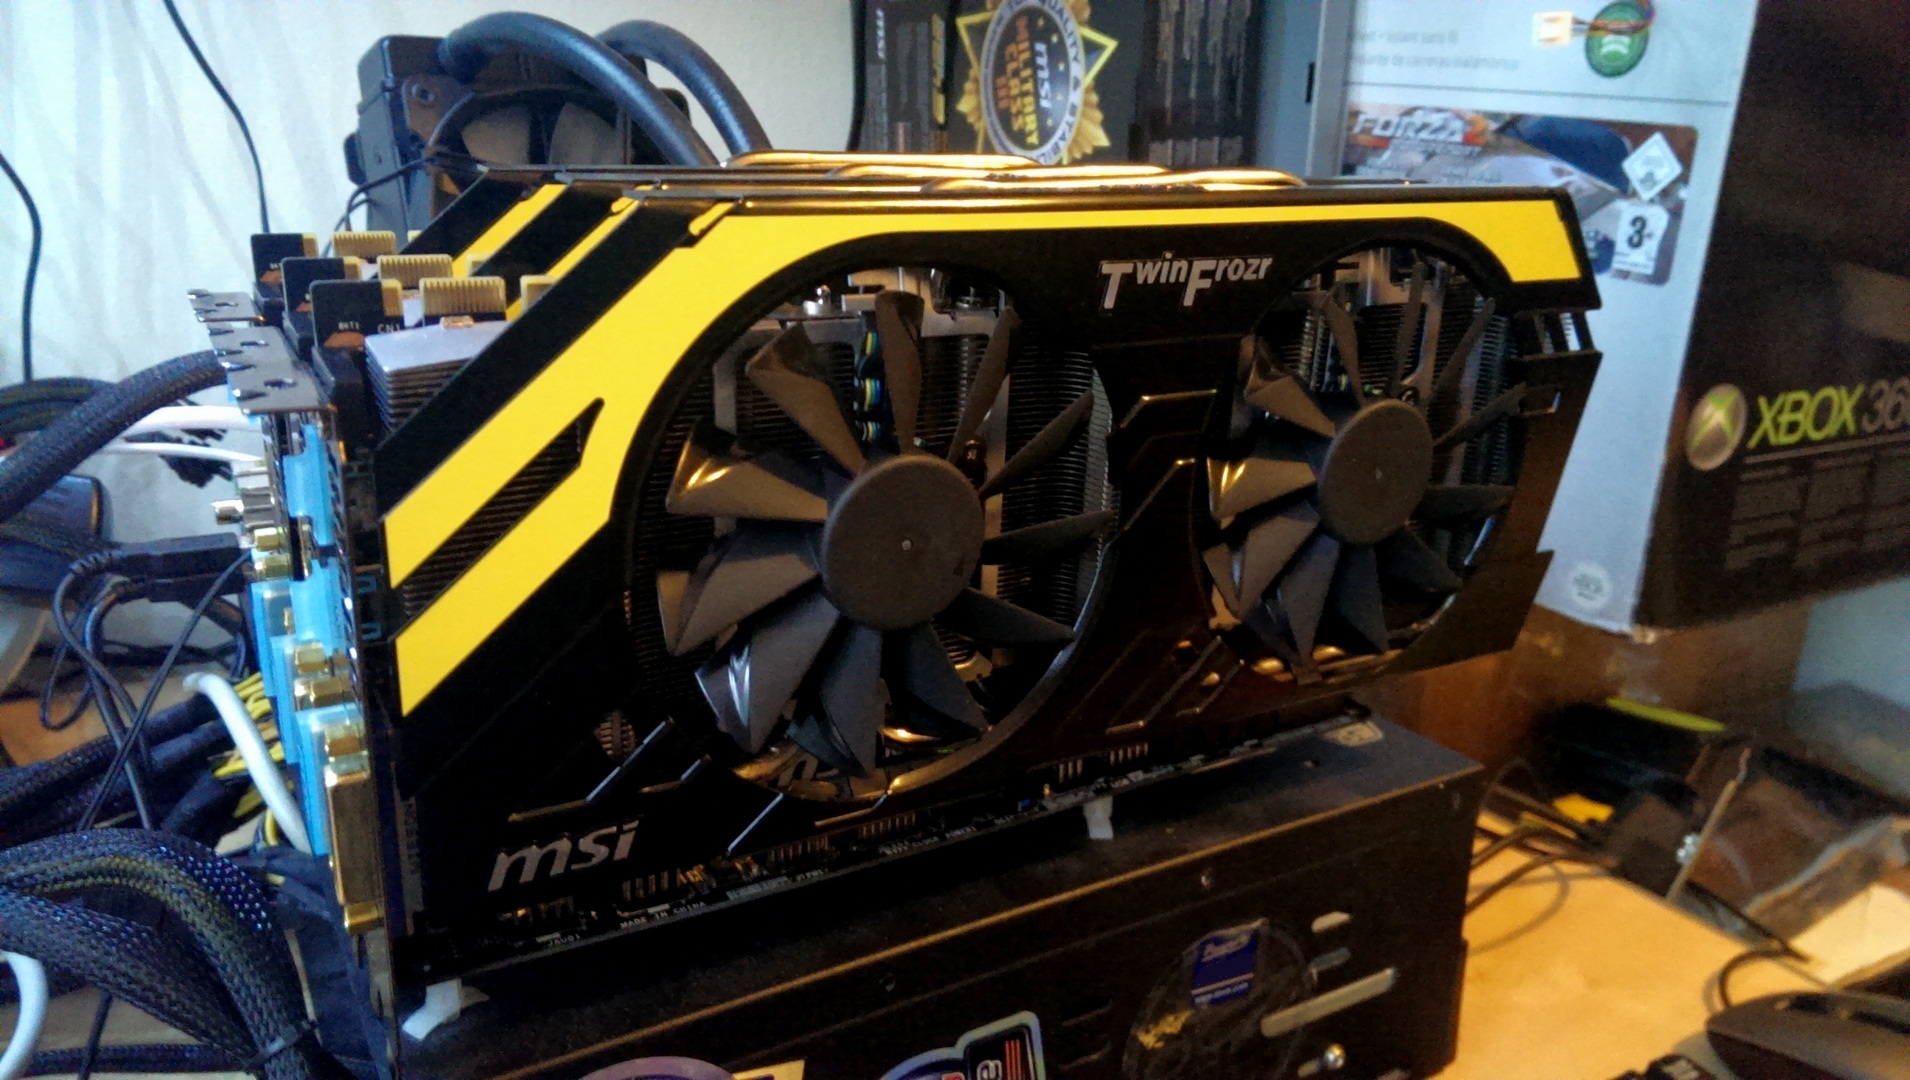
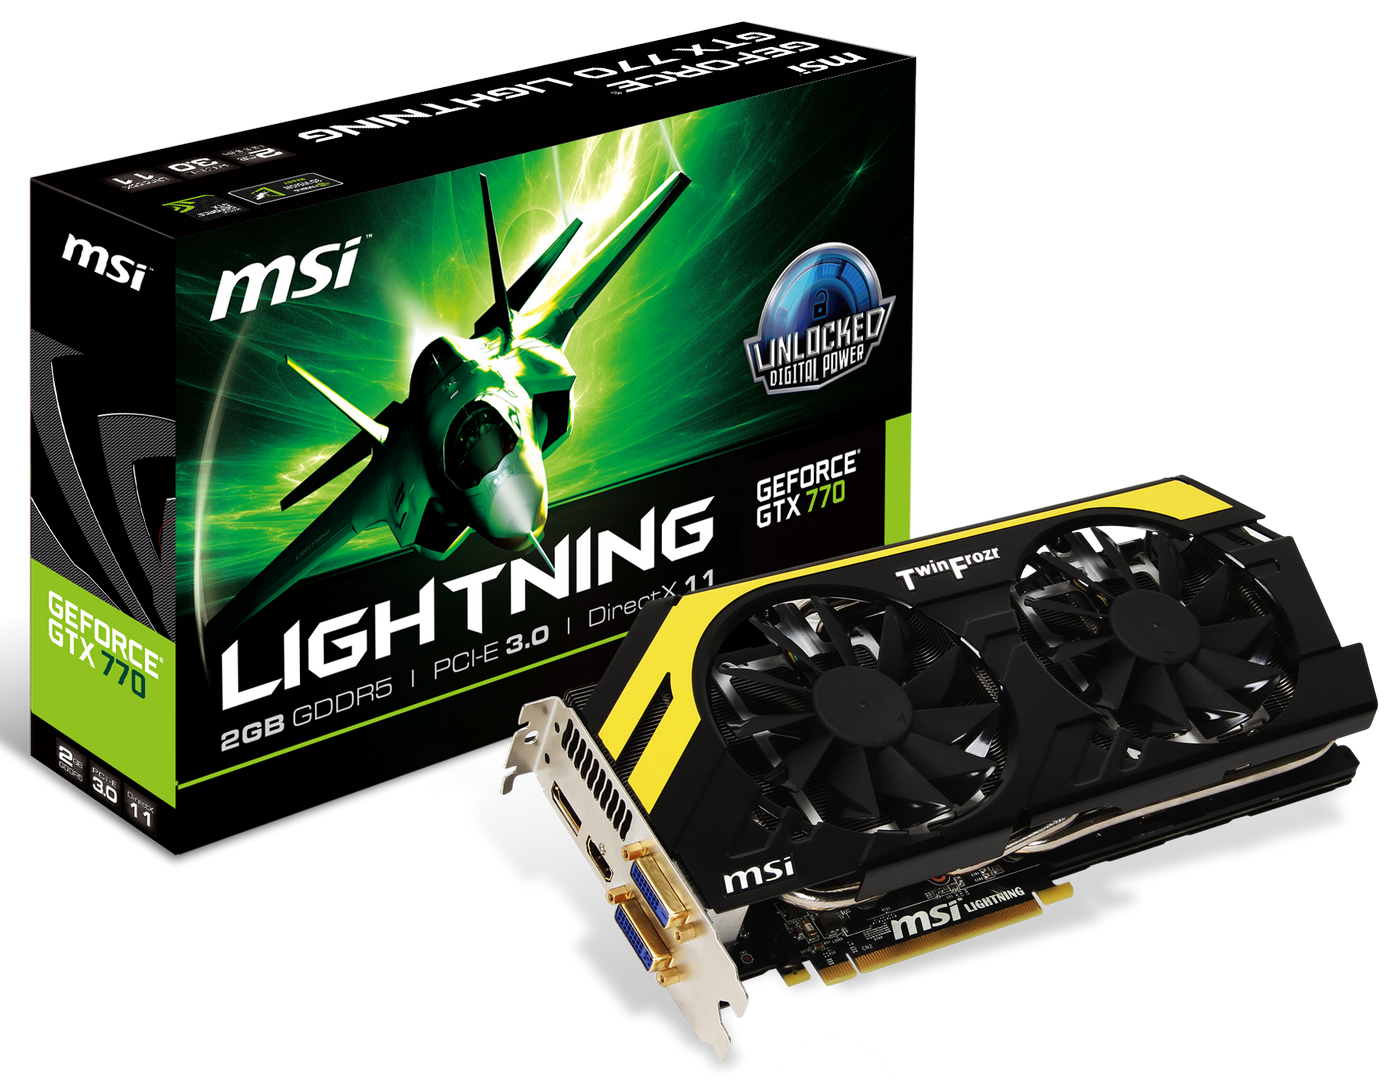
For 2014, the motherboard section has an upgrade in terms of testing hardware and benchmarks. The most significant upgrade for the test bed is on the GPU side, where we are moving from a pair of ECS GTX 580 GPUs to a trio of MSI GTX 770 Lightning models. We would like to thank MSI for this upgrade, which stands to be part of the motherboard test bed for several years to come.
The MSI GTX 770 Lightning is one of the fastest GTX 770 models available, being PCIe 3.0 compatible, having 1536 CUDA Cores at 1150 MHz (Boost 1202 MHz) and 2GB GDDR5 memory at 1750 MHz. Each card has two DVI outputs, a HDMI 1.4a and a DisplayPort 1.2. The card also has a GPU Reactor on the rear to help with overclocking by providing a cleaner power supply, and retails for ~$480.
More information can be found in Ryan’s MSI GTX 770 Lightning review.
Also in our testing, we are implementing 1080p for the gaming benchmarks, switching down from 2560x1440 due to popular request. The benchmark suite is also being updated, including the following new tests:
Adobe Effects CS6
Agisoft Photoscan 1.0
Handbrake v0.9.9
Dolphin Emulator Benchmark
All the other benchmarks included are either the same as previous, or updated to the latest version of the software to take advantage of any performance enhancements.
On the GPU side, the following games are now tested at 1080p maximum settings:
F1 2013
Sleeping Dogs
Tomb Raider
Bioshock Infinite
Company of Heroes 2
Both F1 2013 and CoH 2 unfortunately do not scale beyond a single GPU, and we are still working on a BF4 benchmark which was unfortunately not ready for this review; however it looks like the rail run at the beginning of the Tashgar mission will be used in future.
Other changes include the power testing, which will focus on a single GTX 770, and the POST time which will (after this review) also be with a single GTX 770 installed to gain parity between smaller form factor motherboards. Unfortunately this means that a lot of our older results are no longer valid for this review, and we have included the results of a number of future reviews to provide comparison points.
Many thanks to...
We must thank the following companies for kindly providing hardware for our test bed:
Thank you to OCZ for providing us with 1250W Gold Power Supplies and SSDs.
Thank you to G.Skill and ADATA for providing us with memory kits.
Thank you to Corsair for providing us with an AX1200i PSU, Corsair H80i CLC and 16GB 2400C10 memory.
Thank you to ASUS for providing us with the AMD HD7970 GPUs and some IO Testing kit.
Thank you to MSI for providing us with the NVIDIA GTX 770 Lightning GPUs.
Thank you to Rosewill for providing us with the 500W Platinum Power Supply for mITX testing, BlackHawk Ultra, and 1600W Hercules PSU for extreme dual CPU + quad GPU testing, and RK-9100 keyboards.
Thank you to ASRock for providing us with the 802.11ac wireless router for testing.
Test Setup
| Test Setup | |
| Processor |
Intel Core i7-4960X ES 6 Cores, 12 Threads, 3.6 GHz (4.0 GHz Turbo) |
| Motherboards | MSI X79A-GD45 Plus |
| Cooling |
Corsair H80i Thermalright TRUE Copper |
| Power Supply |
OCZ 1250W Gold ZX Series Corsair AX1200i Platinum PSU |
| Memory |
G.Skill RipjawsZ 4x4 GB DDR3-1866 8-9-9 Kit 2 x Corsair Vengeance Pro 2x8 GB DDR3-2400 10-12-12 Kit |
| Memory Settings | XMP |
| Video Cards |
MSI GTX 770 Lightning 2GB (1150/1202 Boost) ASUS HD7970 3GB (Reference) |
| Video Drivers |
Catalyst 13.12 NVIDIA Drivers 332.21 |
| Hard Drive | OCZ Vertex 3 256GB |
| Optical Drive | LG GH22NS50 |
| Case | Open Test Bed |
| Operating System | Windows 7 64-bit SP1 |
| USB 2/3 Testing | OCZ Vertex 3 240GB with SATA->USB Adaptor |
| WiFi Testing | D-Link DIR-865L 802.11ac Dual Band Router |
Power Consumption
Power consumption was tested on the system as a whole with a wall meter connected to the OCZ 1250W power supply, while in a dual AMD HD 7970 configuration. This power supply is Gold rated, and as I am in the UK on a 230-240 V supply, leads to ~75% efficiency > 50W, and 90%+ efficiency at 250W, which is suitable for both idle and multi-GPU loading. This method of power reading allows us to compare the power management of the UEFI and the board to supply components with power under load, and includes typical PSU losses due to efficiency. These are the real world values that consumers may expect from a typical system (minus the monitor) using this motherboard.
While this method for power measurement may not be ideal, and you feel these numbers are not representative due to the high wattage power supply being used (we use the same PSU to remain consistent over a series of reviews, and the fact that some boards on our test bed get tested with three or four high powered GPUs), the important point to take away is the relationship between the numbers. These boards are all under the same conditions, and thus the differences between them should be easy to spot.
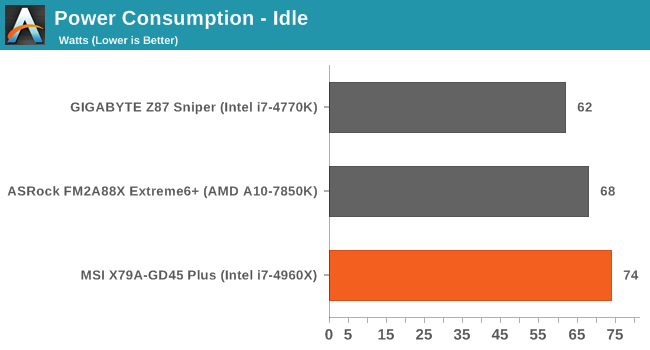
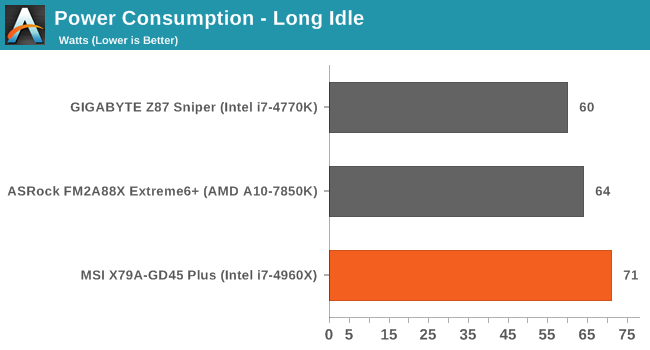

Due to our limited testing of the 2014 suite, it was perhaps obvious that the 4960X platform would draw more power than either the i7-4770K or A10-7850K platforms.
Windows 7 POST Time
Different motherboards have different POST sequences before an operating system is initialized. A lot of this is dependent on the board itself, and POST boot time is determined by the controllers on board (and the sequence of how those extras are organized). As part of our testing, we are now going to look at the POST Boot Time - this is the time from pressing the ON button on the computer to when Windows 7 starts loading. (We discount Windows loading as it is highly variable given Windows specific features.) These results are subject to human error, so please allow +/- 1 second in these results.
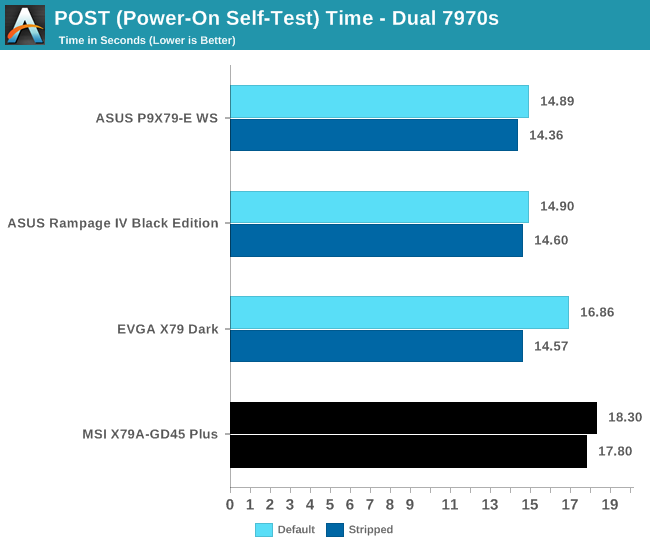
The POST time of the MSI was longer than expected, coming last in our comparison to the other X79 boards we have tested with Ivy Bridge-E.
System Benchmarks
Rightmark Audio Analyzer 6.2.5
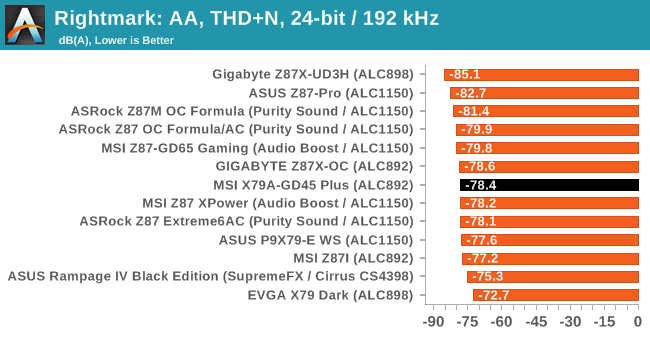
The premise behind Rightmark:AA is to test the input and output of the audio system to determine noise levels, range, harmonic distortion, stereo crosstalk and so forth. Rightmark:AA should indicate how well the sound system is built and isolated from electrical interference (either internally or externally). For this test we connect the Line Out to the Line In using a short six inch 3.5mm to 3.5mm high-quality jack, turn the OS speaker volume to 100%, and run the Rightmark default test suite at 192 kHz, 24-bit. The OS is tuned to 192 kHz/24-bit input and output, and the Line-In volume is adjusted until we have the best RMAA value in the mini-pretest. We discussed the complexity of RMAA testing in a previous news post, but here we look specifically at the Dynamic Range of the audio codec used on board, as well as the Total Harmonic Distortion + Noise.
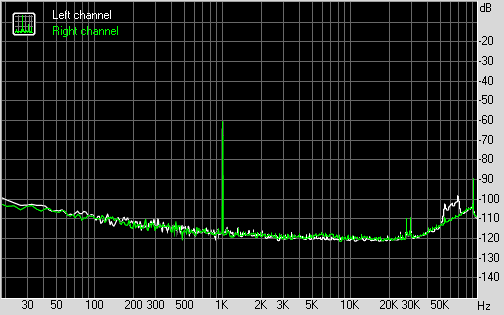
RMAA Dynamic Range of MSI X79A-GD45 Plus
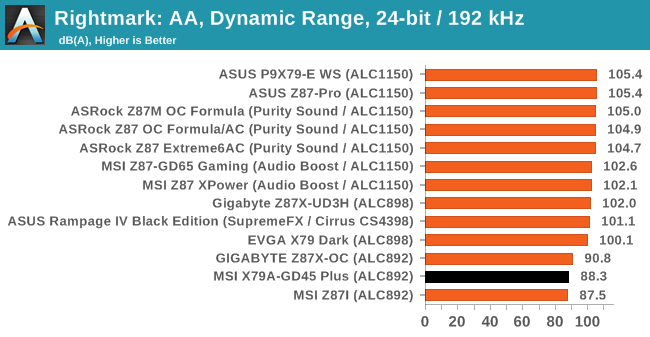
The MSI mimics other ALC892 motherboards such that the audio performance, particularly in dynamic range, is on the bottom of our scale.
USB Backup
For this benchmark, we run CrystalDiskMark to determine the ideal sequential read and write speeds for the USB port using our 240 GB OCZ Vertex3 SSD with a SATA 6 Gbps to USB 3.0 converter. Then we transfer a set size of files from the SSD to the USB drive using DiskBench, which monitors the time taken to transfer. The files transferred are a 1.52 GB set of 2867 files across 320 folders – 95% of these files are small typical website files, and the rest (90% of the size) are the videos used in the WinRAR test. In an update to pre-Z87 testing, we also run MaxCPU to load up one of the threads during the test which improves general performance up to 15% by causing all the internal pathways to run at full speed.
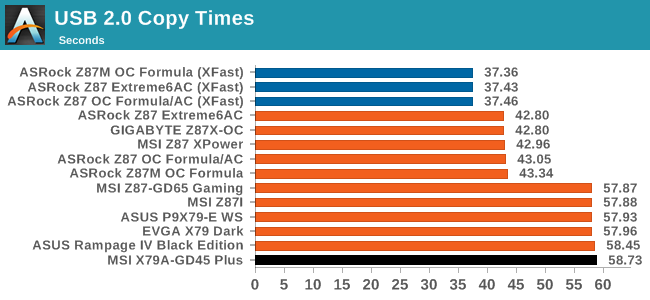
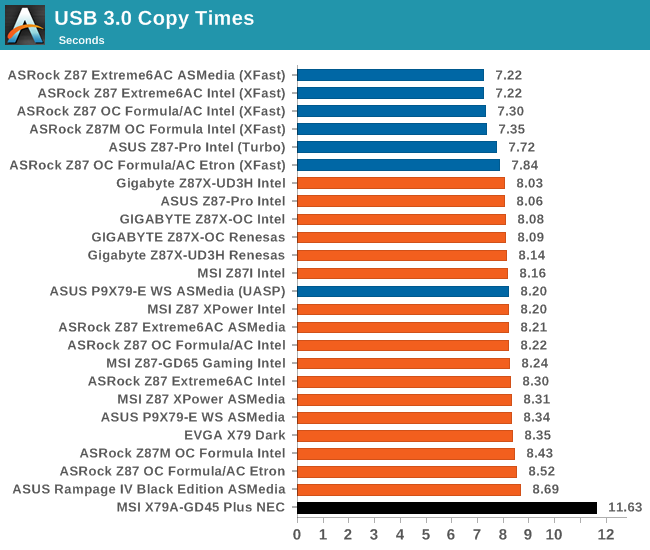
With our newer USB testing methodolgy, the MSI has the first NEC USB 3.0 we have seen and tested. The poor results speak for themselves.
DPC Latency
Deferred Procedure Call latency is a way in which Windows handles interrupt servicing. In order to wait for a processor to acknowledge the request, the system will queue all interrupt requests by priority. Critical interrupts will be handled as soon as possible, whereas lesser priority requests, such as audio, will be further down the line. So if the audio device requires data, it will have to wait until the request is processed before the buffer is filled. If the device drivers of higher priority components in a system are poorly implemented, this can cause delays in request scheduling and process time, resulting in an empty audio buffer – this leads to characteristic audible pauses, pops and clicks. Having a bigger buffer and correctly implemented system drivers obviously helps in this regard. The DPC latency checker measures how much time is processing DPCs from driver invocation – the lower the value will result in better audio transfer at smaller buffer sizes. Results are measured in microseconds and taken as the peak latency while cycling through a series of short HD videos - less than 500 microseconds usually gets the green light, but the lower the better.
Real World CPU Benchmarks
Readers of our motherboard review section will have noted the trend in modern motherboards to implement a form of MultiCore Enhancement / Acceleration / Turbo (read our report here) on their motherboards. This does several things – better benchmark results at stock settings (not entirely needed if overclocking is an end-user goal), at the expense of heat and temperature, but also gives in essence an automatic overclock which may be against what the user wants. Our testing methodology is ‘out-of-the-box’, with the latest public BIOS installed and XMP enabled, and thus subject to the whims of this feature. It is ultimately up to the motherboard manufacturer to take this risk – and manufacturers taking risks in the setup is something they do on every product (think C-state settings, USB priority, DPC Latency / monitoring priority, memory subtimings at JEDEC). Processor speed change is part of that risk which is clearly visible, and ultimately if no overclocking is planned, some motherboards will affect how fast that shiny new processor goes and can be an important factor in the purchase.
For reference, the MSI X79A-GD45 does enable MCT when XMP is enabled.
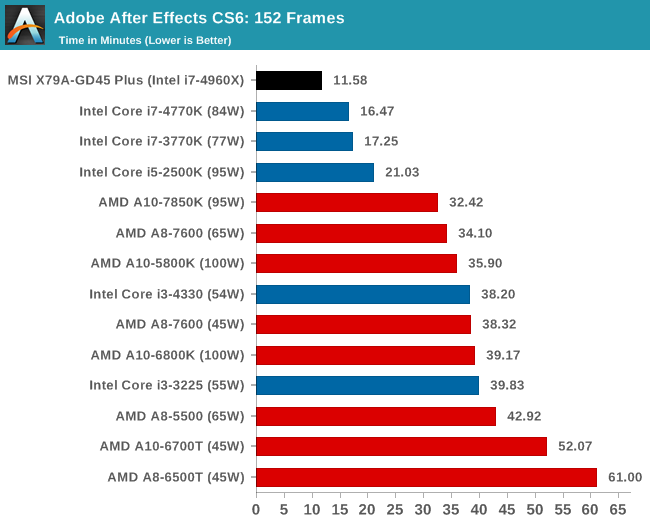
Rendering – Adobe After Effects CS6: link
Published by Adobe, After Effects is a digital motion graphics, visual effects and compositing software package used in the post-production process of filmmaking and television production. For our benchmark we downloaded a common scene in use on the AE forums for benchmarks and placed it under our own circumstances for a repeatable benchmark. We generate 152 frames of the scene and present the time to do so based purely on CPU calculations.
Compression – WinRAR 5.0.1: link
Our WinRAR test from 2013 is updated to the latest version of WinRAR at the start of 2014. We compress a set of 2867 files across 320 folders totaling 1.52 GB in size – 95% of these files are small typical website files, and the rest (90% of the size) are small 30 second 720p videos.
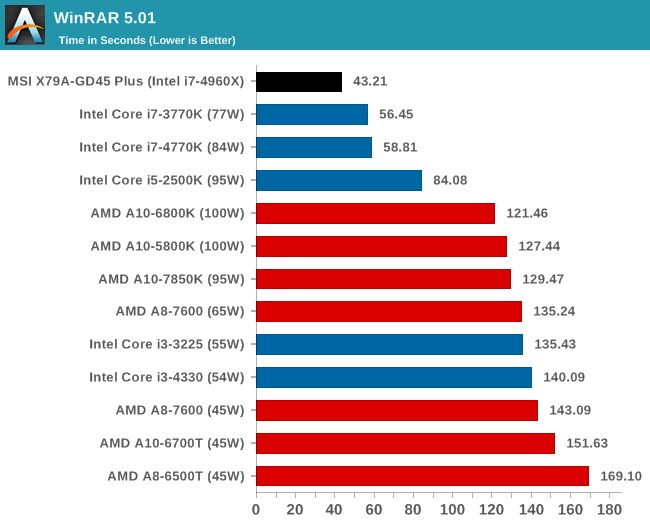
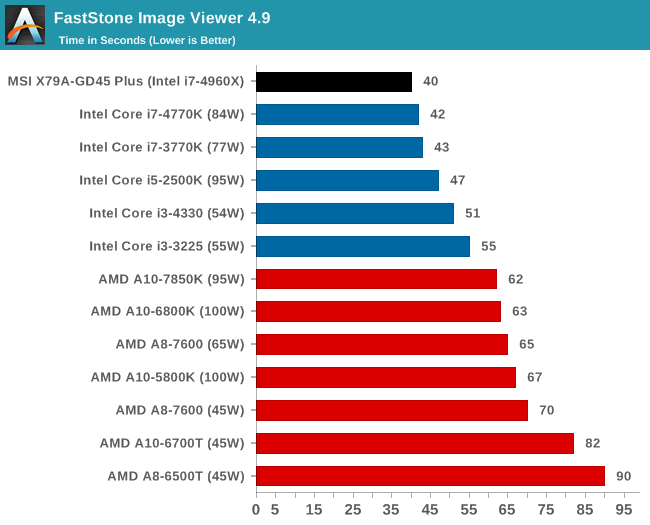
Image Manipulation – FastStone Image Viewer 4.9: link
Similarly to WinRAR, the FastStone test us updated for 2014 to the latest version. FastStone is the program I use to perform quick or bulk actions on images, such as resizing, adjusting for color and cropping. In our test we take a series of 170 images in various sizes and formats and convert them all into 640x480 .gif files, maintaining the aspect ratio. FastStone does not use multithreading for this test, and thus single threaded performance is often the winner.
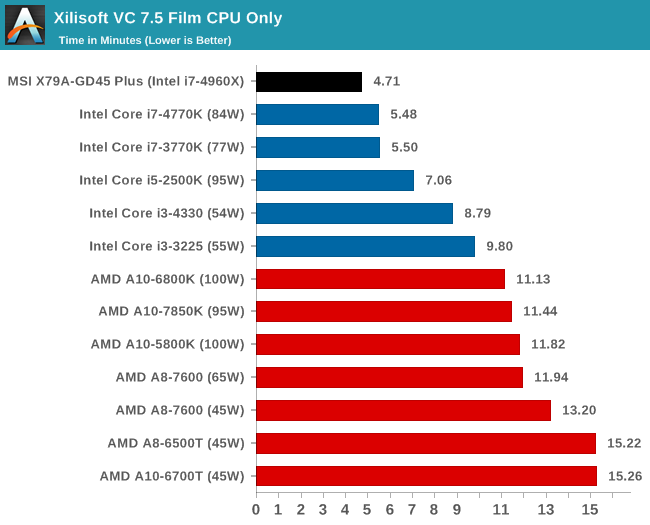
Video Conversion – Xilisoft Video Converter 7: link
The XVC test I normally do is updated to the full version of the software, and this time a different test as well. Here we take two different videos: a double UHD (3840x4320) clip of 10 minutes and a 640x266 DVD rip of a 2h20 film and convert both to iPod suitable formats. The reasoning here is simple – when frames are small enough to fit into memory, the algorithm has more chance to apply work between threads and process the video quicker. Results shown are in seconds and time taken to encode.

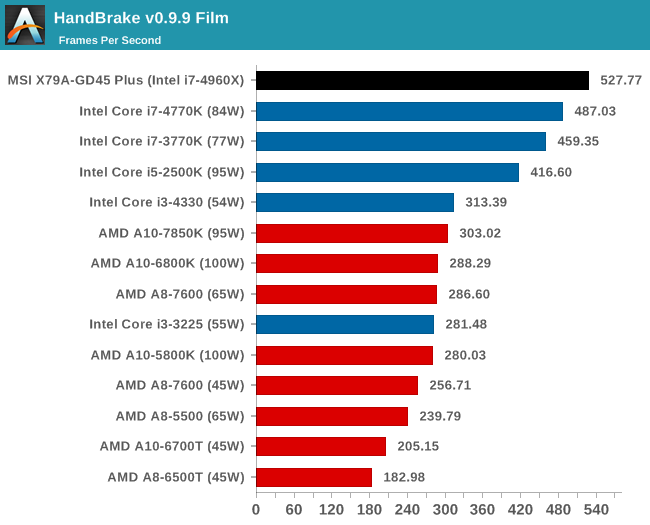
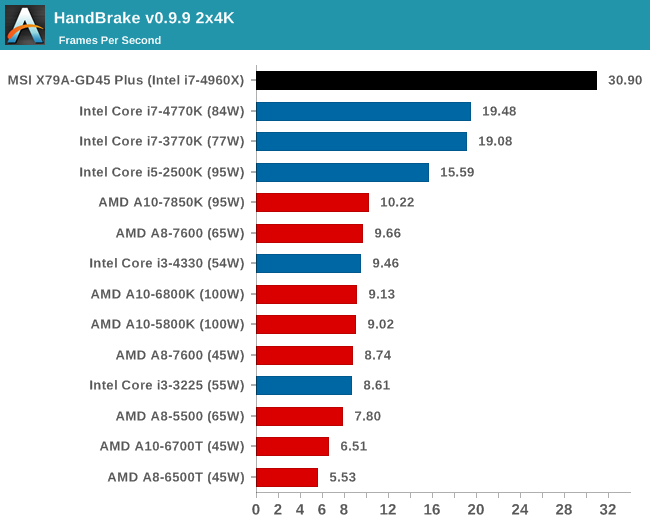
Video Conversion – Handbrake v0.9.9: link
Handbrake is a media conversion tool that was initially designed to help DVD ISOs and Video CDs into more common video formats. The principle today is still the same, primarily as an output for H.264 + AAC/MP3 audio within an MKV container. In our test we use the same videos as in the Xilisoft test, and results are given in frames per second.
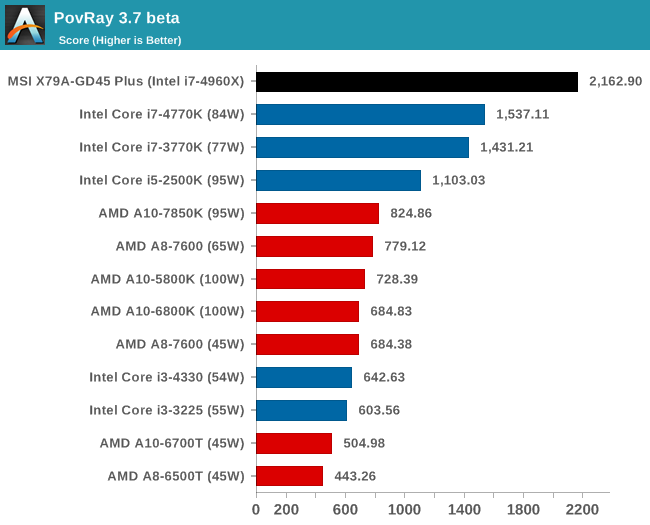
Rendering – PovRay 3.7: link
The Persistence of Vision RayTracer, or PovRay, is a freeware package for as the name suggests, ray tracing. It is a pure renderer, rather than modeling software, but the latest beta version contains a handy benchmark for stressing all processing threads on a platform. We have been using this test in motherboard reviews to test memory stability at various CPU speeds to good effect – if it passes the test, the IMC in the CPU is stable for a given CPU speed. As a CPU test, it runs for approximately 2-3 minutes on high end platforms.
Scientific and Synthetic Benchmarks
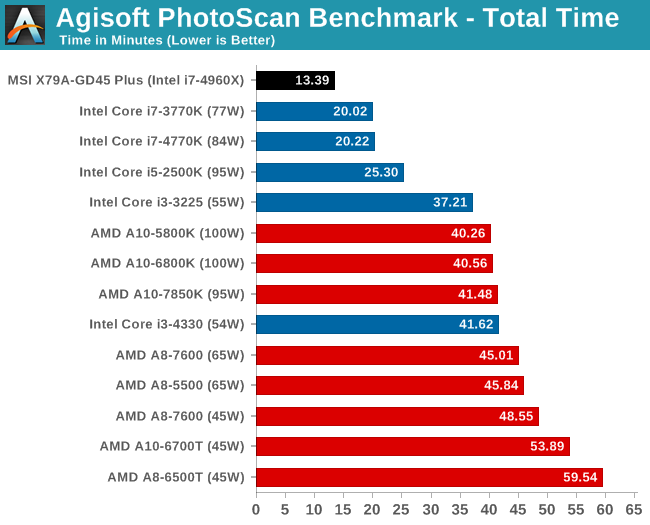
2D to 3D Rendering –Agisoft PhotoScan v1.0: link
Agisoft Photoscan creates 3D models from 2D images, a process which is very computationally expensive. The algorithm is split into four distinct phases, and different phases of the model reconstruction require either fast memory, fast IPC, more cores, or even OpenCL compute devices to hand. Agisoft supplied us with a special version of the software to script the process, where we take 50 images of a stately home and convert it into a medium quality model. This benchmark typically takes around 15-20 minutes on a high end PC on the CPU alone, with GPUs reducing the time.
Console Emulation –Dolphin Benchmark: link
At the start of 2014 I was emailed with a link to a new emulation benchmark based on the Dolphin Emulator. The issue with emulators tends to be two-fold: game licensing and raw CPU power required for the emulation. As a result, many emulators are often bound by single thread CPU performance, and general reports tended to suggest that Haswell provided a significant post to emulator performance. This benchmark runs a Wii program that raytraces a complex 3D scene inside the Dolphin Wii emulator. Performance on this benchmark is a good proxy of the speed of Dolphin CPU emulation, which is an intensive single core task using most aspects of a CPU. Results are given in minutes, where the Wii itself scores 17.53; meaning that anything above this is faster than an actual Wii for processing Wii code, albeit emulated.
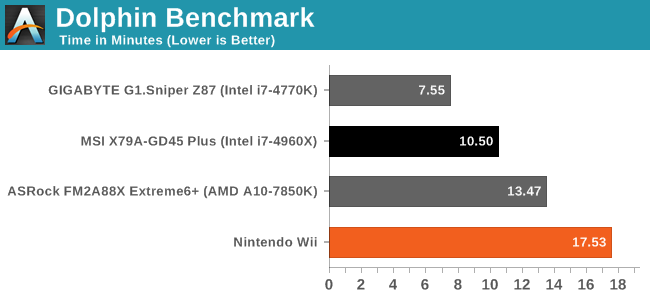
Emulation was reported to have a significant boost when Haswell was launched, and due to the single threaded nature of the benchmark, the Ivy Bridge-E is behind.
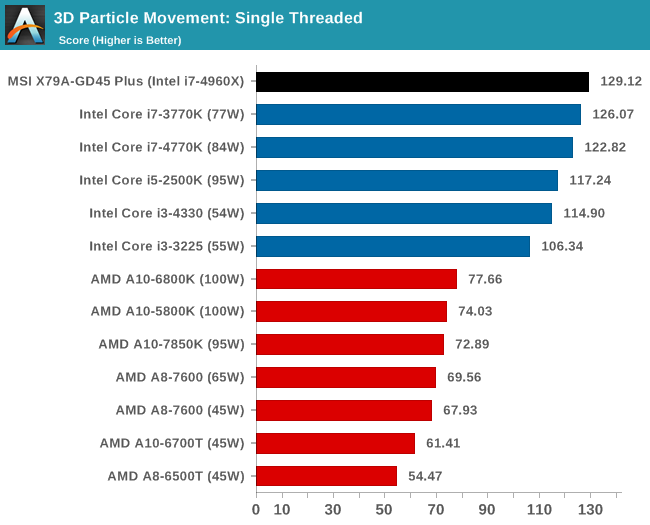
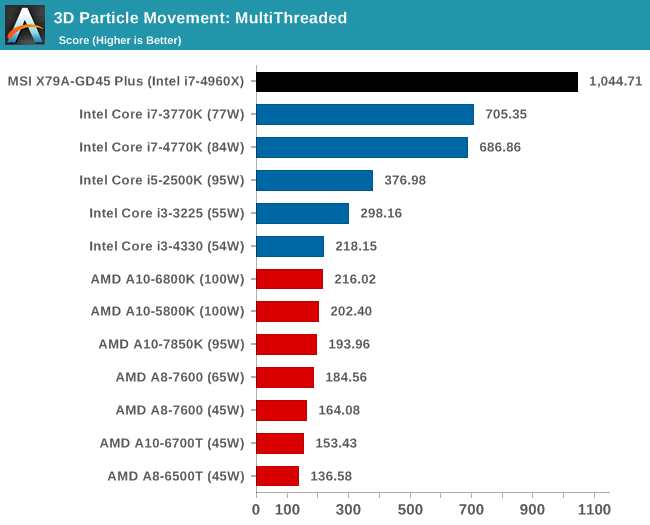
Point Calculations – 3D Movement Algorithm Test: link
3DPM is a self-penned benchmark, taking basic 3D movement algorithms used in Brownian Motion simulations and testing them for speed. High floating point performance, MHz and IPC wins in the single thread version, whereas the multithread version has to handle the threads and loves more cores.
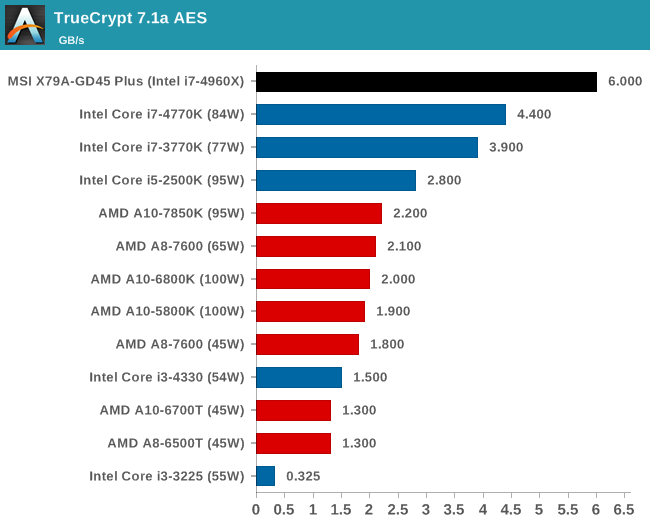
Encryption –TrueCrypt v0.7.1a: link
TrueCrypt is an off the shelf open source encoding tool for files and folders. For our test we run the benchmark mode using a 1GB buffer and take the mean result from AES encryption.
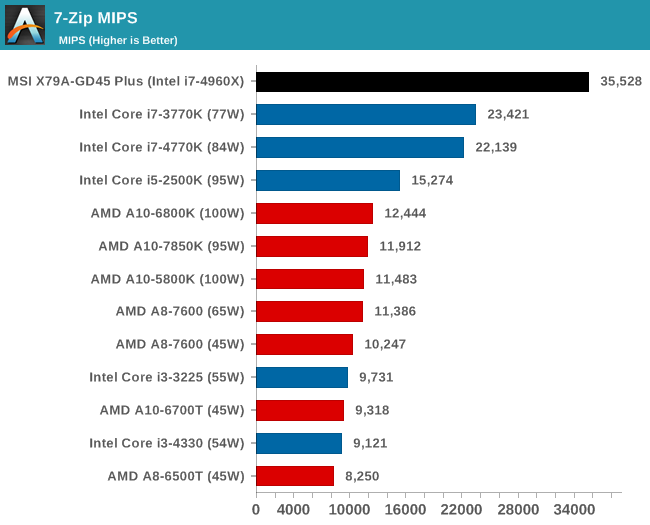
Synthetic – 7-Zip 9.2: link
As an open source compression tool, 7-Zip is a popular tool for making sets of files easier to handle and transfer. The software offers up its own benchmark, to which we report the result.
Gaming Benchmarks
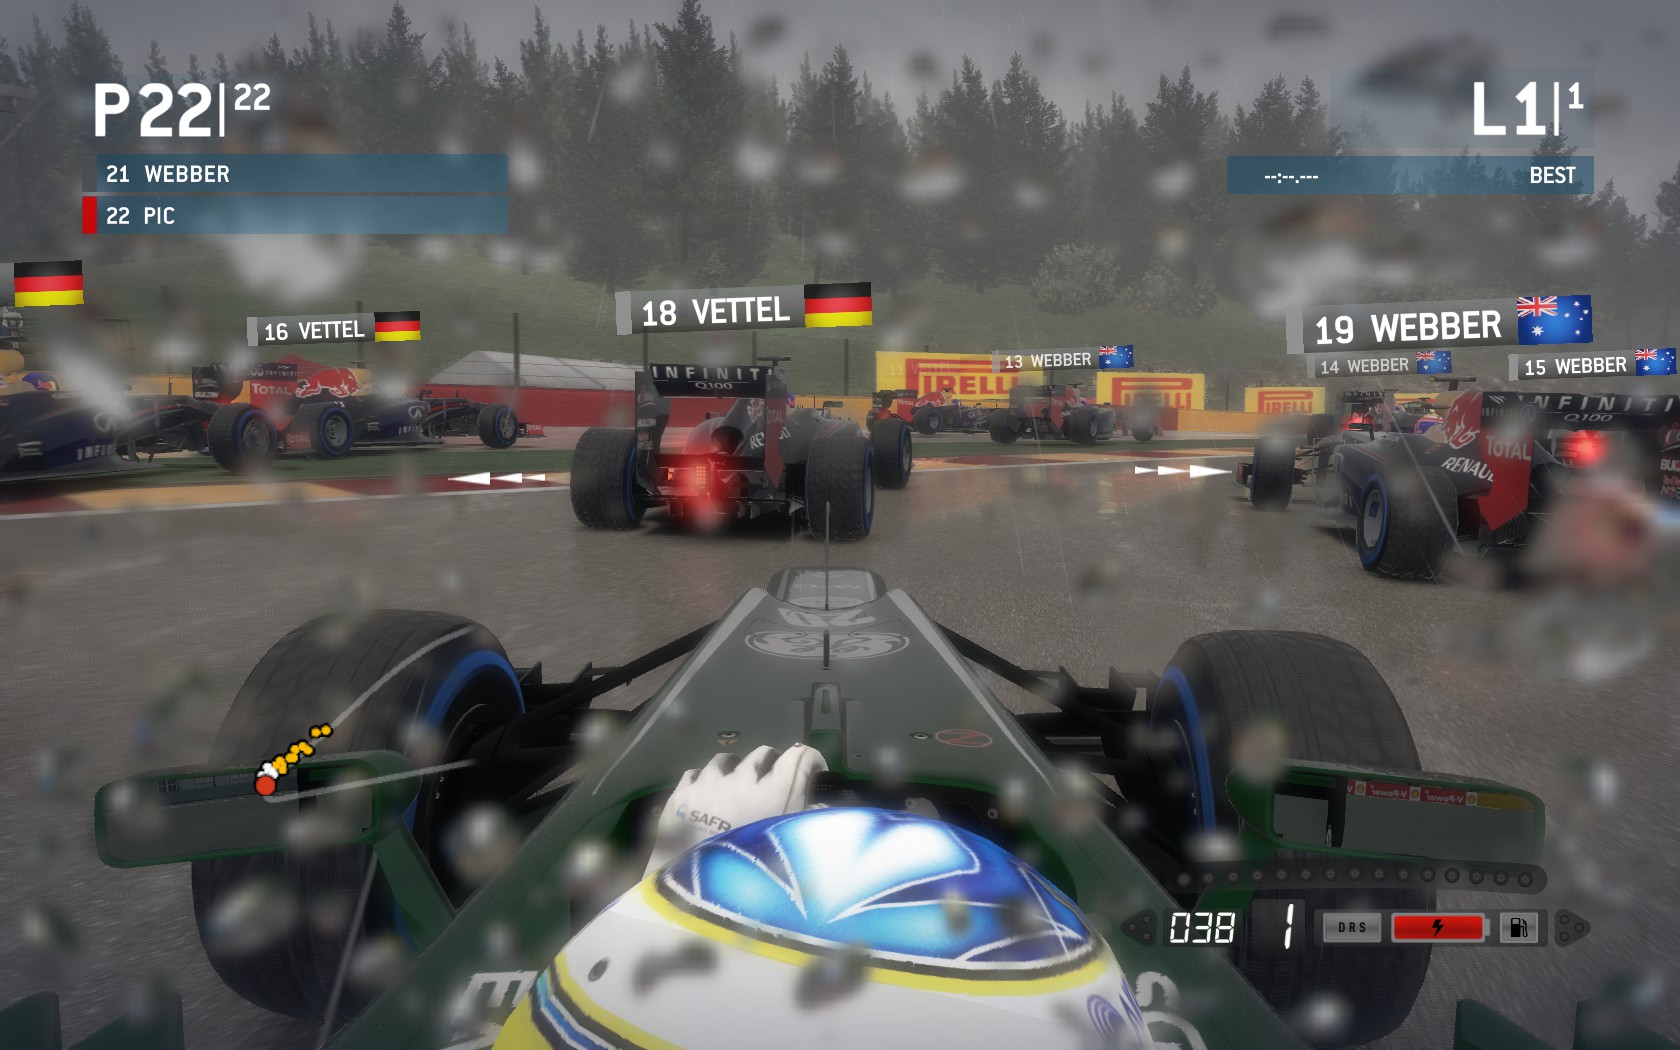
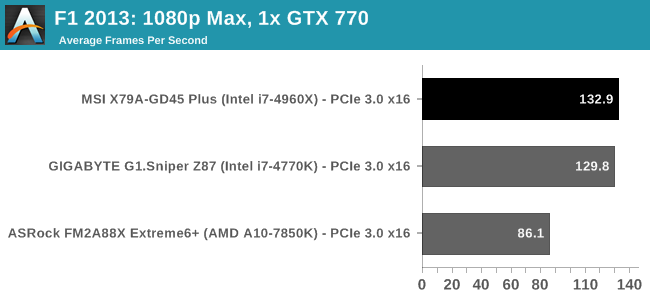
F1 2013
First up is F1 2013 by Codemasters. I am a big Formula 1 fan in my spare time, and nothing makes me happier than carving up the field in a Caterham, waving to the Red Bulls as I drive by (because I play on easy and take shortcuts). F1 2013 uses the EGO Engine, and like other Codemasters games ends up being very playable on old hardware quite easily. In order to beef up the benchmark a bit, we devised the following scenario for the benchmark mode: one lap of Spa-Francorchamps in the heavy wet, the benchmark follows Jenson Button in the McLaren who starts on the grid in 22nd place, with the field made up of 11 Williams cars, 5 Marussia and 5 Caterham in that order. This puts emphasis on the CPU to handle the AI in the wet, and allows for a good amount of overtaking during the automated benchmark. We test at 1920x1080 on Ultra graphical settings for a single GPU, as using multiple GPUs seems to have no scaling effect.
| F1 2013, 1080p Max | ||
| NVIDIA | AMD | |
| Average Frame Rates |
|
|
| Minimum Frame Rates |
|
|
While there is no real scaling with multiple GPUs on F1 2013, having extra cores or PCIe lanes helps when more GPUs are in the system, even on minimum frame rates.
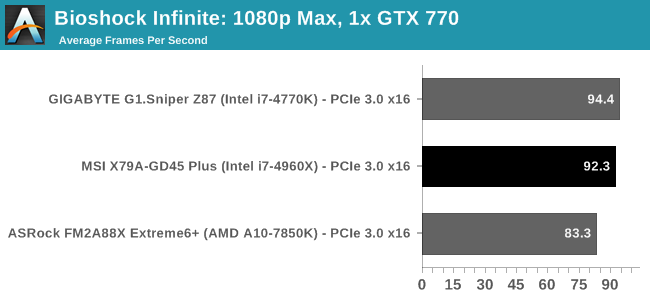
Bioshock Infinite
Bioshock Infinite was Zero Punctuation’s Game of the Year for 2013, uses the Unreal Engine 3, and is designed to scale with both cores and graphical prowess. We test the benchmark using the Adrenaline benchmark tool and the Xtreme (1920x1080, Maximum) performance setting, noting down the average frame rates and the minimum frame rates.

| Bioshock Infinite, 1080p Max | ||
| NVIDIA | AMD | |
| Average Frame Rates |
|
|
| Minimum Frame Rates |
|
|
Bioshock seems to prefer IPC over cores, so Haswell takes the lead here on both dual card AMD and NVIDIA.
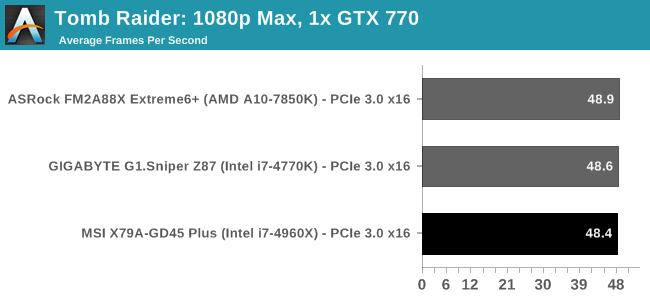
Tomb Raider
The next benchmark in our test is Tomb Raider. Tomb Raider is an AMD optimized game, lauded for its use of TressFX creating dynamic hair to increase the immersion in game. Tomb Raider uses a modified version of the Crystal Engine, and enjoys raw horsepower. We test the benchmark using the Adrenaline benchmark tool and the Xtreme (1920x1080, Maximum) performance setting, noting down the average frame rates and the minimum frame rates.

| Tomb Raider, 1080p Max | ||
| NVIDIA | AMD | |
| Average Frame Rates |
|
|
| Minimum Frame Rates |
|
|
Tomb Raider seems rather unaffected by cores, MHz or lane allocations.
Gaming Benchmarks
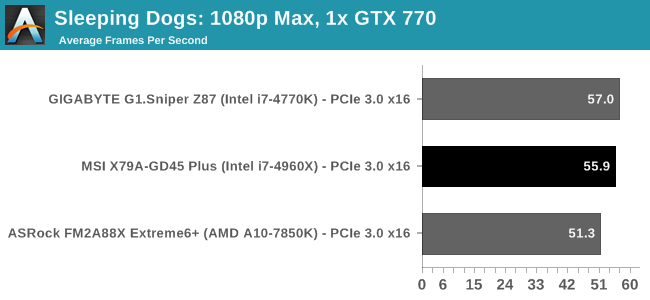
Sleeping Dogs
Sleeping Dogs is a benchmarking wet dream – a highly complex benchmark that can bring the toughest setup and high resolutions down into single figures. Having an extreme SSAO setting can do that, but at the right settings Sleeping Dogs is highly playable and enjoyable. We run the basic benchmark program laid out in the Adrenaline benchmark tool, and the Xtreme (1920x1080, Maximum) performance setting, noting down the average frame rates and the minimum frame rates.

| Sleeping Dogs, 1080p Max | ||
| NVIDIA | AMD | |
| Average Frame Rates |
|
|
| Minimum Frame Rates |
|
|
Company of Heroes 2
The final gaming benchmark is another humdinger. Company of Heroes 2 also can bring a top end GPU to its knees, even at very basic benchmark settings. To get an average 30 FPS using a normal GPU is a challenge, let alone a minimum frame rate of 30 FPS. For this benchmark I use modified versions of Ryan’s batch files at 1920x1080 on Medium. COH2 is a little odd in that it does not scale with more GPUs, and thus only single GPU results are given.
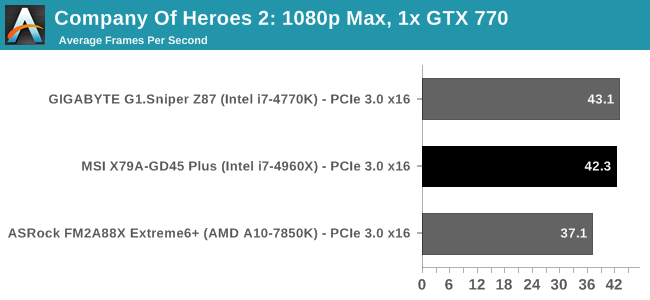
| Company of Heroes 2, 1080p Max | ||
| NVIDIA | AMD | |
| Average Frame Rates |
|
|
| Minimum Frame Rates |
|
|
COH2 shows no scaling beyond one GPU, but there is a small advantage to having a better IPC generation of processor.
MSI X79A-GD45 Plus Conclusion
When a motherboard manufacturer designs a product, they have an Intel specification to work with based on the socket used and the chipset to be used. This defines the basic list of ports to be included, and anything beyond this requires planning and investment in additional hardware. When speaking to motherboard manufacturers, the whole process from specification to mass production can take 8-12 months, meaning that manufacturers have to predict the needs of the market in advance. What gets put onto the motherboard over and above the Intel specification comes in two flavors – direct enhancement and indirect enhancement.
Direct enhancement gives more immediate features to the user. This means more network ports, more SATA ports, more USB 3.0, fan controls, a better PCIe layout and what comes in the box with the product (cables and so forth). These are features we can quantify and provide in a list, such as types of video output, or buttons directly on the motherboard.
Indirect enhancement is harder to quantify. Features that come under this heading include power phase counts, routing around the motherboard, sound enhancement, heatsink placement and stability. Each one of these is hard to test, or requires a statistical variation to provide an accurate sample. Nonetheless, indirect enhancement is a fundamental feature of the motherboard to provide a base to which motherboard manufacturers compete against each other.
For indirect enhancement, MSI has pushed the socket area down on the motherboard to give more space to components, at the expense of a PCIe x1 slot. MSI use a base Realtek audio codec and an Intel NIC for a $250 product, both of which are standard off-the-shelf components. In the direct enhancement camp, we have no additional controllers to play with, although a full complement of SATA cables is in the box, but only one SLI bridge despite the 3-way GPU layout.
MSI are attempting to bolster their position by providing an aesthetically pleasing product, as well as on the software/BIOS side. I have to commend MSI on Live Update which still requires an equal, and despite the issue of being able to set 1.8 volts on the CPU in software all too easily, the rest of the package (RAMDisk) is decent enough. It is a shame I could not get OC Genie to display any difference against a standard stock+XMP setup however.
Performance wise, due to MultiCore Turbo being enabled by default when XMP is applied, the X79A-GD45 Plus performs well in our new benchmarking suite, taking advantage when other products falter. Unfortunately our overclocking results were stunted by a relatively poor CPU and we hit a temperature limit early on.
With Ivy Bridge-E bringing little more to the table than a small IPC improvement, there are relatively few X79 refresh motherboards because the chipset is showing its age. We have reviewed a couple of the new ones, and they offer reasonable starting points for people jumping onto Intel’s enthusiast platform due to being designed for Ivy Bridge-E. At $250, MSI is aiming for the lower end of the spectrum in X79, although there are cheaper boards still available we have reviewed [1,2] as well as some that have won awards and are ~10% more expensive [1]. At this price point, users will end up purchasing for that one specific feature that a motherboard might have, or with their allegiance to a particular manufacturer. The main selling point for the MSI X79A-GD45 Plus, apart from its release aimed at Ivy Bridge-E, will be the PCIe layout with full eight DIMM memory support.


