Original Link: https://www.anandtech.com/show/7613/asus-p9x79e-ws-review
ASUS P9X79-E WS Review: Xeon meets PLX for 7x
by Ian Cutress on January 10, 2014 10:00 AM EST- Posted in
- Motherboards
- Asus
- Workstation
- X79
- Prosumer

Alongside their line of channel and ROG motherboards, ASUS also has business (B/Q chipset) and Workstation (WS) lines for professional markets. The goal of these products is compatibility and stability – the desire to be a rock solid product in the face of any computational conundrum. Today we are reviewing hopefully the first of many ASUS WS motherboards – the P9X79-E WS, for the socket 2011 / performance Xeon market. This is an upgrade over the P9X79 WS, featuring a PLX chip giving seven full length PCIe slots.
The goal of the P9X79-E WS is to be able to tackle anything a user wants to use in it: in order to ensure this, ASUS try to validate as many RAID cards, 10 GbE cards, FPGA and PCIe devices as possible. The goal of the P9X79-E WS is to be the final frontier in single socket performance, suggesting that a 12 core Xeon E5-2697W and several of the latest Xeon Phi cards is just a walk in the park, as well as any consumer level CPU. If a user needs to run seven RAID cards should not be a problem here.
Several of the main features of workstation motherboards are hard to test from a review point of view. Compatibility is wholly taken from the QVL list: either a device works or it does not – if I find a device that does not and tell ASUS, chances are it will probably be working in the next BIOS update. Stability and longevity is hard to test as well – these motherboards are built to withstand several years at full throttle in high ambient temperatures, so if I tested it like that and it fails or works, then it might be up to the sample and I would have to take a statistical look at MTBF (mean time between failures) – a test not within my remit and could take a while to perform! Feature comparisons and performance are thus vital to our testing – aesthetics for gaming motherboard evaluations are not required here. It needs to work, ideally out of the box, and work well.
ASUS P9X79-E WS Overview
After reviewing ASUS’ X79, Z87 and ROG ranges, it seems almost nostalgic to start looking at the blue and black of ASUS again. The P9X79-E WS has actually been on the market for a number of months, and one of the first features to note is usually the seven full length PCIe slots. The P9X79-E WS uses two PLX PEX 8747 chips to increase the number of PCIe 3.0 lanes on the motherboard from 40 to 72 – if a user needed to, this motherboard will support PCI 3.0 x16/x16/x16/x16 and x16/x8/x8/x8/x16/x8/x8. We covered the operation of the PLX 8747 chip in a previous review – each of these chips requires ~7W of power hence the extended heatsinks around the motherboard.
Along with the two PLX chips, the P9X79-E WS also uses a Marvell PCIe 9230 controller for four more SATA 6 Gbps ports (over the standard two SATA 6 Gbps and four SATA 3 Gbps), an ASMedia controller for two eSATA 6 Gbps ports with port multiplier support, two Intel I210 NICs, the Realtek ALC1150 audio codec, a VIA 6315N controller for FireWire/IEEE1394 support and an ASMedia controller for four USB 3.0 ports. All these chips require heat removal, again a cause for a large extended heatsink array.
Being a Workstation board, the P9X79-E WS is designed to accept any socket 2011 Xeon, as well as ECC memory – up to 64GB is listed on the specification sheet. After speaking with ASUS, they also suggest using the P9X79-E WS in a high airflow environment – I found the system hot to touch due to no active fan on the motherboard for all the extra controllers.
Like the ASUS Rampage IV Black Edition we reviewed previously, ASUS are moving as many modern (read: latest in use) chipsets to the new BIOS layout involving a My Favorites screen, Quick Note, Last Modified, and plenty of CPU/Memory calibration options very similar to the ROG range. One thing worth noting is the lack of SSD Secure Erase which we see on the ROG boards: I would have thought it appropriate to include it on the workstation range as well. One new feature called ASUS Ratio Boost is in the BIOS, which implements MultiCore Turbo for Xeon CPUs.
The software for the P9X79-E WS is the older AI Suite II, in line with the X79 launch, with features such as TurboV Evo for non-Xeon overclocking, EPU for power conservation, Fan Xpert+ for tuning fans, Dr.Power for monitoring the power supply, USB 3.0 Boost, AI Charger, SSD Caching and ASUS Update.
In terms of performance, not much differentiates the P9X79-E WS from the other X79 counterparts. Despite the workstation status, the system even implements MultiCore Turbo when XMP is enabled, giving our i7-4960X sample the full turbo mode (4.0 GHz) no matter the loading. The difference with this motherboard is all going to be in the functionality it provides and QVL of extra PCIe products rather than raw performance. To that extent we at least hit the limit of our CPU overclock at 4.5 GHz without too much difficulty, although the platform and heatsink arrangement did get relatively warm.
POST time is reasonable in our standard test (dual GPUs) at just under fifteen seconds, although idle power usage is higher than most due to the extra controllers on board. DPC Latency is low (115 microseconds), which is always a good thing.
Being a workstation board, price is always going to be a factor. ASUS covers the P9X79-E WS with a 3 year warranty and provides the ASUS Premium Service for North America customers in case of any issues. The only issue we really had was that USB 3.0 boost would not disable UASP on our drives, although this was fixed with an update to the latest software. ASUS (and others) need to get into the groove of providing an update tool for software and drivers in the OS that works well to avoid future issues.
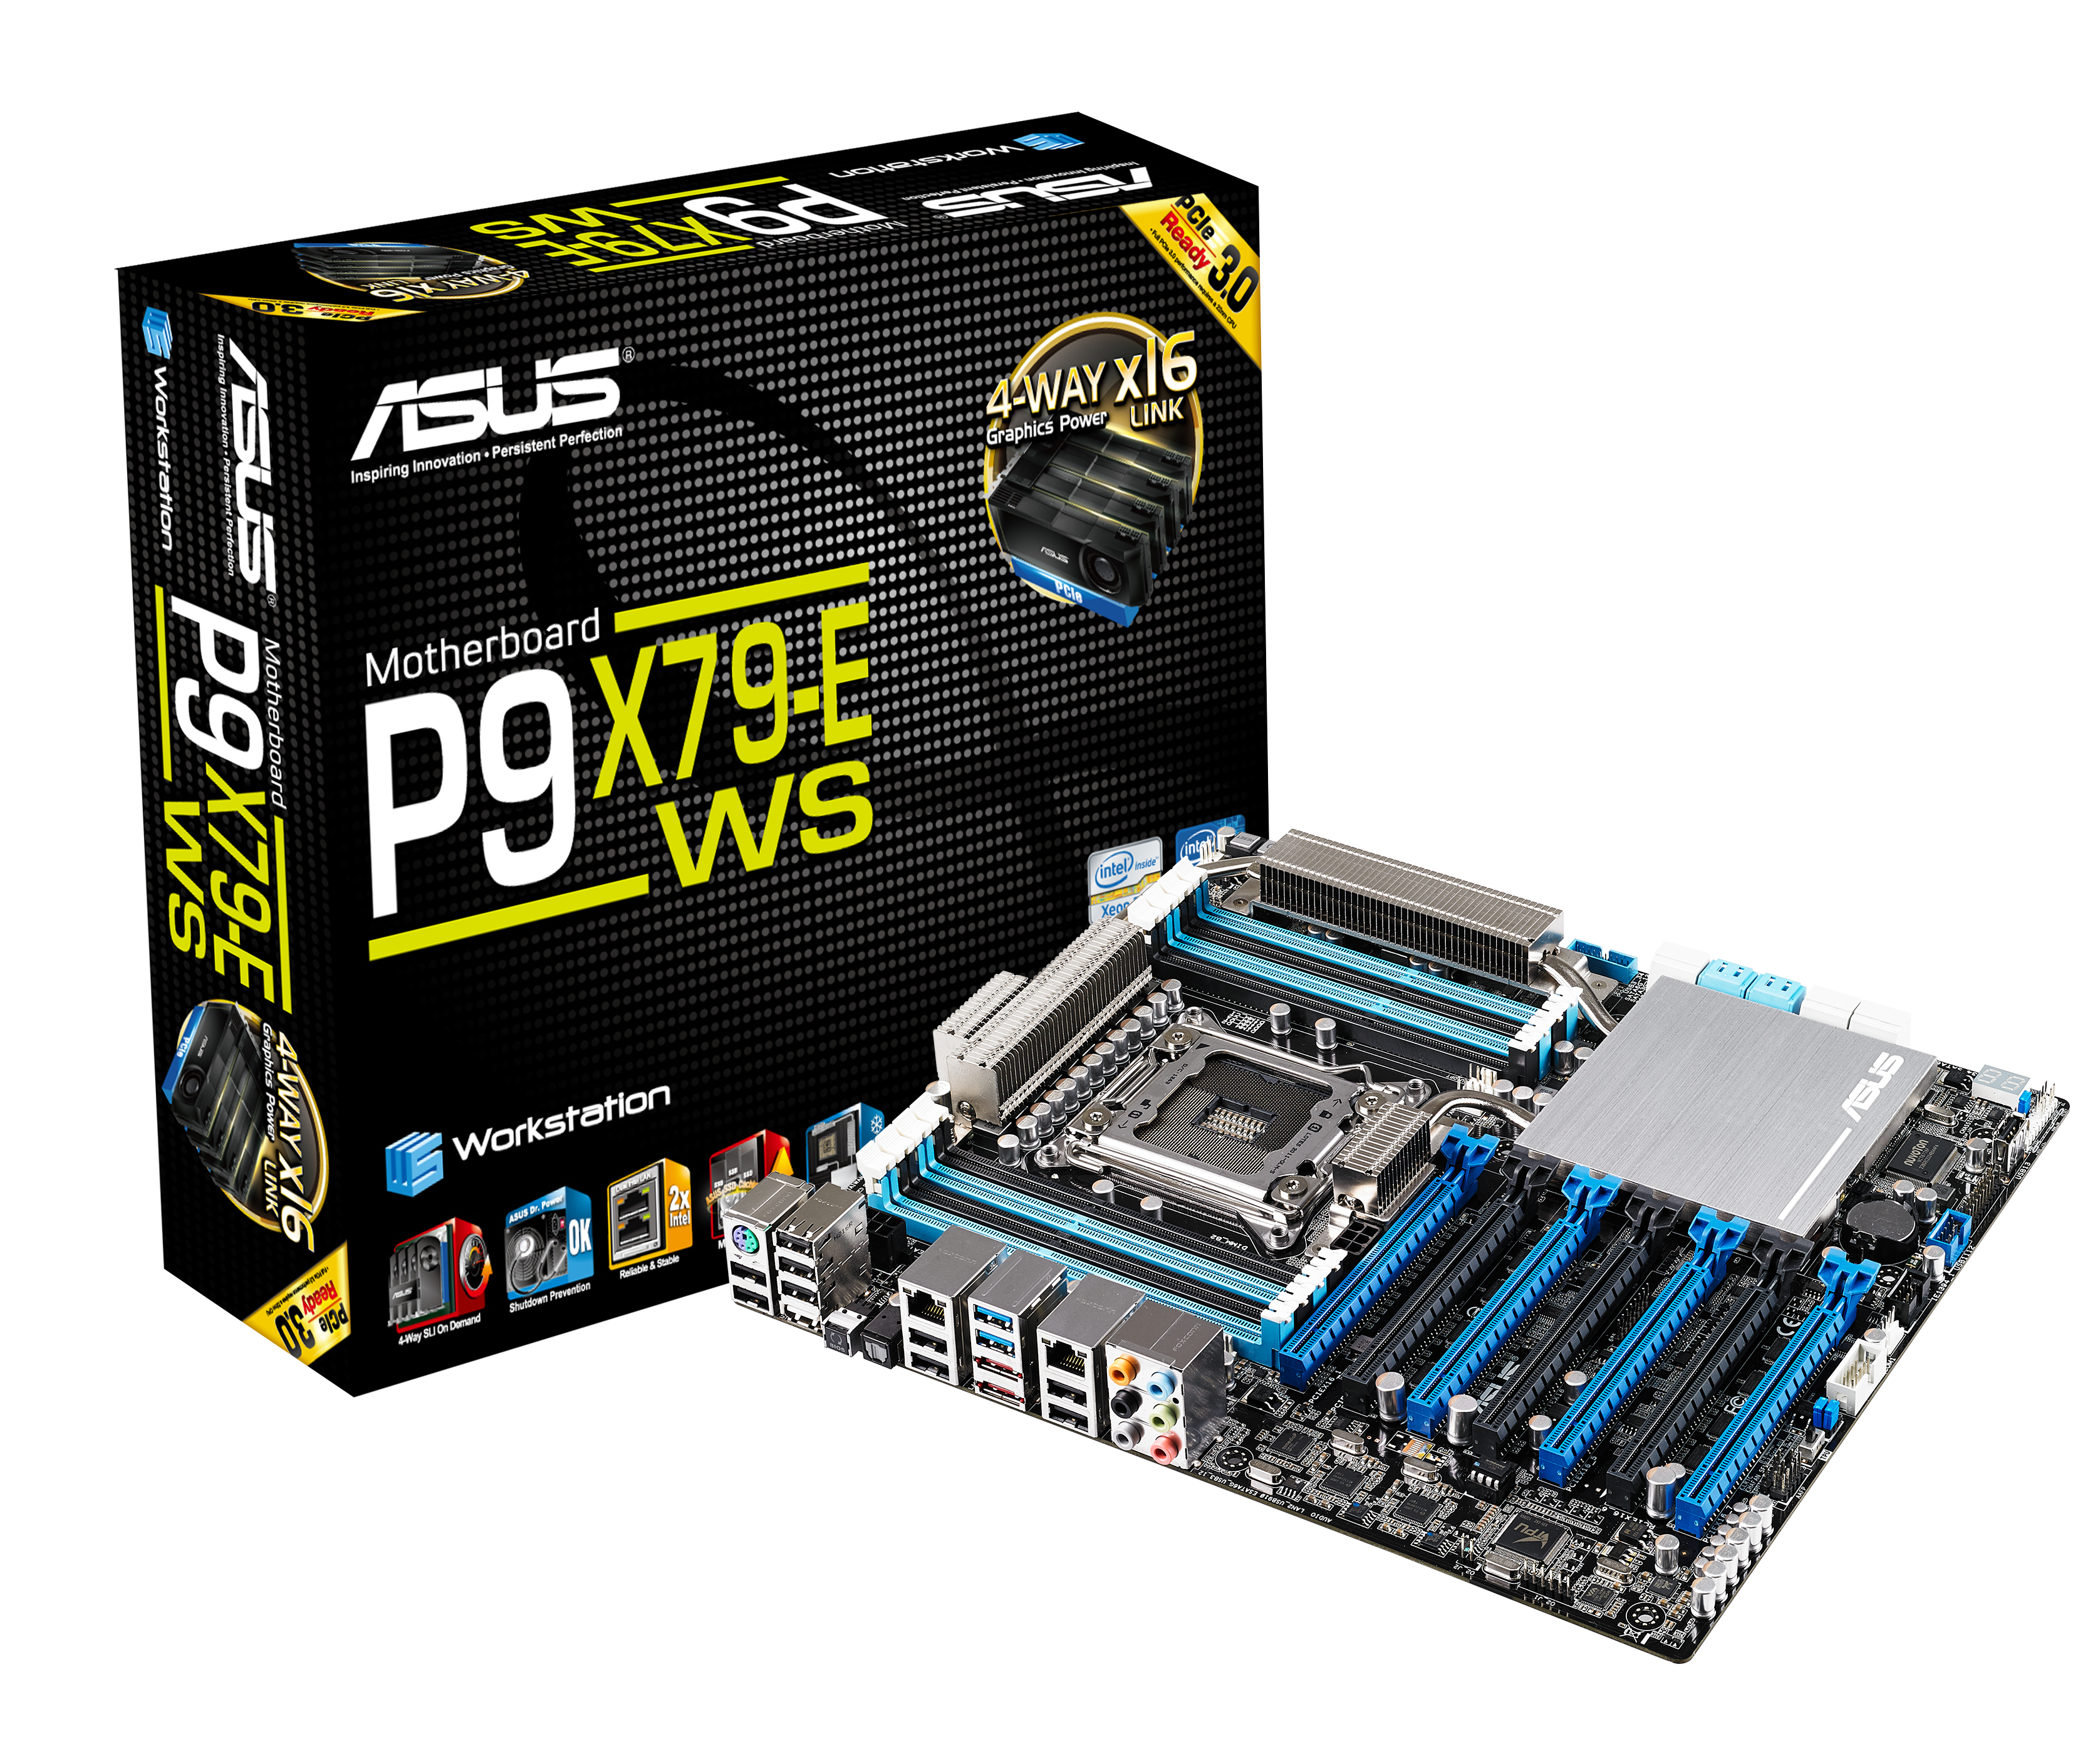
Visual Inspection
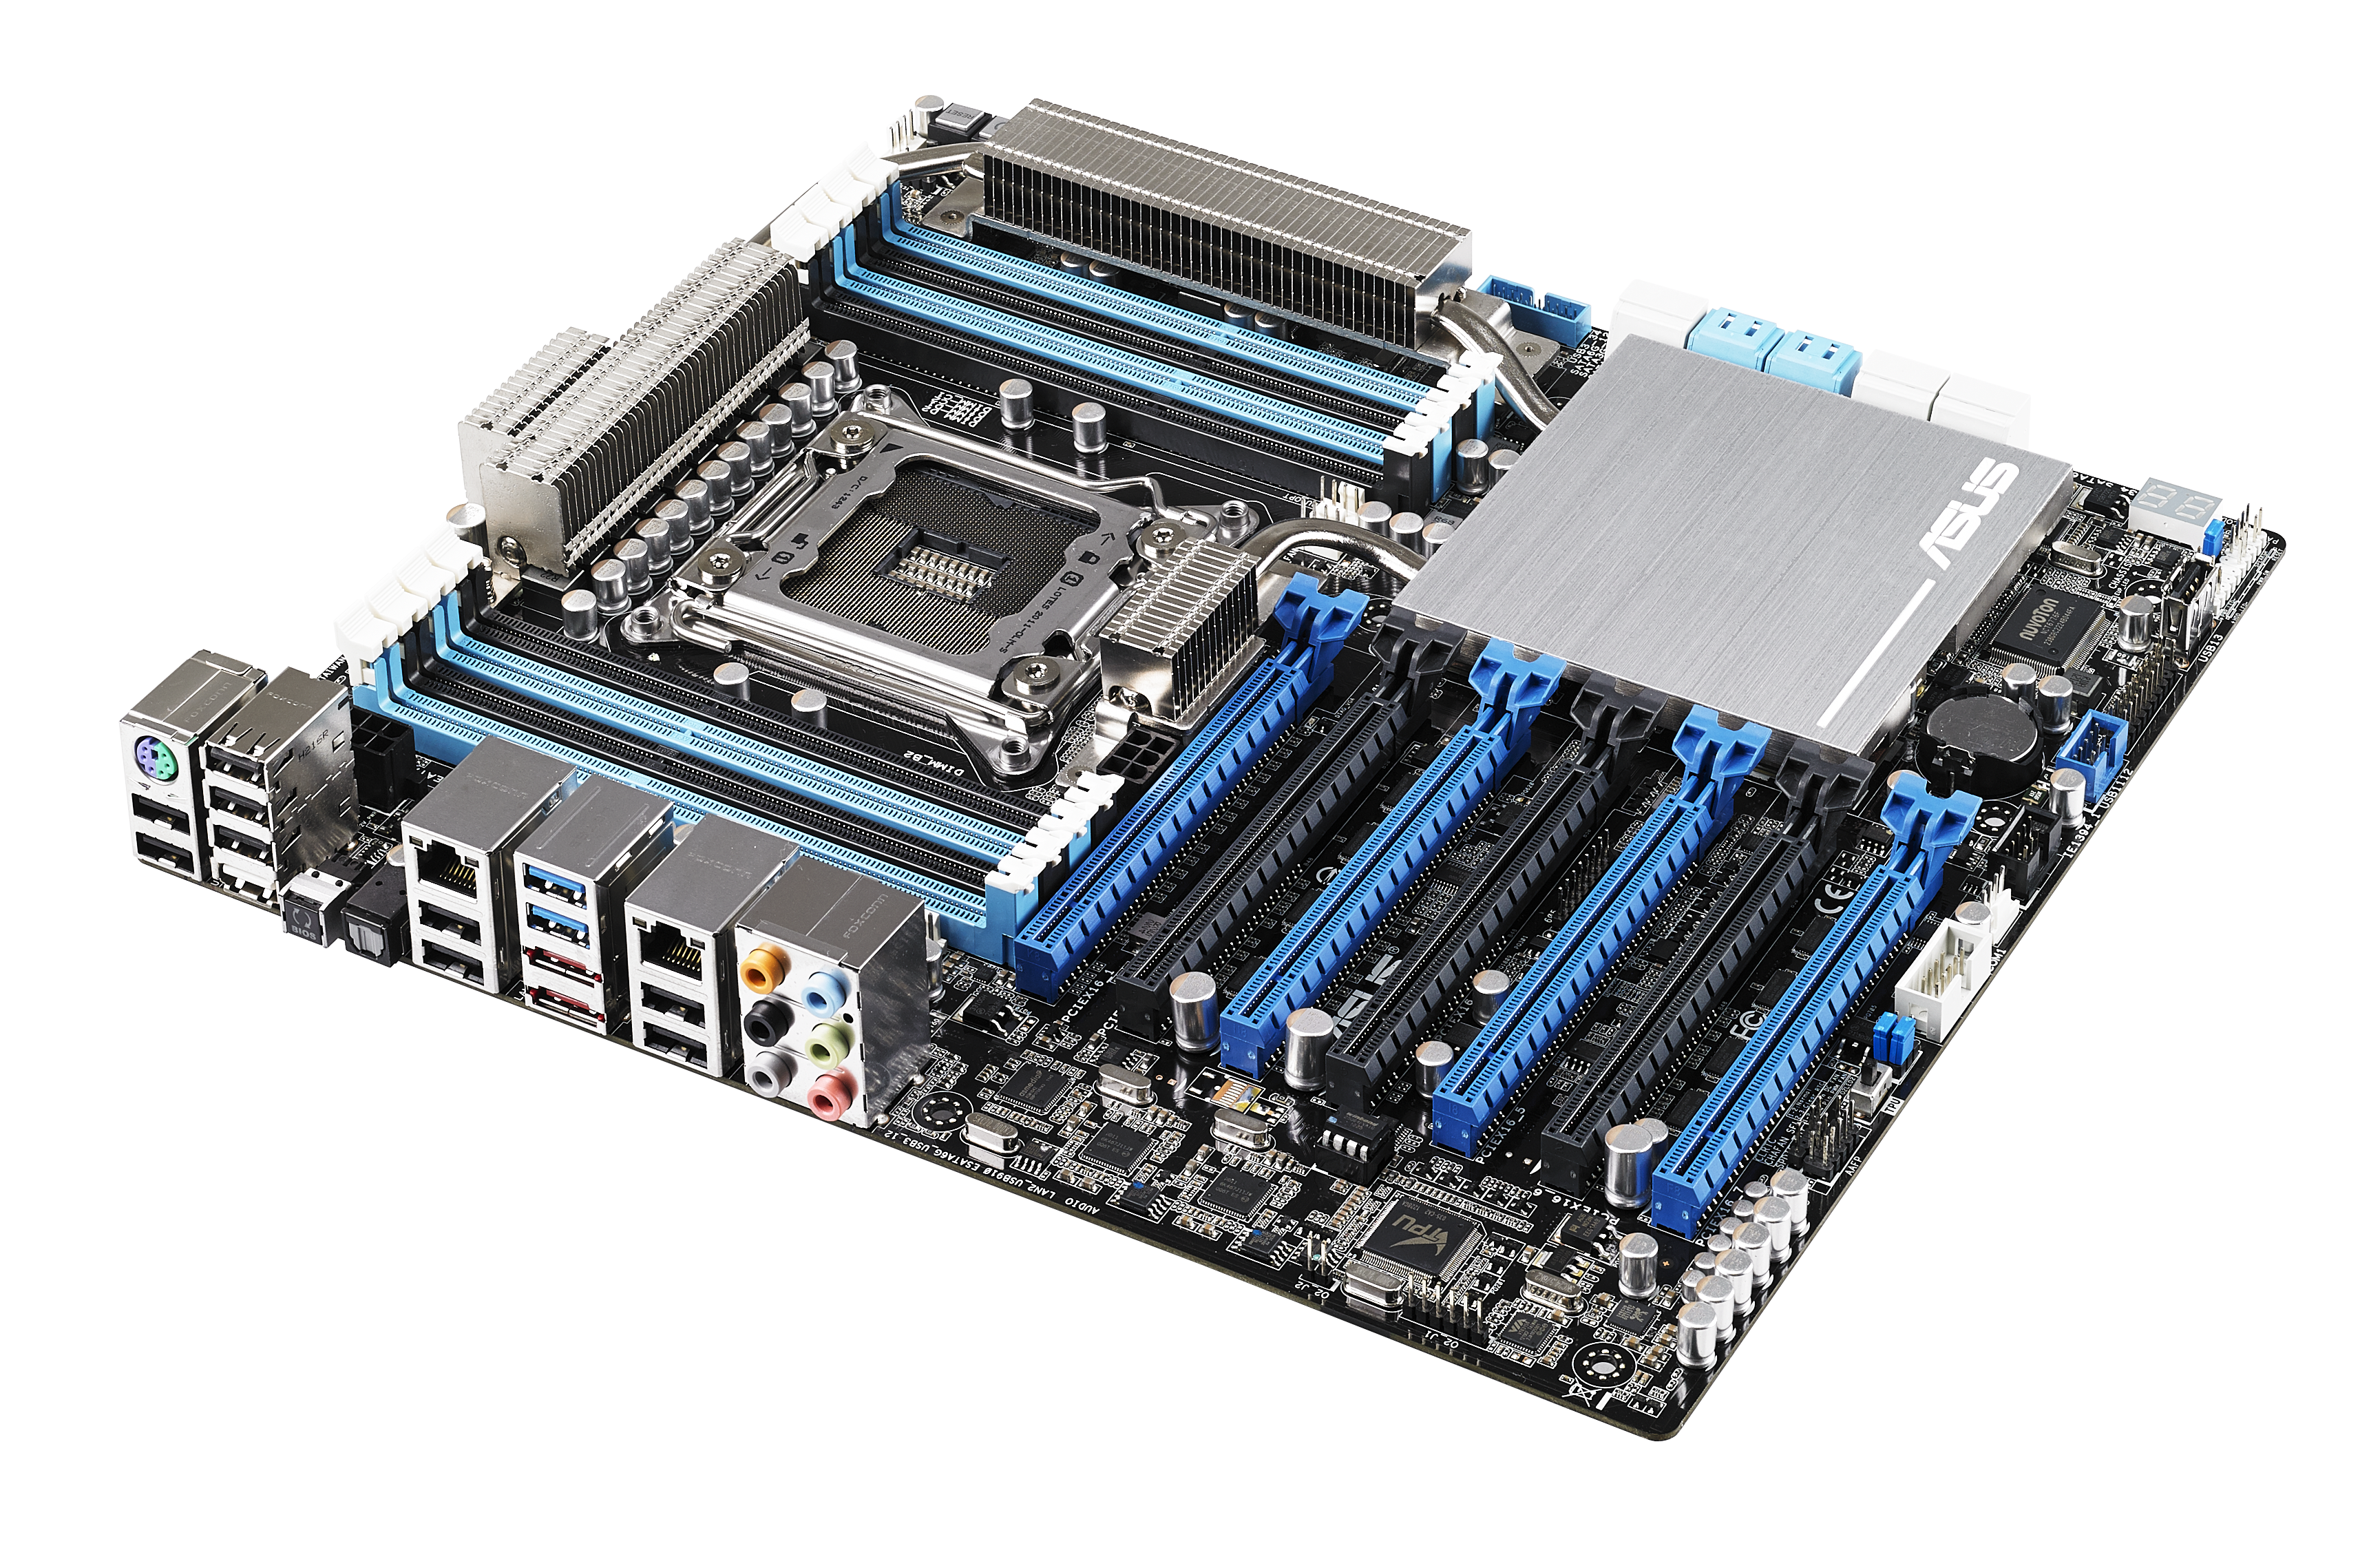
The first image of the P9X79-E WS is in striking contrast to the Rampage IV Black Edition I reviewed previously. We are back to the old blue, white and black styling that ASUS will look to keep for their workstation line (at least for the time being) but again, this being a WS motherboard, functionality is more important than looks.
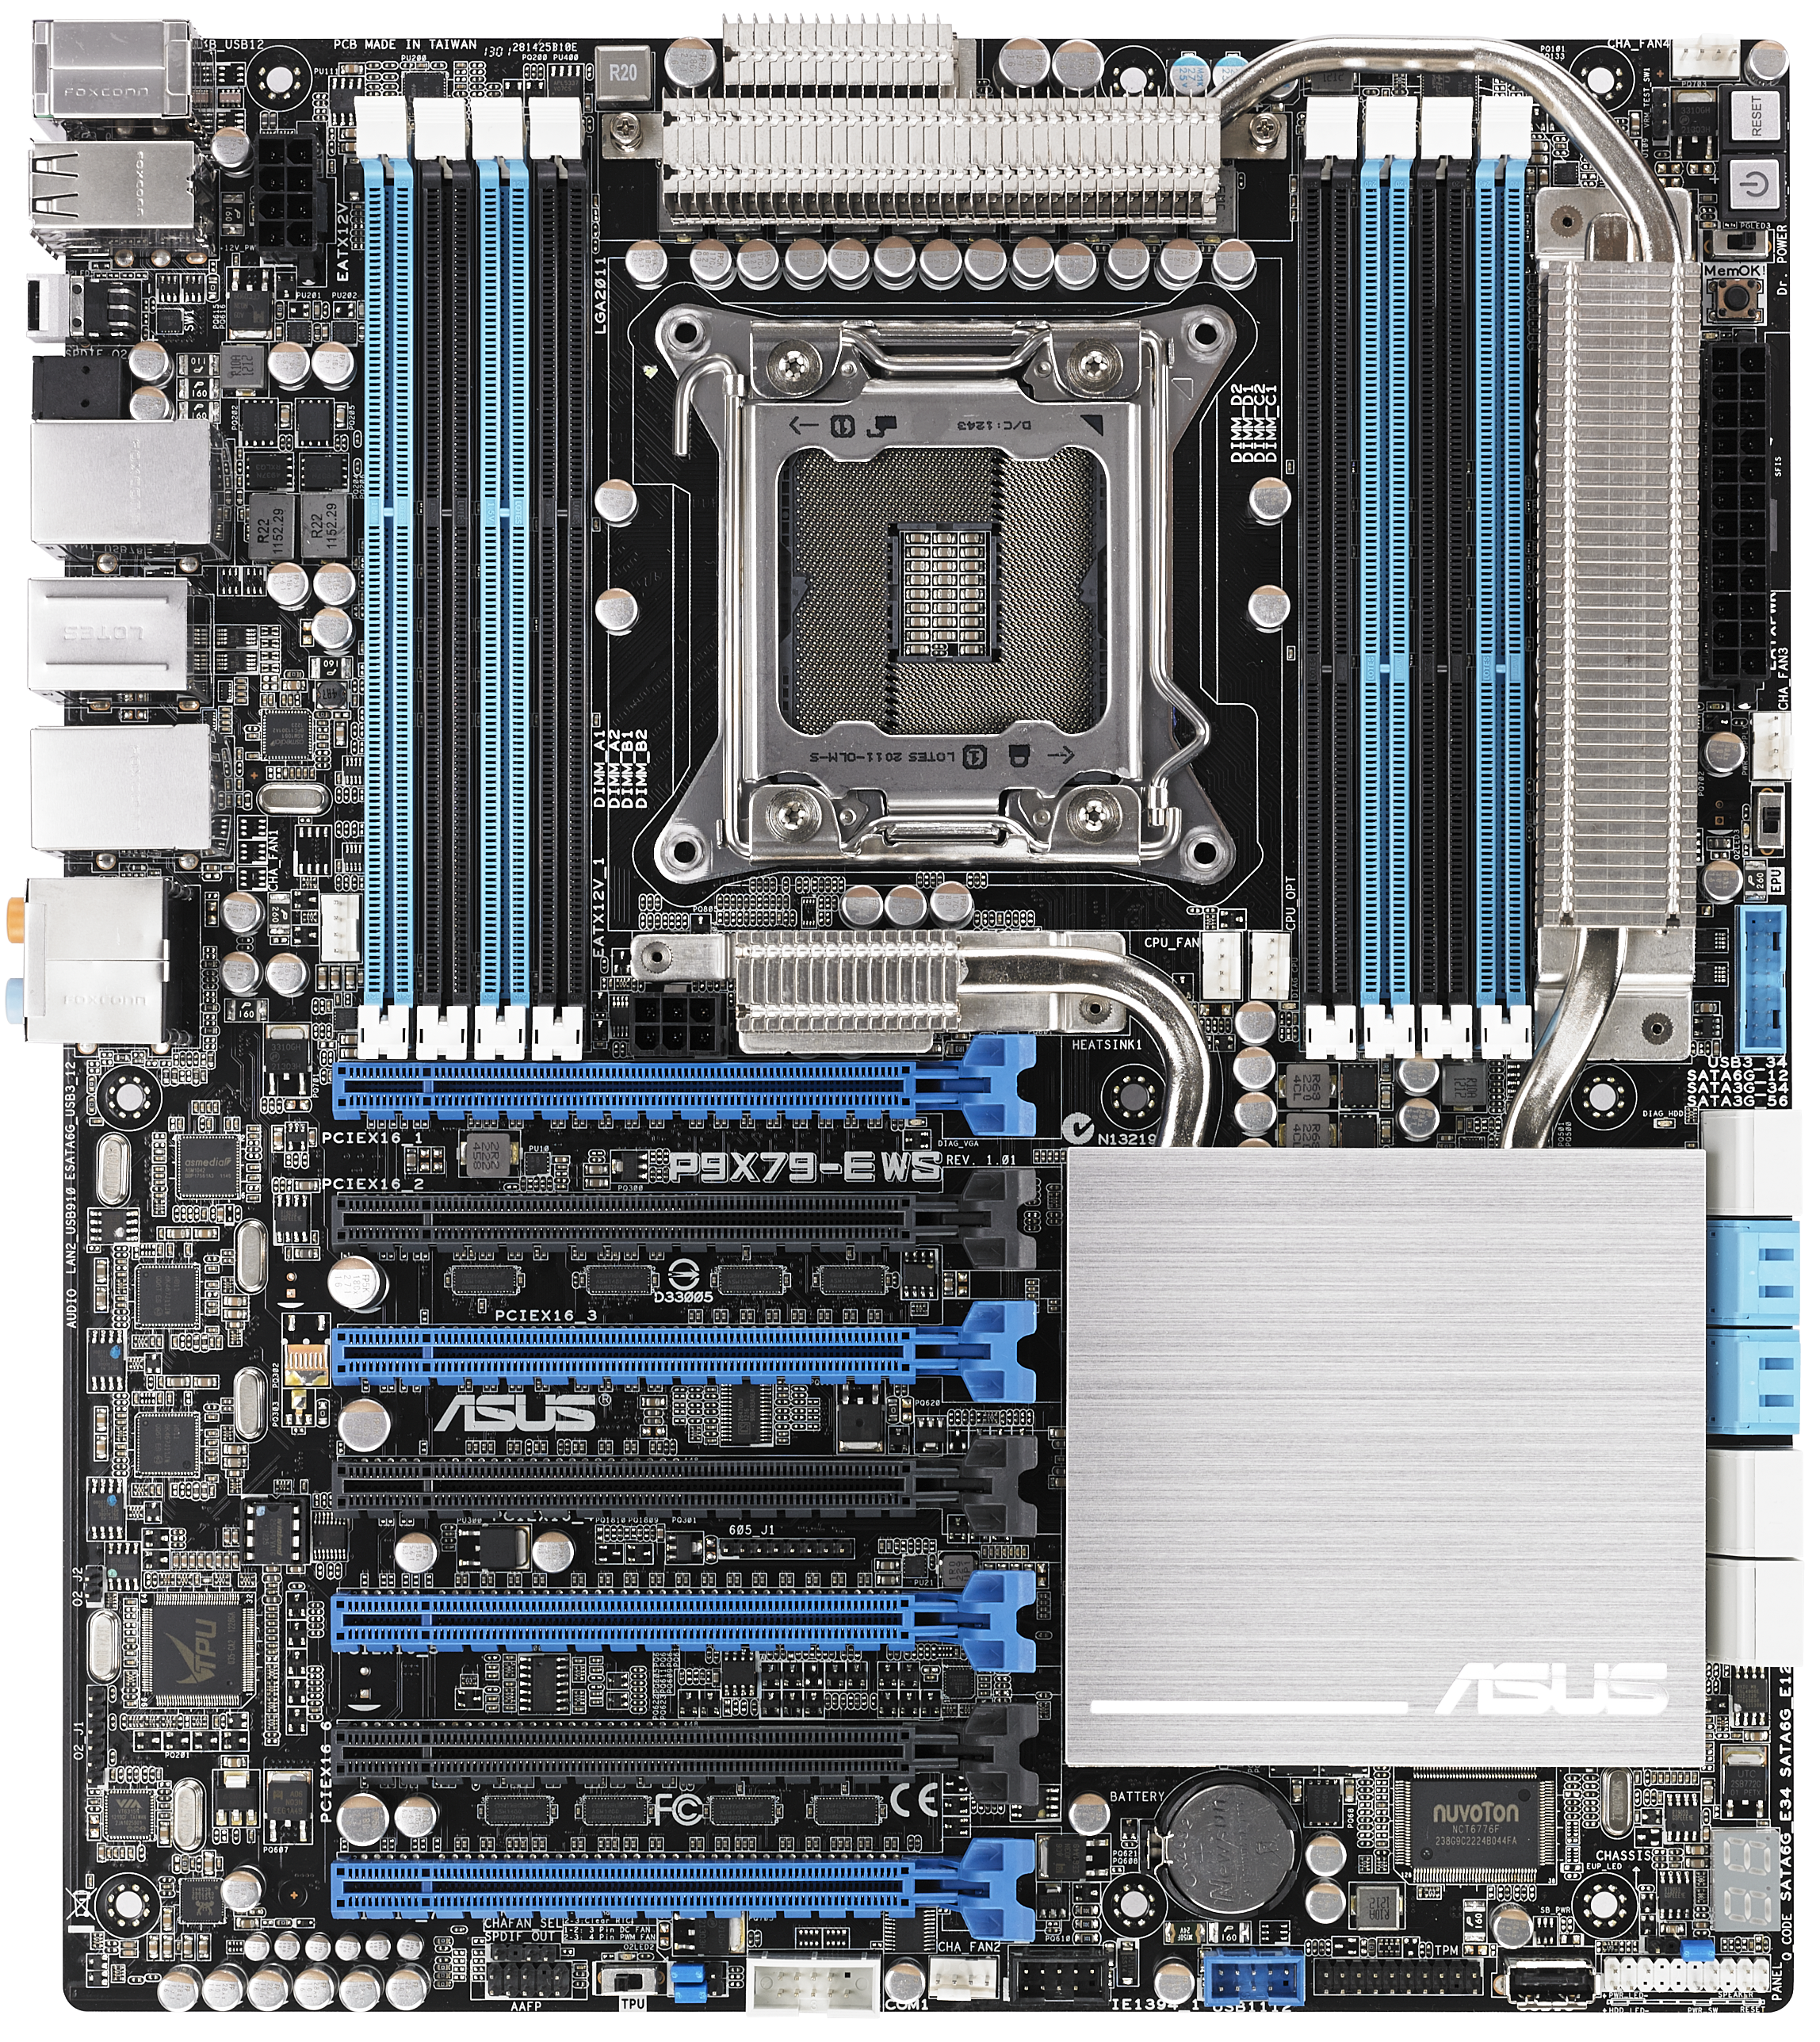
A full bodied X79 motherboard comes equipped with eight DRAM slots, and ASUS have taken single side latches again so as not to encroach onto any PCIe devices in the first slot. This means users should make sure that all DRAM is firmly inserted. The power delivery, again like on the RIVBE, is above the socket, although this time ASUS has an extended heatsink arrangement around the side of the motherboard and onto a very large chipset heatsink. As mentioned in the overview, this is due to the sizable number of controllers (at least four, plus a chipset) requiring heat removal, as well as the VRMs which need to handle an Intel 150W Xeon processor (the E5-2687W v2, the high frequency 8-core option) if a user specifies a high end build.
There are six 4-pin fan headers on board in total, five of which within easy reach of the socket: two 4-pin CPU fan headers to the bottom right of the socket area, a 4-pin to the left of the DRAM slots, a 4-pin at the top right of the motherboard next to the power/reset buttons and a fifth 4-pin just underneath the 24-pin ATX power connector. The final 4-pin header is on the bottom of the board, and all can be controlled via the BIOS and OS.
Due to the non-focus of overclocking a Xeon based system, only a single 8-pin CPU 12V EPS power connector is provided. This should provide 150W for any CPU over and above anything the 24-pin ATX power connector can provide – there is no need for an 8+4 or two 8-pins here. There is a 6-pin PCIe power connector below the socket, although this is for the VGA slots. That connector in itself is in a slightly awkward position (between the DRAM, PLX heatsink and the PCIe slots), and is the only one for the PCIe slots which could create power issues (more on that later).
Moving clockwise around the motherboard, the top right contains the common power and reset buttons (a must for almost any system I find, especially the more expensive models), a ‘Dr. Power’ switch which enables the PSU monitoring circuits, a Mem OK button (for recovering a bad memory overclock) and the 24-pin ATX power connector. Due to the heatsink in this area of the motherboard, it does look quite cramped up against the edge of what is already an E-ATX (or technically, CEB) sized motherboard. Further on is one of the fan headers, an EPU switch (for power saving modes) and a USB 3.0 header, powered by an ASMedia USB 3.0 controller.
The P9X79-E WS features 10 SATA ports in total: the six from the PCH (two SATA 6 Gbps, four SATA 3 Gbps) and four SATA 6 Gbps from a Marvell PCIe 9230 controller. Although the Marvell is used in order to enable SSD caching via software, one of the reasons X79 needs an update is this: Intel needed to push for more SATA 6 Gbps ports so we can move away from controllers altogether. Technically X79 has the silicon workings for six SAS/SATA ports, but requested that manufacturers did not use them (the X79R-AX we reviewed decided to) unless they employed the enterprise C6xx versions of the chipset which were validated (like the X79S-UP5). The only difference between the X79 and C606 chipsets, as far as I can tell, is cost and the SAS connectivity, and thus ASUS went for the X79 chipset here either because they did not want SAS or to reduce cost.
Along the bottom of the motherboard, from right to left, we have a two-digit debug LED, the front panel headers, an internal USB 2.0 port (useful for servers that require license dongles), a TPM header, two USB 2.0 headers, a fan header, a COM port header (often advised in WS builds in case a user requires one), a TPU switch (for one option CPU overclocking) and a front panel audio connector. What surprised me about the specification list for the P9X79-E WS is that for this front panel audio, ASUS went for the Realtek ALC1150 codec rather than a cheaper option. The ALC1150 is rated for superior SNR in one of the outputs, but less in the others, and unlike the SupremeFX variants on the consumer ROG motherboards, there is no PCB separation or headphone amplifiers here. We still managed 105 dB in our audio test however.
So while the PCIe layout is a full array of PCIe 2.0/3.0 x16 slots, the way that it is all wired up via PLX switches to the CPU is actually rather interesting (from my point of view). A socket 2011 CPU offers 40 PCIe lanes direct, and ASUS are transcribing a total of 72 lanes via the specification list of x16/x8/x8/x8/x16/x8/x8 when all the slots are populated. This requires a PCIe switch, such as a PLX chip, to be used. The most common one in use is the PLX PEX 8747, which takes x8 or x16 lanes from the CPU to provide 32 lanes as output. We covered the workings of the PLX chip in a previous review. However, 40 – 8 + 32 = 64, or 40 – 16 + 32 = 56, and thus there either ASUS are using two PLX 8747 chips (40 – 16 + 32 – 16 + 32 = 72) or using a different PLX chip, such as the 8780 which takes 16 lanes and creates 48 (40 – 16 + 48 = 72), like we saw on the Galaxy Z87 HOF at Computex. To put this into perspective, manufacturers like ASUS use PLX 8747 switches enough to get a nice discount (~$20 each), whereas PLX 8480 are rare enough to add $100 to the price. In this situation, it is almost like SLI/CFX, whereby one PLX chip uses less power (and requires less engineering) than two. Thankfully ASUS provided a PCIe diagram layout to dispel any inaccurate hypotheses:
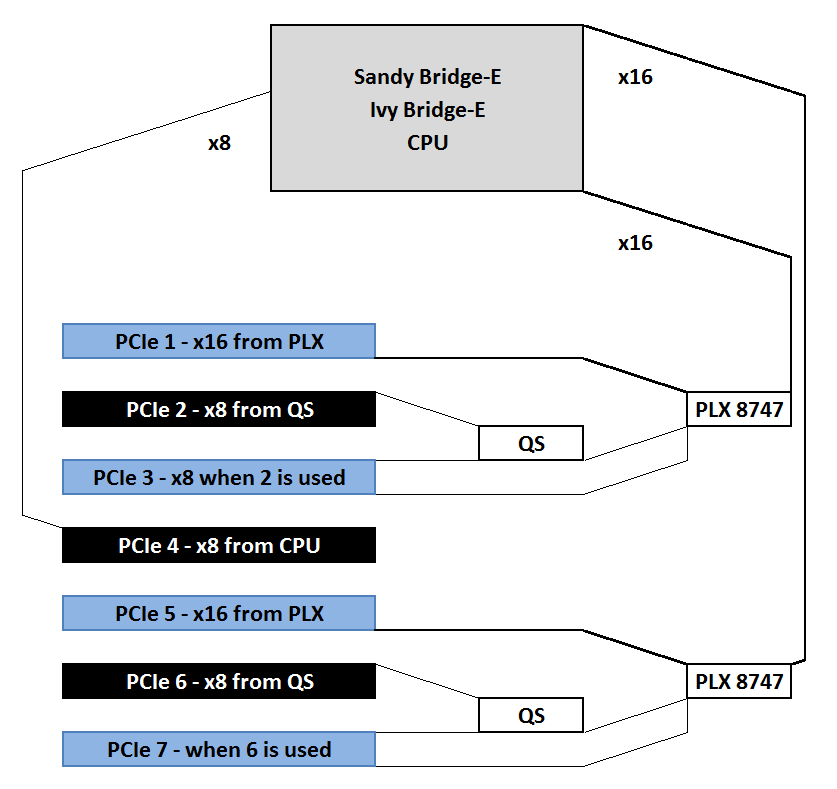
In this diagram the thick lines are where x16 lanes are directed, and the thin lanes are x8. So PCIe 3 has 8 lanes from the PLX and 8 lanes from the Quick Switch normally, but when PCIe 2 is populated, the Quick Switch will move the eight lanes over to PCIe 2.
So in order to get the best layout from your devices, start with the blue slots for a full x16/x16/x16/x16 bandwidth and rearrange as necessary. Beyond this, black slots should be used only when the situation is pertinent, and selecting the right black slots will keep PCIe bandwidth as high as it can be. In our gaming testing at least, older NF200 PCIe switches used to add a sizable difference in performance, but the PLX chips are ~1-2% at most / on a bad day in terms of non-PLX based performance.
One feature that ASUS might come into issues with is if a user decides to put graphics cards in every single GPU slot. Typically a graphics card will draw up to 75W through the PCIe slot and when 3+ GPUs are to be used the manufacturer will add an extra power cable to help supply the juice. With seven GPUs, this would be up to 525 watts, which the single 6-pin PCIe on board will not be able to cope with. The system would then draw more power through the 24-pin PCIe connector to compensate, which would cause issues (so a good thing that Dr. Power is there!). For a comparison, the EVGA SR-2 uses two extra 6-pin PCIe connectors to satisfy the similar PCIe layout it provides.
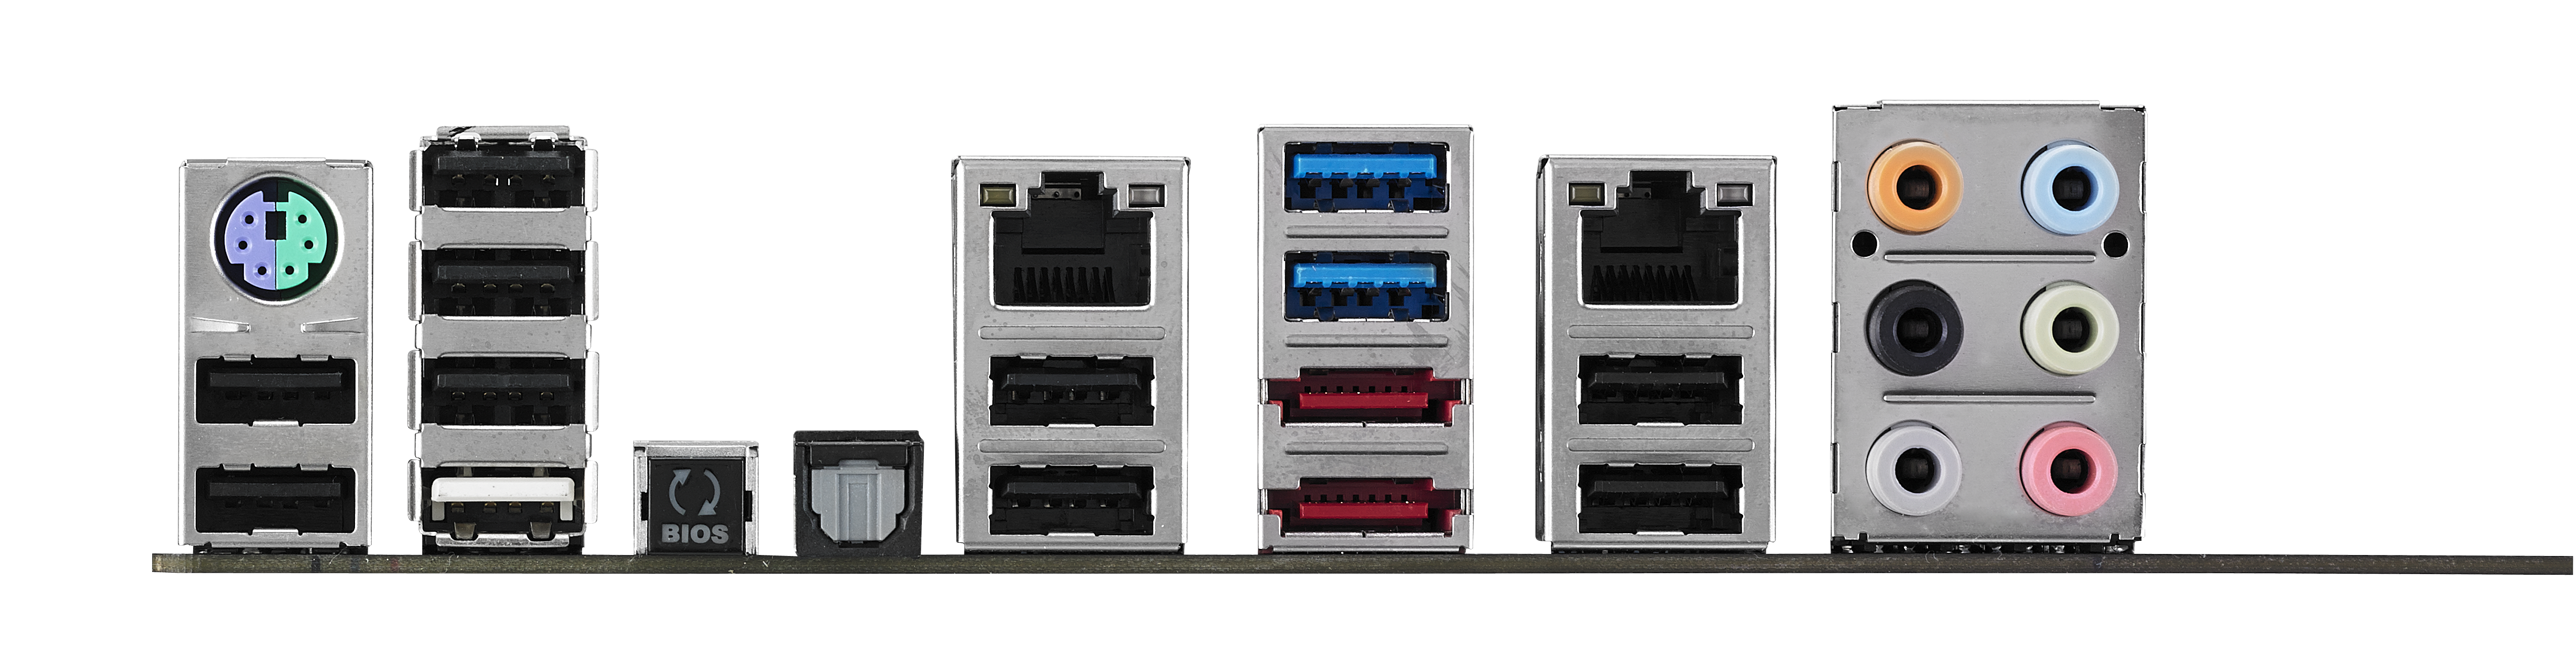
At some point, we will see top end motherboards in the performance segment of ASUS' lineup having Thunderbolt 2, but today is not that day. Due to X79’s positioning and the CPUs therein, something needs to be updated to provide this long-term addition. As it stands, our rear IO is thus standard enough for any WS product. From left to right there is a PS/2 combination port, ten USB 2.0 ports (one in white for USB BIOS Flashback), a USB BIOS Flashback button, SPDIF output, two USB 3.0 ports in blue, two eSATA ports in red (another controller), and two Intel I210 NICs and then the audio jacks. It is safe to assume that WS builders are within reach of Ethernet, and thus while WiFi would be a welcome addition, nothing is inherently lost by not having it. There are plenty of PCIe lanes to pick up a WiFi card if needed.
Board Features
| ASUS P9X79-E WS | |
| Price | Link |
| Size | SSI CEB (12" x 10") |
| CPU Interface | LGA-2011 |
| Chipset | Intel X79 |
| Memory Slots |
Eight DDR3 DIMM slots supporting up to 64 GB ECC and non-ECC supported Up to Quad Channel, 1333-2400 MHz |
| Video Outputs | None |
| Onboard LAN | 2 x Intel I210 |
| Onboard Audio | Realtek ALC 1150 |
| Expansion Slots |
7 x PCIe 3.0 x16 via 2x PLX 8747 - x16/-/x16/x8/x16/-/x16 or - x16/x8/x8/x8/x16/8/x8 |
| Onboard SATA/RAID |
2 x SATA 6 Gbps (X79), RAID 0, 1, 5, 10 4 x SATA 3 Gbps (X79), RAID 0, 1, 5, 10 4 x SATA 6 Gbps (Marvell PCIe 9230) 2 x eSATA 6 Gbps (ASMedia) |
| USB 3.0 / IEEE 1394 |
4 x USB 3.0 (ASMedia ASM1042) [1 header, 2 back panel] 12 x USB 2.0 (PCH) [10 back panel, 1 headers] 1 x Vertical USB 2.0 1 x IEEE 1394a Header (Via 6315N) |
| Onboard |
6 x SATA 6 Gbps 4 x SATA 3 Gbps 1 x USB 3.0 Header 1 x USB 2.0 Headers 6 x Fan Headers 1 x Vertical USB 2.0 1 x TPM Header TPU/EPU Switches Clear_CMOS Jumper MemOK! Button Dr. Power Switch Power/Reset Buttons Two Digit Debug |
| Power Connectors |
1 x 24-pin ATX Power Connector 1 x 8-pin CPU Power Connector 1 x 6-pin PCIe Power Connector |
| Fan Headers |
2 x CPU (4-pin) 4 x CHA (4-pin) |
| IO Panel |
10 x USB 2.0 1 x USB 3.0 2 x eSATA 6 Gbps 1 x PS/2 Combination Port 2 x Intel I210 NIC 1 x USB BIOS Flashback Button Audio Jacks |
| Warranty Period | 3 Years, APS in North America |
| Product Page | Link |
Big motherboard means big feature set – 12 SATA ports in total including the four extra SATA 6 Gbps and two eSATA provided by controllers, and PCIe devices are well fed and positioned due to the all-out slot configuration.
The Realtek ALC1150 is a little odd given its status in many of the high end audio solutions in the mainstream consumer range, although its presence is not unwelcome. The vertical USB 2.0 port on board might be strange for some – this is typically a server feature whereby expensive software that requires USB dongle licenses can place the license onto the machine without having to worry about anyone stealing it / it knocking off, as well as keeping it cool in the case if needs be.
Dr. Power is a feature we have not come across before at AnandTech, but it is a hardware and software implementation to monitor abnormal power supply readings via the 24-pin ATX power connector and others. With the installed driver and software, the OS will report if the power supply is near abnormal in some of its ranges.
Although not required by any stretch, absent from the motherboard is a management tool to allow users to configure the system over a network without the system being powered on. We typically see this on server level motherboards (such as the ones we have reviewed previously) in combination with an ASpeed 23xx 2D video chip. One could argue that as this is a workstation product rather than a server product, there is no need, but it would be interesting to see the crossover.
ASUS P9X79-E WS BIOS
The BIOS for workstation motherboards, at least from the ones we have tested, are not different from the main channel line of motherboards. This is mainly due to the motherboard unit at ASUS that produces the workstation is also the same unit that deals with the consumer lines. As a result, we get a near identical BIOS to the recent Z87 line of motherboards (updated with Last Modified, My Favorites, Quick Note etc), with one or two options aimed specifically at the WS. As one might imagine, there is fewer automatic overclock options provided due to the nature of the market being aimed at (as well as the fact that Xeons are multiplier and CPU strap locked), but our analysis is essentially the same as our other reviews on this BIOS generation.
Since the inception of graphical interfaces for consumer motherboard BIOSes, motherboard manufacturers have been keen to give the user as much functionality as they need without going overboard with garish visuals, as well as catering for users who are new to the BIOS. The Z77 platform BIOS from ASUS was well received, giving users a large number of options for configuration in a textual format – the implementation that debuted with Z87 and is on the P9X79-E WS is another iteration along similar lines with a few new interesting points.
Firstly when we enter the BIOS, we get our ‘EZ Mode’ (‘easy’, rather than ee-zed) similar to the last generation but with a few minor updates. Firstly the font is changed to a pixelated form of common fixed-length word processing fonts:
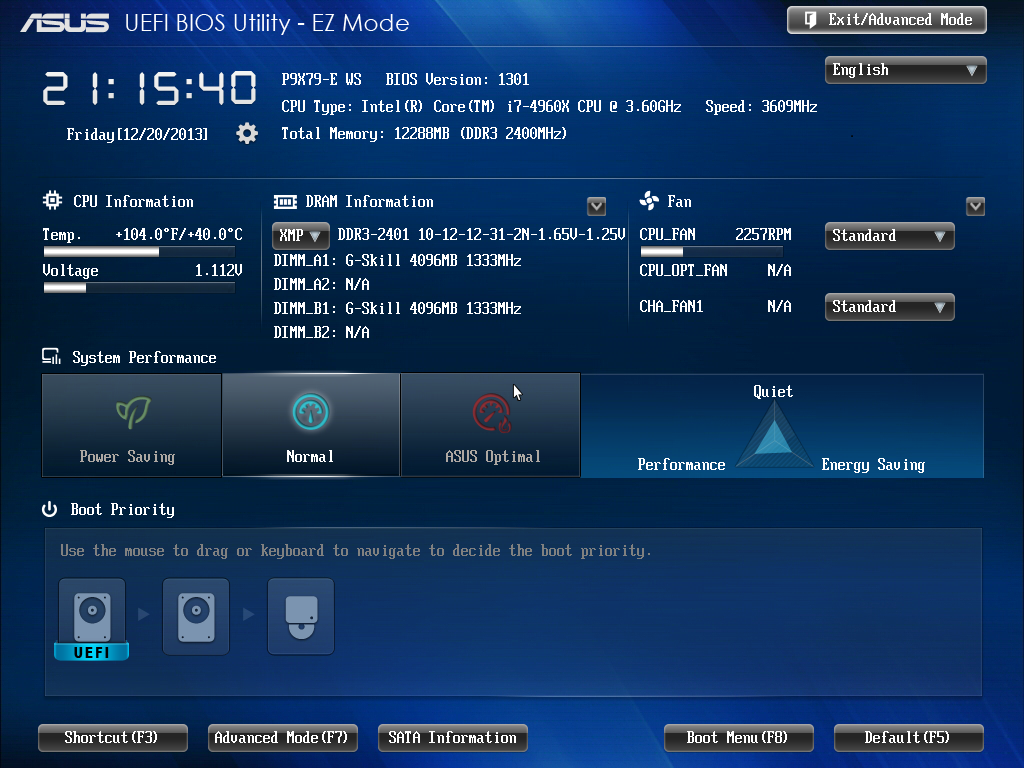
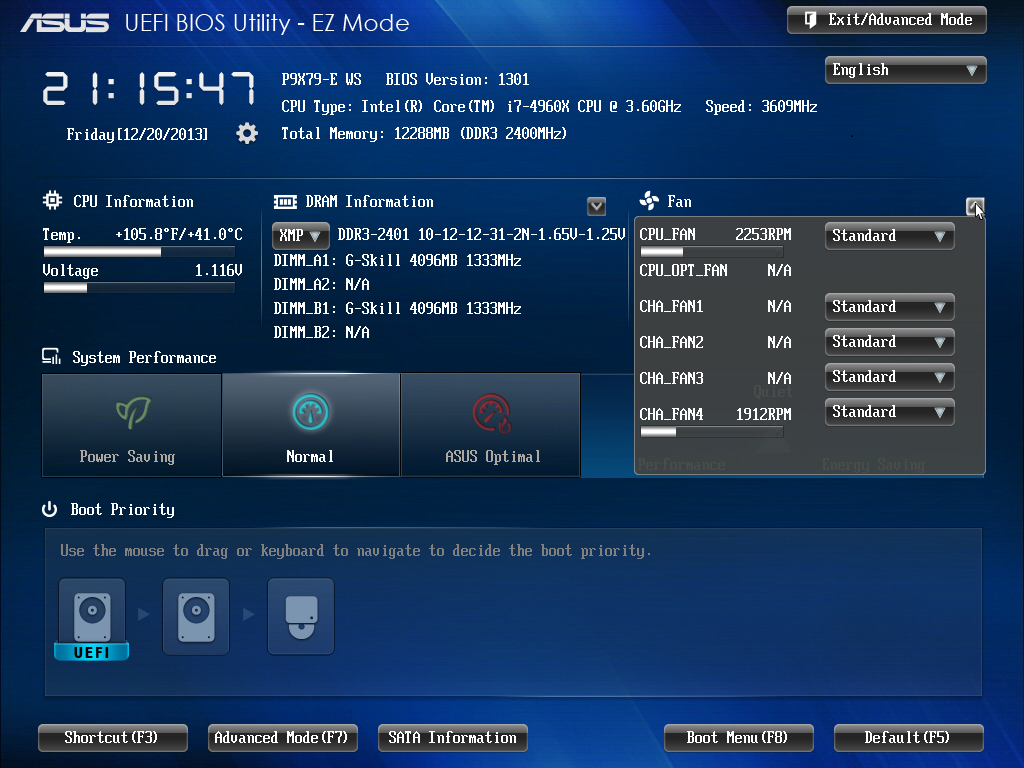
On this front screen we get detail on the motherboard in use, the BIOS version, the CPU installed, the speed of the CPU, the total memory installed, the CPU information (temperature/voltage), the DIMM slot recognition and fan speeds. An addition to this screen is that we can apply XMP without going into Advanced mode with a small drop down in the DRAM Information section. The fans too can be adjusted with their own drop downs:
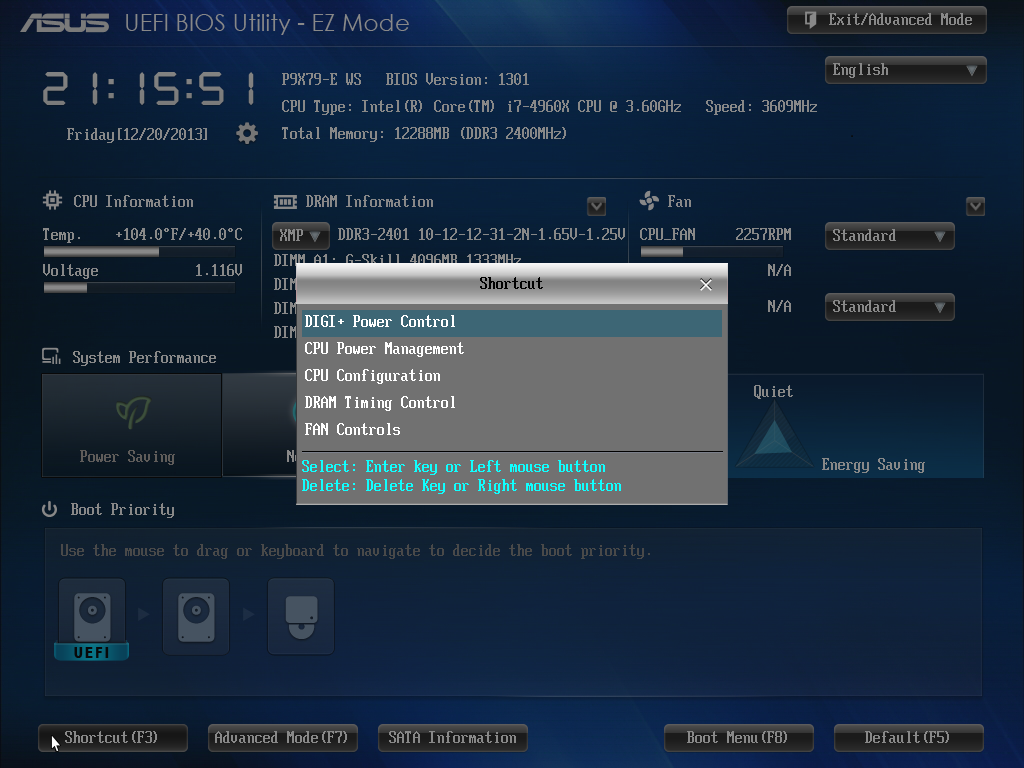
For users that want to access Advanced Mode but a specific menu, the Shortcut (F3) option at the bottom defaults to the following:
When entering the BIOS Advanced Mode, we get put into the Main tab to begin with:
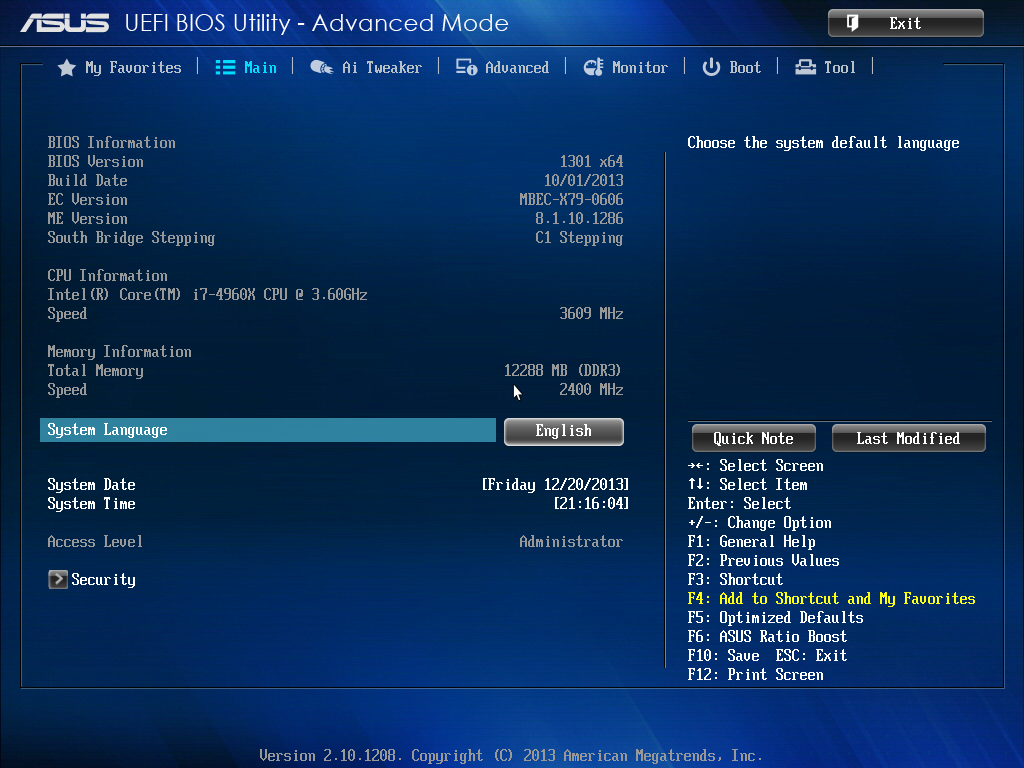
Several options are new to the BIOS that are worth pointing out. On the right hand side we have two new options – Quick Note and Last Modified. By choosing Quick Note, a user can leave notes in a notepad type window for future reference. Last Modified does what it says on the tin – it tells the user what options have been changed in the BIOS since the system was booted.
Another feature shown on the Main screen is on the right hand side and in yellow, labeled ‘F4: Add to Shortcut and My Favorites’. This is pointing to the tab on the top left of the BIOS, called ‘My Favorites’.
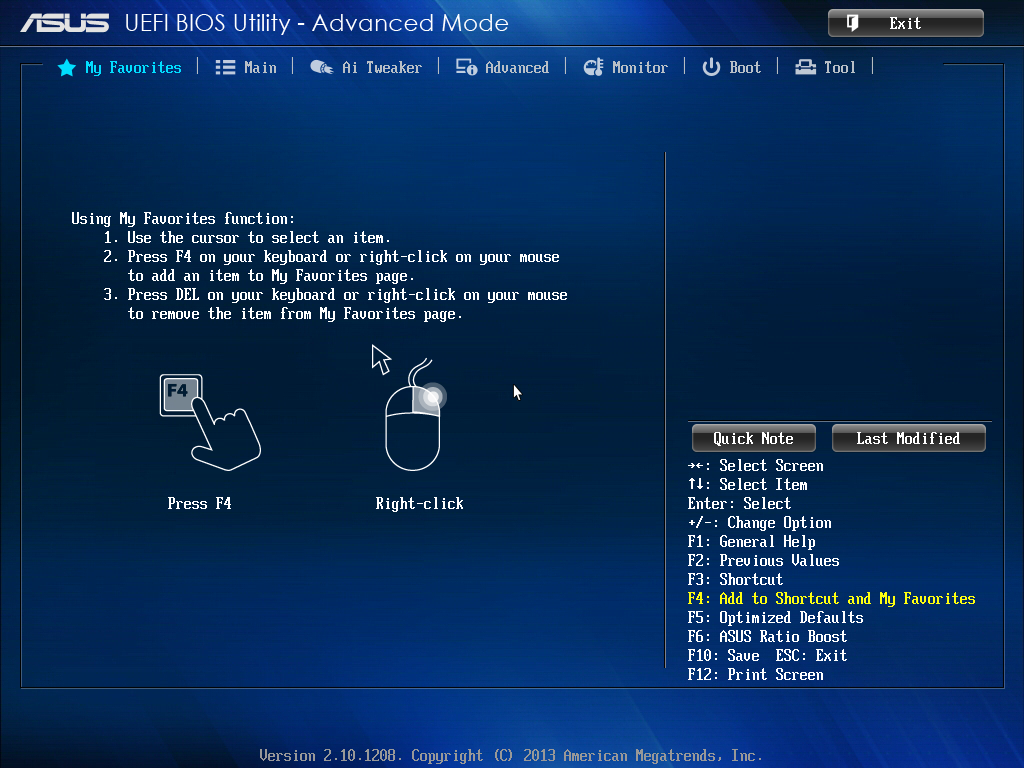
My Favorites allows users to select any option in the BIOS they want and place it in this menu. This is of invaluable help to overclockers who use the BIOS frequently – it allows these users to place the options they used most frequently (CPU Ratio, CPU Voltage, Memory sub-timings) into a single menu rather than shuffle around several menus at once. It solves the issue of ‘what is the right way to show your options’, as almost all the different motherboard manufacturers have their own way. Also in terms of customization, users can place their own overall tabbed menu options into the shortcut menu.
The main series of options are all found in AI Tweaker, the home for overclocking options.
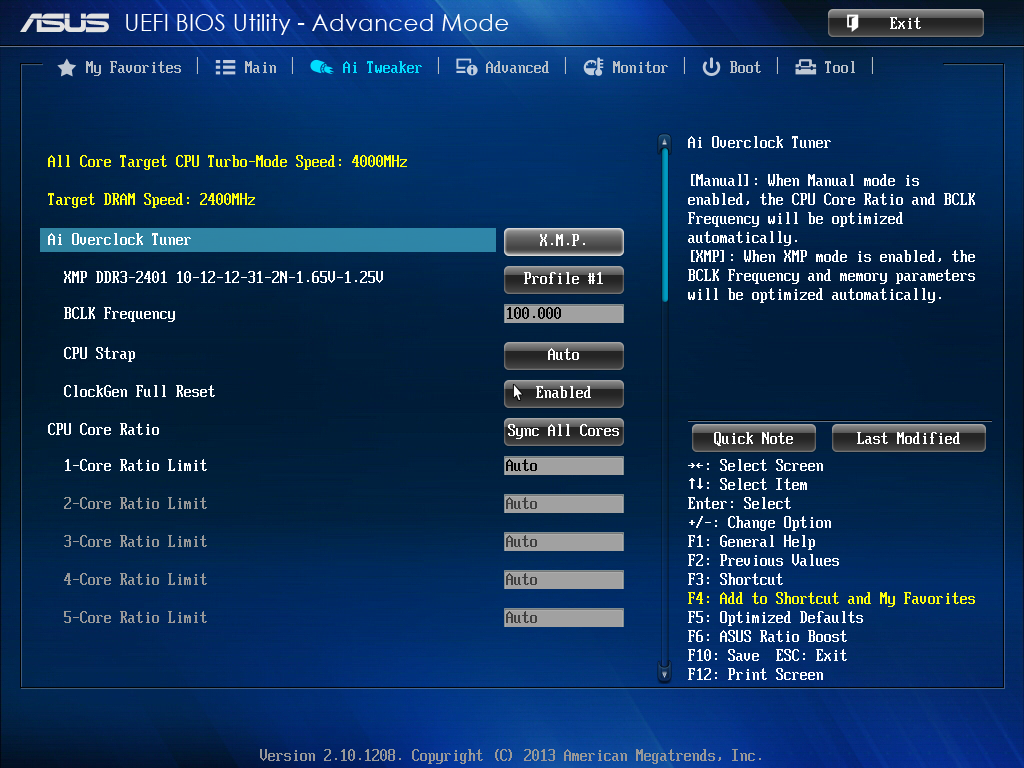
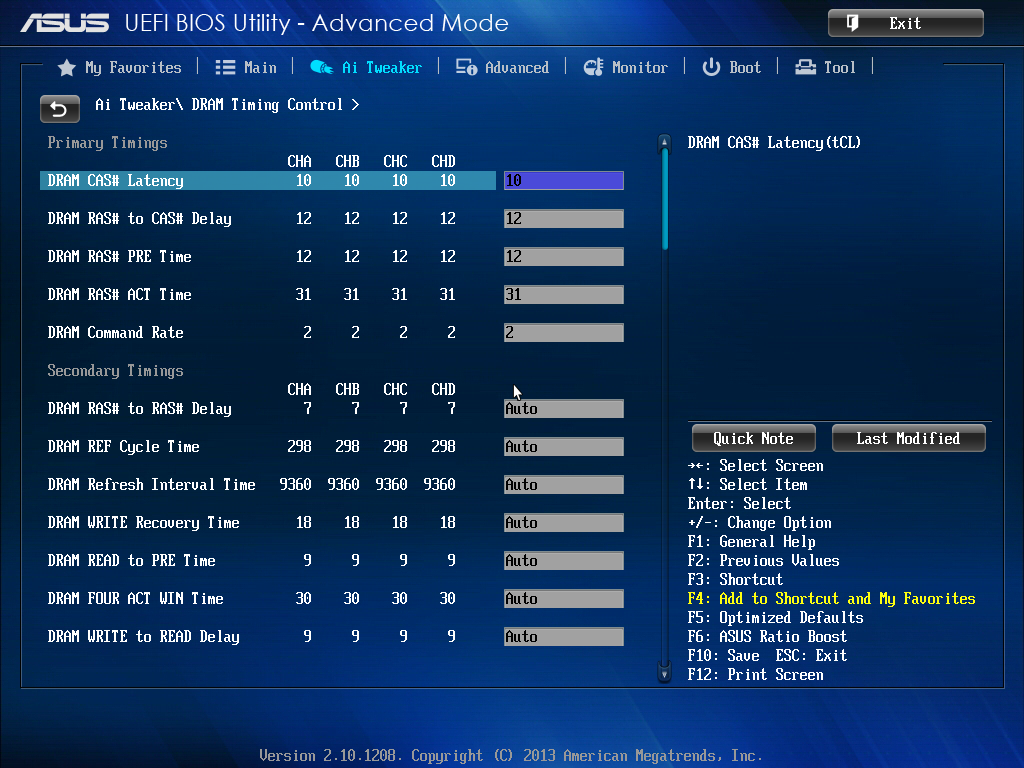
One of the many positives about the ASUS BIOS is the information provided with options in the top right corner. For most of the options it provides an explanation of what the option does - if it comes with Auto/Manual selections these are described as well. As for AI Tweaker itself, our options are split into CPU+DRAM, voltages and more voltages. Advanced options for DRAM subtimings and power control are in sub menus off this main list:
Unfortunately we do not get the GPU options similar to Z77 ROG boards which show which GPUs are in the motherboard at POST. This is a little unfortunate to be overlooked for a WS motherboard.
In the Advanced menu are the controller options and additional CPU/power state adjustment options.
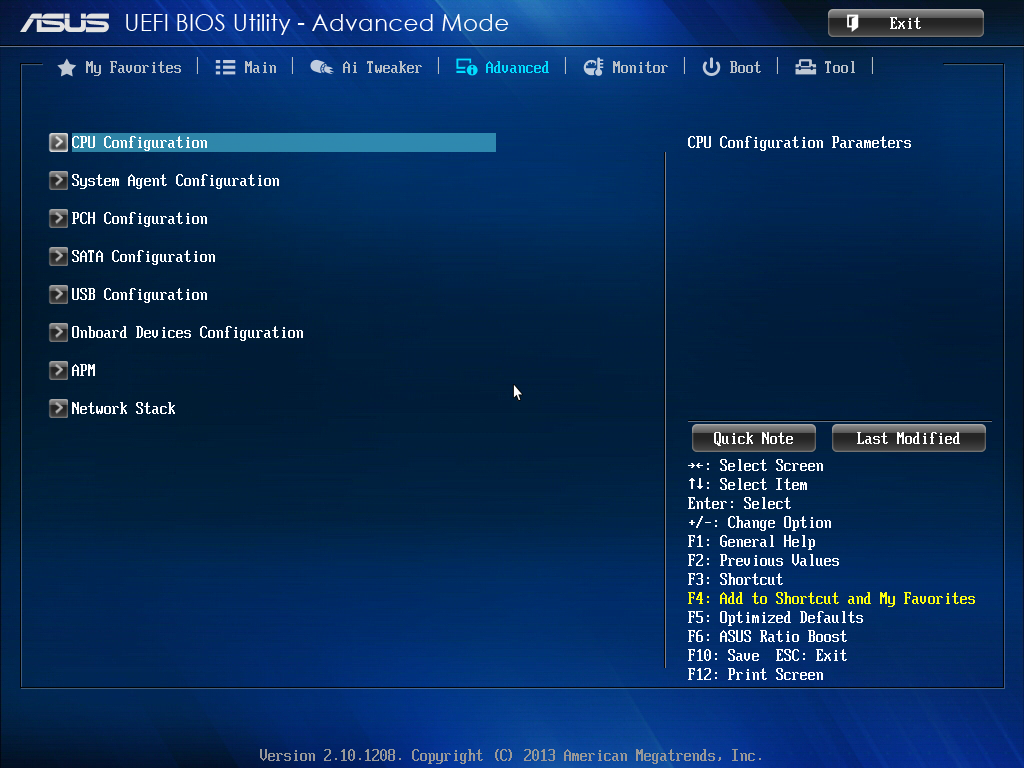
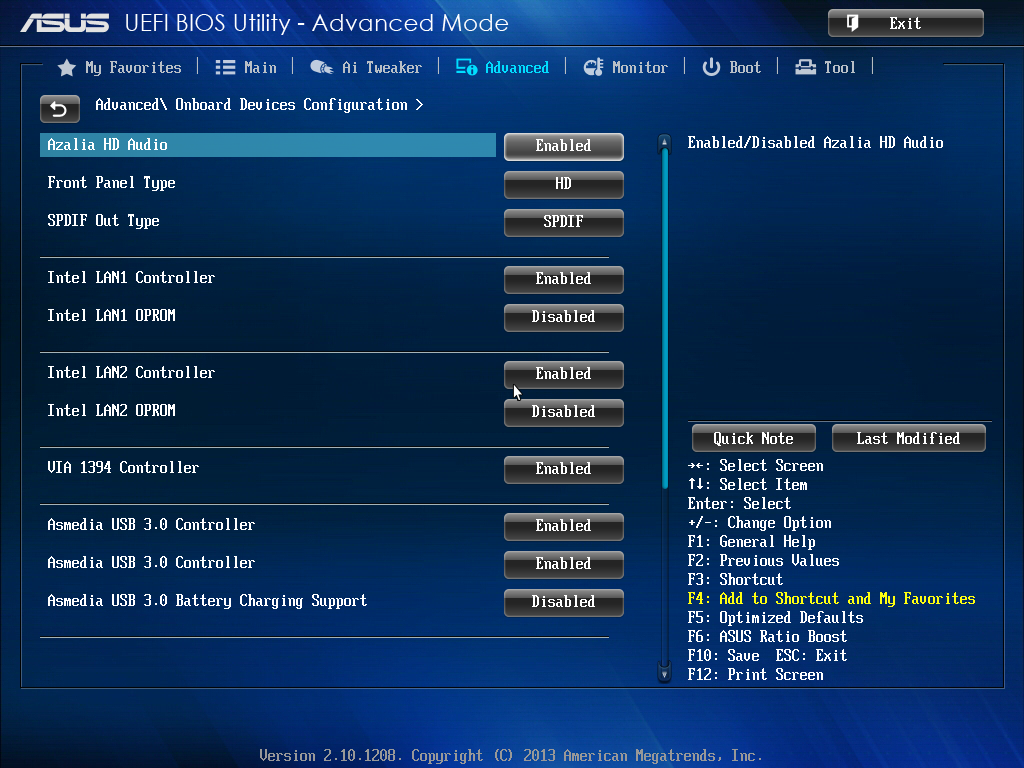
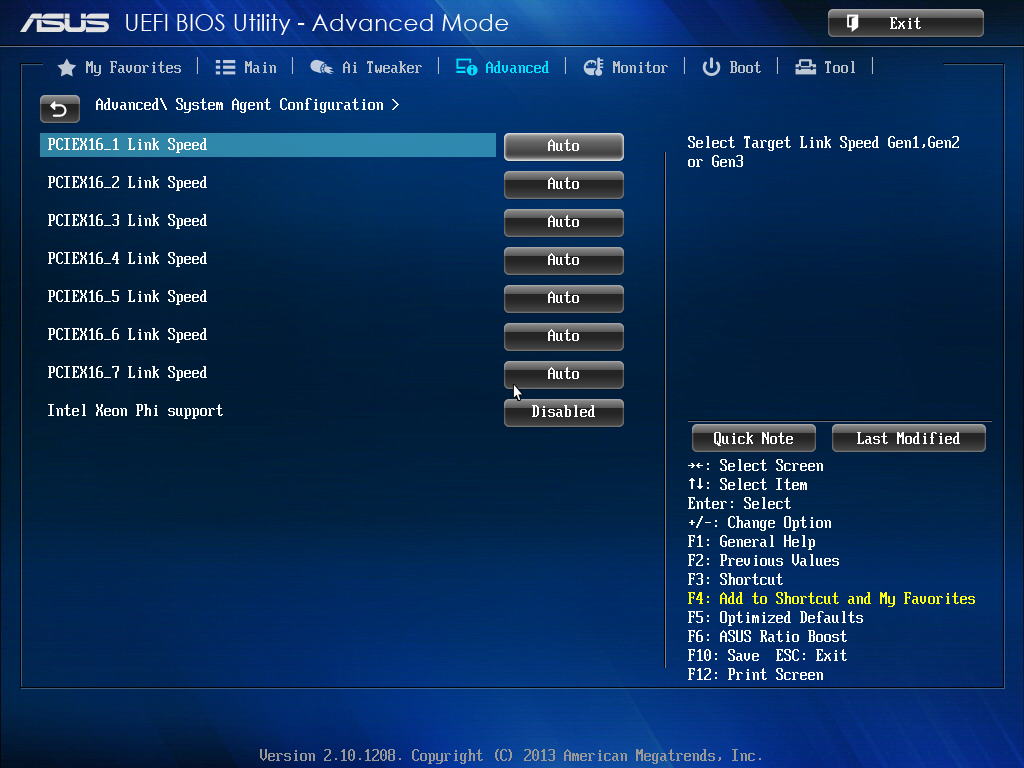
In the Onboard Devices options above show the available controller options, and for Xeon Phi users the option in System Agent has to be enabled:
BIOS fan controls are found under the Monitor tab menu:
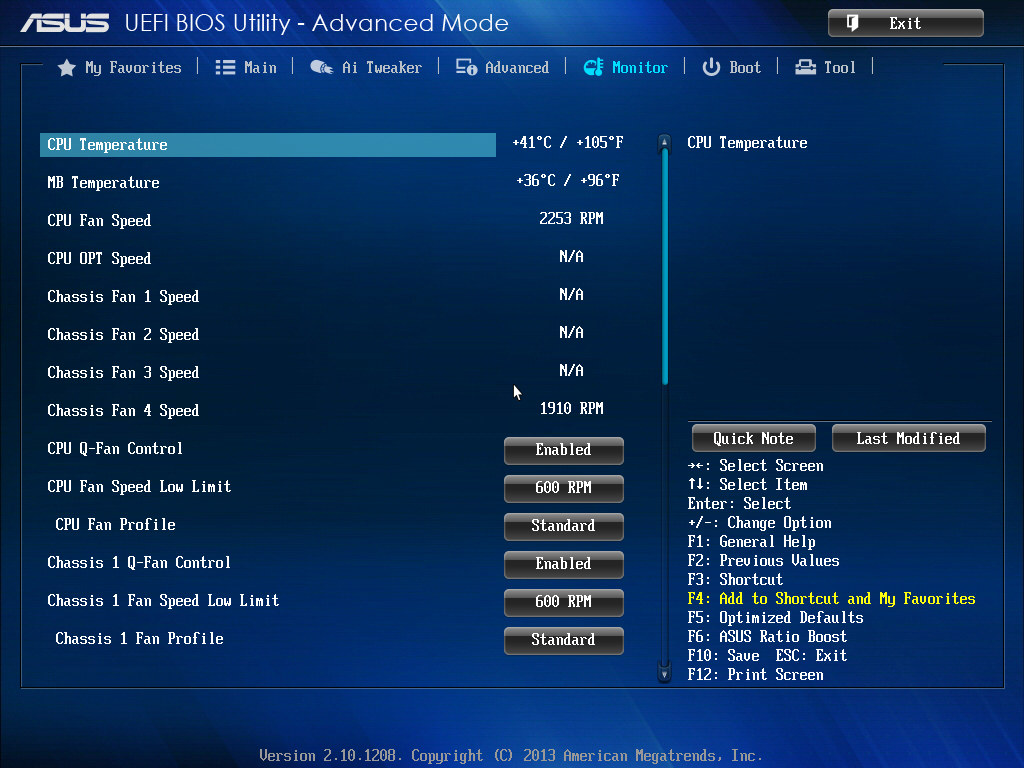
Ideally users will head to the OS for more extensive fan controls, but ASUS offers the basics here – an RPM lower-bound limit with silent/standard/turbo fan profiles.
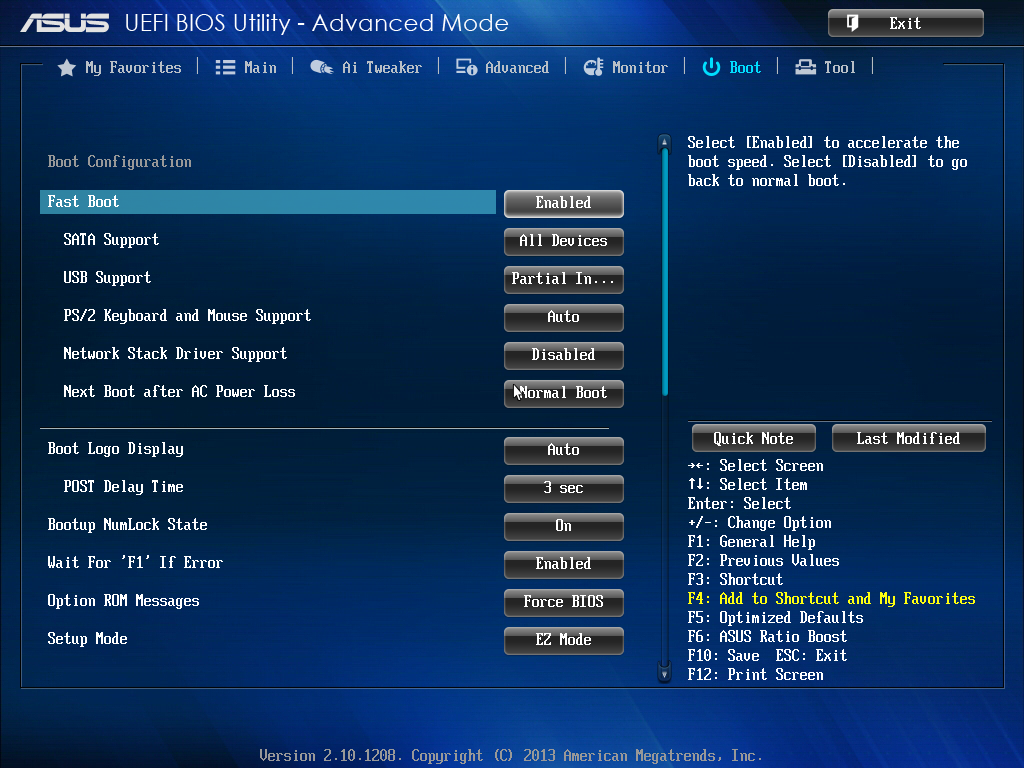
Elsewhere in the BIOS we have boot options for fast booting, boot order, boot override, and also utilities such as EZ Flash and ASUS’ OC Profiling.


ASUS P9X79-E WS Software
One of the old habits of X79 launch for ASUS is AI Suite II. While on Z87 and the Rampage IV Black Edition (a new build) the system is designed to use AI Suite III, for the P9X79-E WS we get AI Suite II, which still has much of the functionality except the slicker interface and DIP4 overclocking options. Instead we go back to a TPU/EPU arrangement in the options.
AI Suite

AI Suite starts as a simple bar with buttons for the software tools, monitoring and updates, as well as a tuning button to allow the software to perform overclocking. As part of our reviews of the P8Z77-V Pro and the P8Z77-V Deluxe, we have covered most of this software, including:
TurboV Evo: Overclocking tools.
DIGI+ Power Control: Adjusting power delivery to the system.
EPU: Energy saving functionality.
Fax Xpert: Fan control and management.
Probe II: Monitoring temperatures, voltages and fan speeds.
Sensor Recorder: Time comparison charts for Probe II.
AI Charger+: Fast USB 3.0 charging for BC 1.1 compliant devices.
USB 3.0 Boost: Increased USB 3.0 speed.
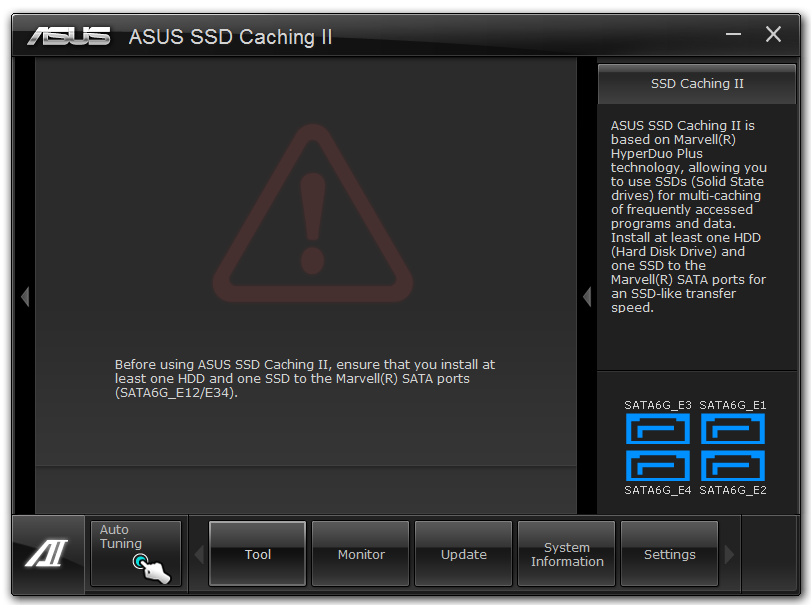
ASUS SSD Caching II: SSD Caching using ASUS technology and Marvell controllers.
Here are the key features:
TurboV Evo
The overclocking heart of AI Suite is TurboV Evo, which allows users to adjust the voltages and BCLK of the system in real time. I typically use this software to find basic OS limits, and then attempt to boot into OS at that speed to give a little headroom.
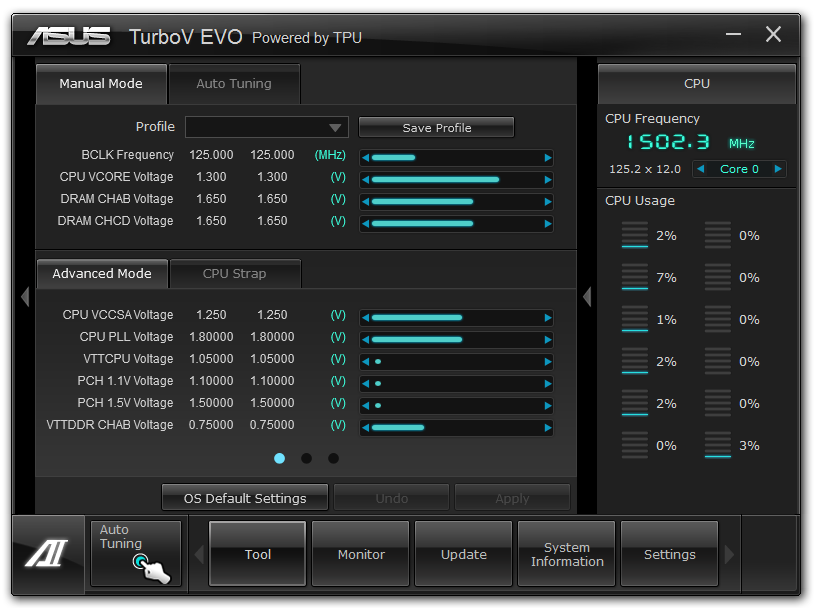
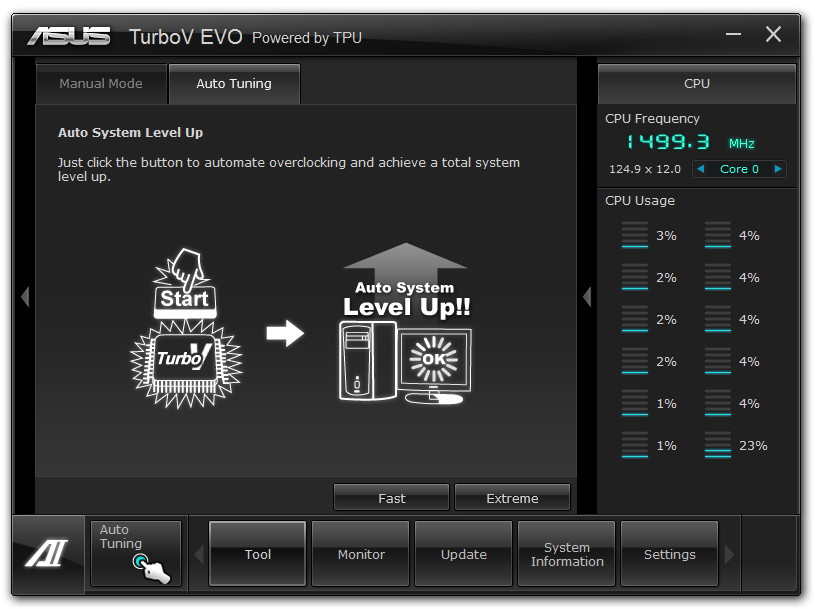
Part of TurboV Evo is the Auto Tuning section, which gives users two choices for automatic overclocks - Fast and Extreme. Both of these are covered in the Overclocking part of this review.
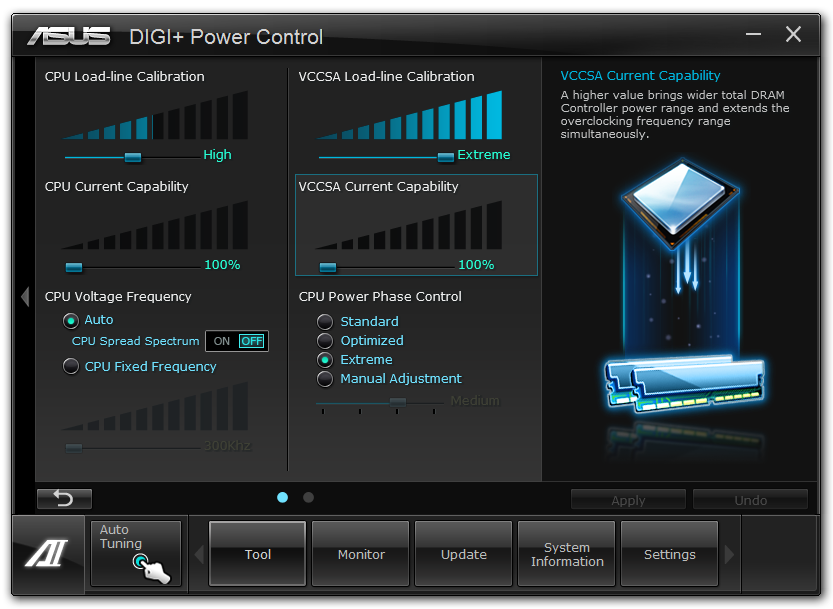
DIGI+ Power Control
One of the features that ASUS likes to advertise as part of their motherboard range is the ability for the user to adjust how the power delivery responds to load. These options help maintain constant voltage under busy periods (useful for stability testing and overclocks), or can be used to reduce the power usage of the motherboard and increase life expectancy. Along with the BIOS controls, ASUS also offers software tools in AI Suite to perform these operations.
Fan XPert
In order to separate itself from the rest of the motherboard manufacturers, ASUS does like to parade their fan technology. By using upgraded fan controllers on board, a combination of hardware and clever software allows ASUS to control their fans like no other. From the software perspective, we have Fan Xpert.
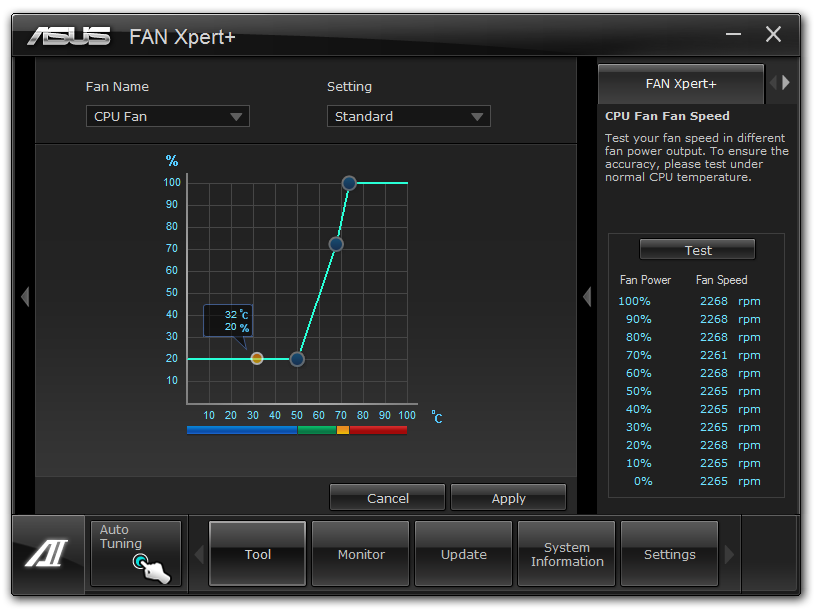
Fan Xpert will auto tune the fans, giving each one a power vs. RPM curve (as fans do not linearly increase in speed with applied power). The user can then adjust a multi-point power against temperature curve for each of the fans in the system. In my case, I like to have my fans run as quiet as possible when idle and during videos, and as fast as they can during gaming.
SSD Caching
For users that want to use a small SSD as a cache to a larger hard drive, ASUS use Marvell controllers on the P9X79-E WS to allow the system to use SSD Caching. This was all the rage when prices for SSDs were $2+ per GB, but now we are down to less than a quarter that in some cases, which suggests that SSD Caching might have had its time. It is still part of the X79 system however.
Marvell Storage Utility
While not from ASUS, the motherboard does come with the software in order to manage the Marvell SATA ports in terms of arrays. The controller is capable of RAID 0, 1 and 10 (unfortunately not RAID 5), and the web-based interface is similar to other Marvell systems we have reviewed before.


Any highly priced motherboard should come with almost everything supplied in the box, and ones labeled ‘Workstation’ I should imagine have everything that a prosumer might need. This includes GPU bridges, SATA cables and anything else a user might need (Molex to SATA, 12V extension cables?). In the P9X79-E WS box we get the following:
Driver CD
User Guide
Rear IO Panel
10 SATA Cables
Flexi SLI Bridge
Rigid 3-way SLI Bridge
Rigid 4-way SLI Bridge
COM Rear Bracket
USB and IEEE1394 Rear Bracket
Molex to 2x SATA power cable
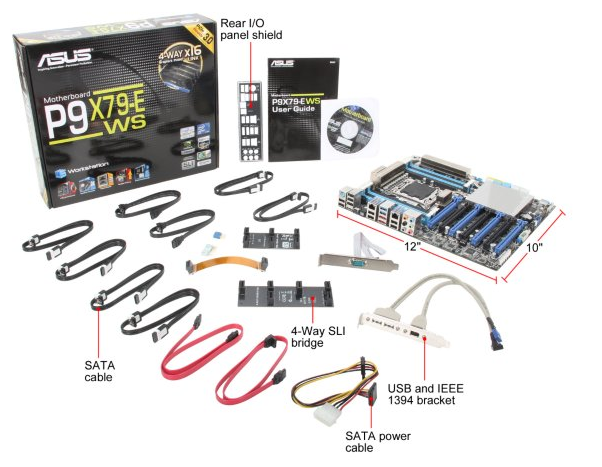
Well, I was right about the full complement of SATA cables, even additional power cables, SLI bridges and it is good to see the rear brackets for the less commonly used ports on board, which may be an important facet of a prosumer build.
ASUS P9X79-E WS Overclocking
Experience with ASUS P9X79-E WS
The P9X79-E WS is a workstation board, and often any overclocking features are a secondary thought – given that the purpose of such a product is the prosumer Xeon market, the fact that it supports the regular consumer level CPUs is more a bonus than anything else. But rather than use a server chipset and work down, ASUS have used the consumer chipset and worked up to include Xeons over the consumer level. As we are using a consumer CPU for this test, all the overclocking options were available, albeit limited.
For automatic overclocks, the AI Suite software offers Fast and Extreme modes, whereby the Fast mode is mirrored in the OC Tuner option in the BIOS and by the switch on the motherboard. The fast mode implements a set overclock whereas the extreme mode uses the preset as a starting point to probe the system for faster speeds. Unfortunately due to our lackluster CPU sample, both these settings returned almost the same result.
For manual overclocking, all the options that most regular overclockers are familiar with are here, and compared to the Rampage IV Extreme we actually had some success in beating BIOS set voltages to hit certain frequencies. Nonetheless, the big extended heatsink on the motherboard does play a part and we saw 90C at the limit of our CPU.
Methodology:
Our standard overclocking methodology is as follows. We select the automatic overclock options and test for stability with PovRay and OCCT to simulate high-end workloads. These stability tests aim to catch any immediate causes for memory or CPU errors.
For manual overclocks, based on the information gathered from previous testing, starts off at a nominal voltage and CPU multiplier, and the multiplier is increased until the stability tests are failed. The CPU voltage is increased gradually until the stability tests are passed, and the process repeated until the motherboard reduces the multiplier automatically (due to safety protocol) or the CPU temperature reaches a stupidly high level (100ºC+). Our test bed is not in a case, which should push overclocks higher with fresher (cooler) air.
Automatic Overclock:
The automatic overclock options are fond in the TurboV EVO section of AI Suite, and offer one button selections. Our results are as follows:
On the ‘Fast’ setting, the system changed the CPU strap from 100 MHz to 125 MHz, as well as adjusting the CPU to 33x base turbo with 36x full turbo. This gave a MHz range of 4125 MHz to 4500 MHz, with the CPU set at 1.300 volts and Load Line Calibration on Auto. At this setting the CPU scored 2210.71 in PovRay, a peak temperature of 74C in OCCT and a load voltage of 1.288 volts on the CPU.
On the ‘Extreme’ setting, the system rebooted to the ‘Fast’ mode speed and then attempted to stress test the CPU, first by incrementing the multiplier and then the BCLK. Unfortuantely there was an issue with the software when upping the multiplier, causing the system to loop the same screen animation. If the system is reset at that point, the software tries again but with BCLK. On this setting, the system ended up with the same multiplier range as the ‘Fast’ setting, but at 125.50 MHz, a small 0.50 MHz difference – the CPU voltage and LLC were set the same as the Fast mode. With this setting, PovRay scored 2235.18, OCCT peak temperature was 74C and the system reported a load voltage of 1.288 volts.
Manual Overclock:
For our manual overclock, we start at the 40x multiplier, set load line calibration to Ultra High, the CPU voltage to 1.100 volts and start testing. If the system is stable (PovRay and OCCT test), the multiplier is increased; if unstable, the voltage is increased. Here are our results:

At 4.5 GHz the OCCT test was moving above 90C, so we decided to stop there in our testing. It was interesting to see such a level voltage up to 4.2 GHz.
Many thanks to...
We must thank the following companies for kindly providing hardware for our test bed:
Thank you to OCZ for providing us with 1250W Gold Power Supplies.
Thank you to G.Skill for providing us with memory kits.
Thank you to Corsair for providing us with an AX1200i PSU, Corsair H80i CLC and 16GB 2400C10 memory.
Thank you to ASUS for providing us with the AMD GPUs and some IO Testing kit.
Thank you to ECS for providing us with the NVIDIA GPUs.
Thank you to Rosewill for providing us with the 500W Platinum Power Supply for mITX testing, BlackHawk Ultra, and 1600W Hercules PSU for extreme dual CPU + quad GPU testing, and RK-9100 keyboards.
Thank you to ASRock for providing us with the 802.11ac wireless router for testing.
Test Setup
| Test Setup | |
| Processor |
Intel Core i7-4960X ES 6 Cores, 12 Threads, 3.6 GHz (4.0 GHz Turbo) |
| Motherboards |
EVGA X79 Dark ASUS Rampage IV Black Edition ASUS P9X79-E WS |
| Cooling |
Corsair H80i Thermalright TRUE Copper |
| Power Supply |
OCZ 1250W Gold ZX Series Corsair AX1200i Platinum PSU |
| Memory | 2 x Corsair Vengeance Pro 2x8 GB DDR3 2400 10-12-12 Kit |
| Memory Settings | XMP (2400 10-12-12) |
| Video Cards |
ASUS HD7970 3GB ECS GTX 580 1536MB |
| Video Drivers |
Catalyst 13.1 NVIDIA Drivers 310.90 WHQL |
| Hard Drive | OCZ Vertex 3 256GB |
| Optical Drive | LG GH22NS50 |
| Case | Open Test Bed |
| Operating System | Windows 7 64-bit |
| USB 2/3 Testing | OCZ Vertex 3 240GB with SATA->USB Adaptor |
| WiFi Testing | D-Link DIR-865L 802.11ac Dual Band Router |
Power Consumption
Power consumption was tested on the system as a whole with a wall meter connected to the OCZ 1250W power supply, while in a dual 7970 GPU configuration. This power supply is Gold rated, and as I am in the UK on a 230-240 V supply, leads to ~75% efficiency > 50W, and 90%+ efficiency at 250W, which is suitable for both idle and multi-GPU loading. This method of power reading allows us to compare the power management of the UEFI and the board to supply components with power under load, and includes typical PSU losses due to efficiency. These are the real world values that consumers may expect from a typical system (minus the monitor) using this motherboard.
While this method for power measurement may not be ideal, and you feel these numbers are not representative due to the high wattage power supply being used (we use the same PSU to remain consistent over a series of reviews, and the fact that some boards on our test bed get tested with three or four high powered GPUs), the important point to take away is the relationship between the numbers. These boards are all under the same conditions, and thus the differences between them should be easy to spot.
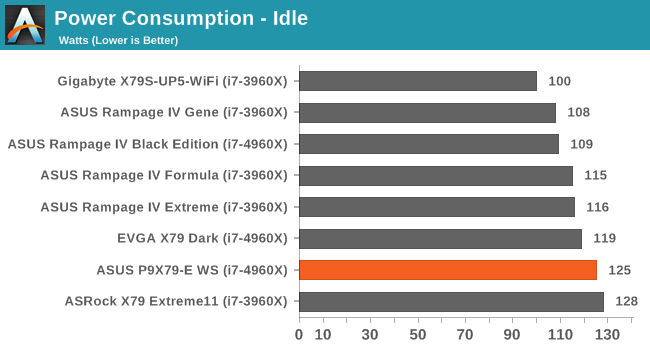
The idle power numbers from the P9X79-E WS are a little higher than the others, presumably due to the large number of extra controllers present.
Windows 7 POST Time
Different motherboards have different POST sequences before an operating system is initialized. A lot of this is dependent on the board itself, and POST boot time is determined by the controllers on board (and the sequence of how those extras are organized). As part of our testing, we are now going to look at the POST Boot Time - this is the time from pressing the ON button on the computer to when Windows 7 starts loading. (We discount Windows loading as it is highly variable given Windows specific features.) These results are subject to human error, so please allow +/- 1 second in these results.
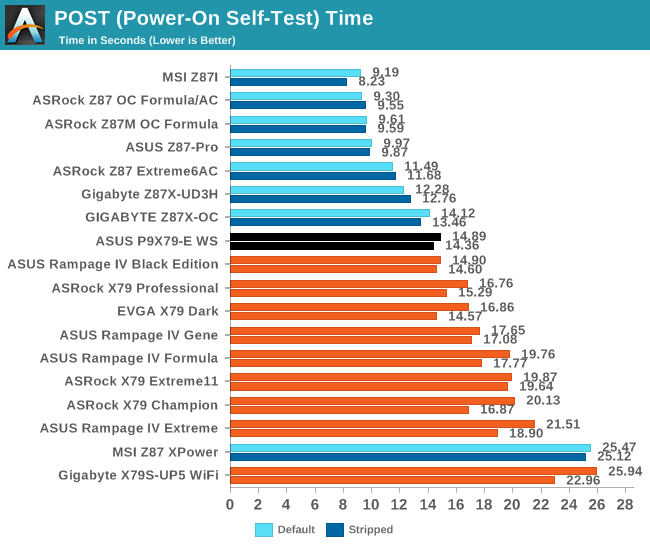
Typically large motherboards with extra features take longer to POST into Windows 7, such as some of our 25+ second tests, but the P9X79-E WS does better than expected coming just under 15 seconds.
Rightmark Audio Analyzer 6.2.5
In part due to reader requests, we are pleased to include Rightmark Audio Analyzer results in our benchmark suite. The premise behind Rightmark:AA is to test the input and output of the audio system to determine noise levels, range, harmonic distortion, stereo crosstalk and so forth. Rightmark:AA should indicate how well the sound system is built and isolated from electrical interference (either internally or externally). For this test we connect the Line Out to the Line In using a short six inch 3.5mm to 3.5mm high-quality jack, turn the OS speaker volume to 100%, and run the Rightmark default test suite at 192 kHz, 24-bit. The OS is tuned to 192 kHz/24-bit input and output, and the Line-In volume is adjusted until we have the best RMAA value in the mini-pretest. We look specifically at the Dynamic Range of the audio codec used on board, as well as the Total Harmonic Distortion + Noise.
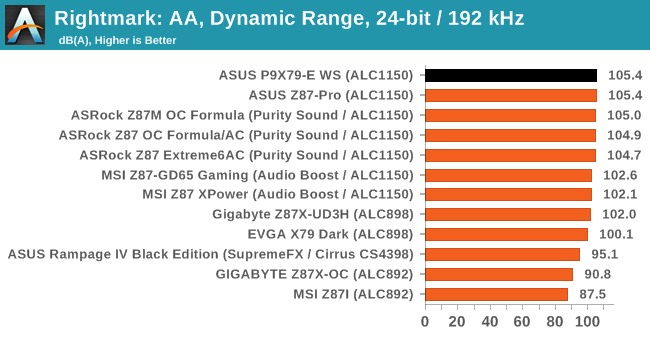
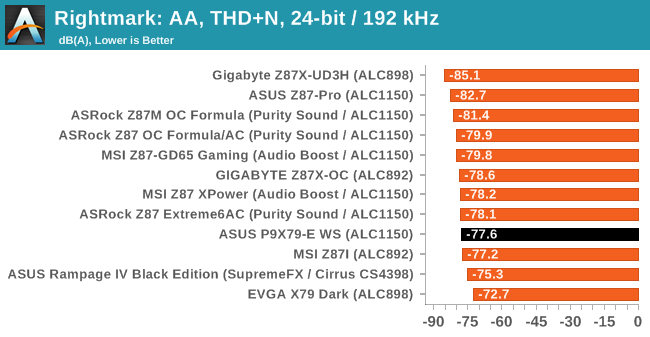
I expressed my surprise to see the Realtek ALC1150 used on the P9X79-E WS, and even without the extra treatment given to it on some other motherboards it performs better than expected here.
USB Backup
For this benchmark, we run CrystalDiskMark to determine the ideal sequential read and write speeds for the USB port using our 240 GB OCZ Vertex3 SSD with a SATA 6 Gbps to USB 3.0 converter. Then we transfer a set size of files from the SSD to the USB drive using DiskBench, which monitors the time taken to transfer. The files transferred are a 1.52 GB set of 2867 files across 320 folders – 95% of these files are small typical website files, and the rest (90% of the size) are the videos used in the WinRAR test. In an update to pre-Z87 testing, we also run MaxCPU to load up one of the threads during the test which improves general performance up to 15% by causing all the internal pathways to run at full speed.
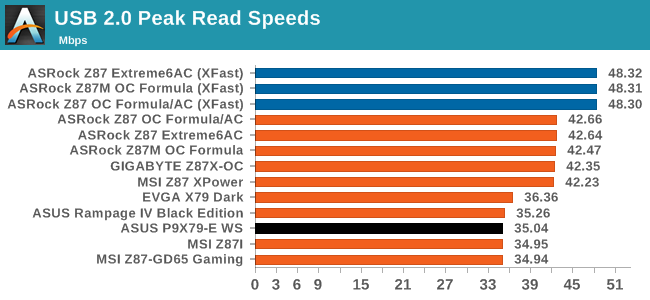
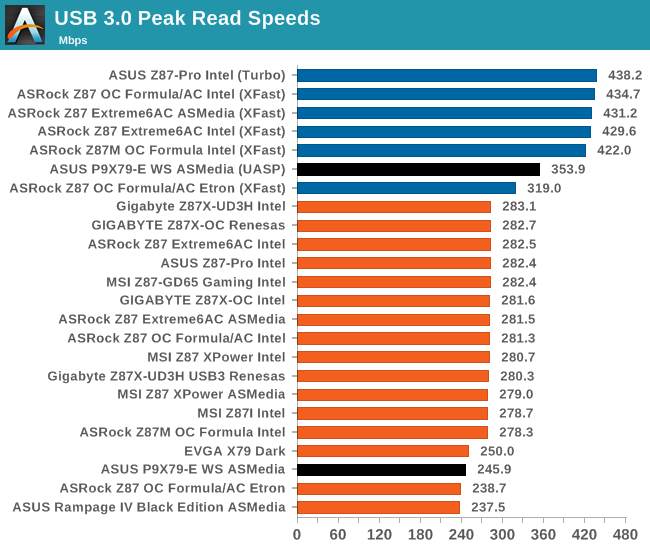
The lack of native USB 3.0 really does hurt the older platforms especially when trying to bring them into new personas.
DPC Latency
Deferred Procedure Call latency is a way in which Windows handles interrupt servicing. In order to wait for a processor to acknowledge the request, the system will queue all interrupt requests by priority. Critical interrupts will be handled as soon as possible, whereas lesser priority requests, such as audio, will be further down the line. So if the audio device requires data, it will have to wait until the request is processed before the buffer is filled. If the device drivers of higher priority components in a system are poorly implemented, this can cause delays in request scheduling and process time, resulting in an empty audio buffer – this leads to characteristic audible pauses, pops and clicks. Having a bigger buffer and correctly implemented system drivers obviously helps in this regard. The DPC latency checker measures how much time is processing DPCs from driver invocation – the lower the value will result in better audio transfer at smaller buffer sizes. Results are measured in microseconds and taken as the peak latency while cycling through a series of short HD videos - under 500 microseconds usually gets the green light, but the lower the better.

In typical WS fashion, a low DPC Latency is required for DAW users, and at 115 microseconds (peak), the P9X79-E WS does a good job.
Readers of our motherboard review section will have noted the trend in modern motherboards to implement a form of MultiCore Enhancement / Acceleration / Turbo (read our report here) on their motherboards. This does several things – better benchmark results at stock settings (not entirely needed if overclocking is an end-user goal), at the expense of heat and temperature, but also gives in essence an automatic overclock which may be against what the user wants. Our testing methodology is ‘out-of-the-box’, with the latest public BIOS installed and XMP enabled, and thus subject to the whims of this feature. It is ultimately up to the motherboard manufacturer to take this risk – and manufacturers taking risks in the setup is something they do on every product (think C-state settings, USB priority, DPC Latency / monitoring priority, memory subtimings at JEDEC). Processor speed change is part of that risk which is clearly visible, and ultimately if no overclocking is planned, some motherboards will affect how fast that shiny new processor goes and can be an important factor in the purchase.
Using our consumer level i7-4960X CPU, the P9X79-E WS does implement MultiCore Turbo when XMP is enabled. This gives a full 4.0 GHz CPU power under any loading.
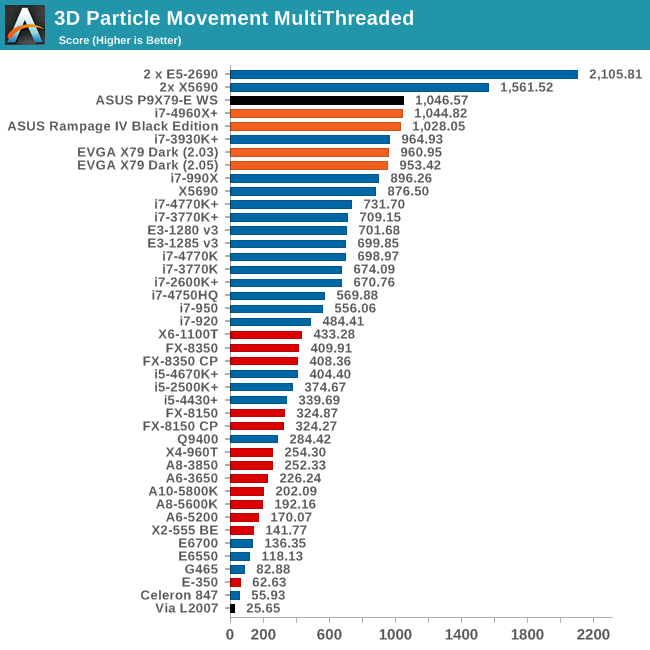
Point Calculations - 3D Movement Algorithm Test
The algorithms in 3DPM employ both uniform random number generation or normal distribution random number generation, and vary in various amounts of trigonometric operations, conditional statements, generation and rejection, fused operations, etc. The benchmark runs through six algorithms for a specified number of particles and steps, and calculates the speed of each algorithm, then sums them all for a final score. This is an example of a real world situation that a computational scientist may find themselves in, rather than a pure synthetic benchmark. The benchmark is also parallel between particles simulated, and we test the single thread performance as well as the multi-threaded performance.
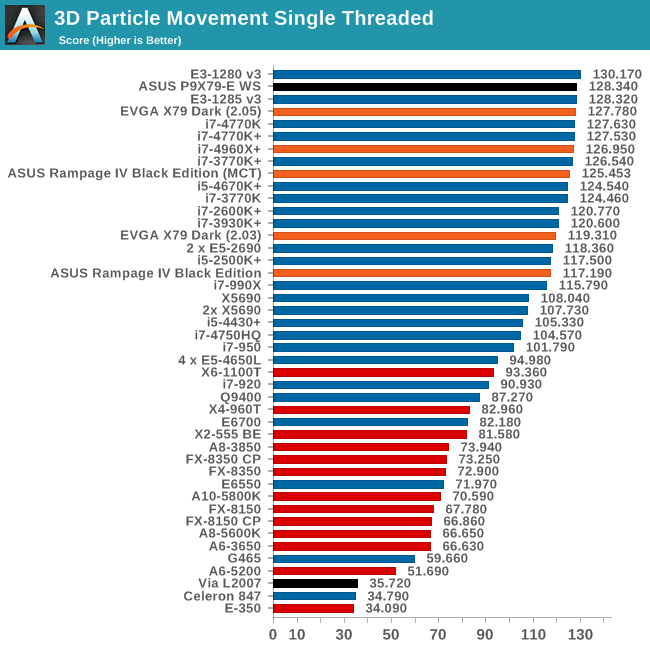
The P9X79-E WS results come across as very efficient in our 3DPM ST test, with none of the issues we found with the RIVBE coming through.
Compression - WinRAR 4.2
With 64-bit WinRAR, we compress the set of files used in the USB speed tests. WinRAR x64 3.93 attempts to use multithreading when possible, and provides as a good test for when a system has variable threaded load. WinRAR 4.2 does this a lot better! If a system has multiple speeds to invoke at different loading, the switching between those speeds will determine how well the system will do.
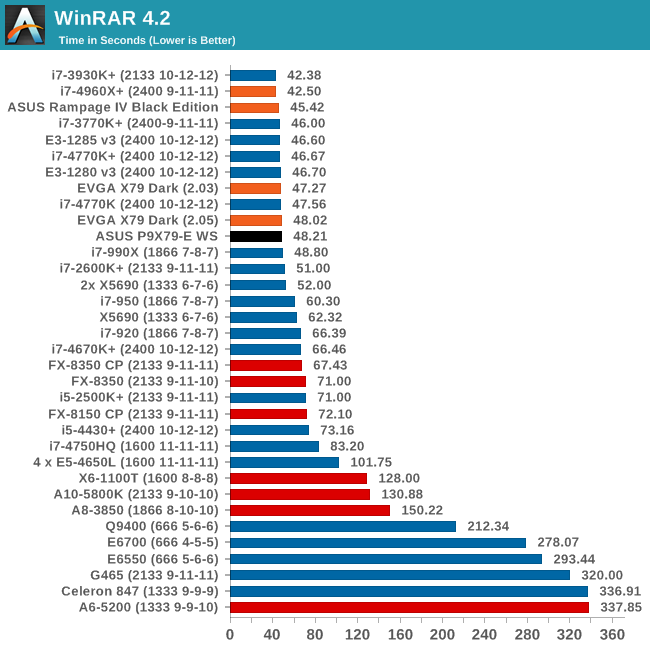
Image Manipulation - FastStone Image Viewer 4.2
FastStone Image Viewer is a free piece of software I have been using for quite a few years now. It allows quick viewing of flat images, as well as resizing, changing color depth, adding simple text or simple filters. It also has a bulk image conversion tool, which we use here. The software currently operates only in single-thread mode, which should change in later versions of the software. For this test, we convert a series of 170 files, of various resolutions, dimensions and types (of a total size of 163MB), all to the .gif format of 640x480 dimensions.
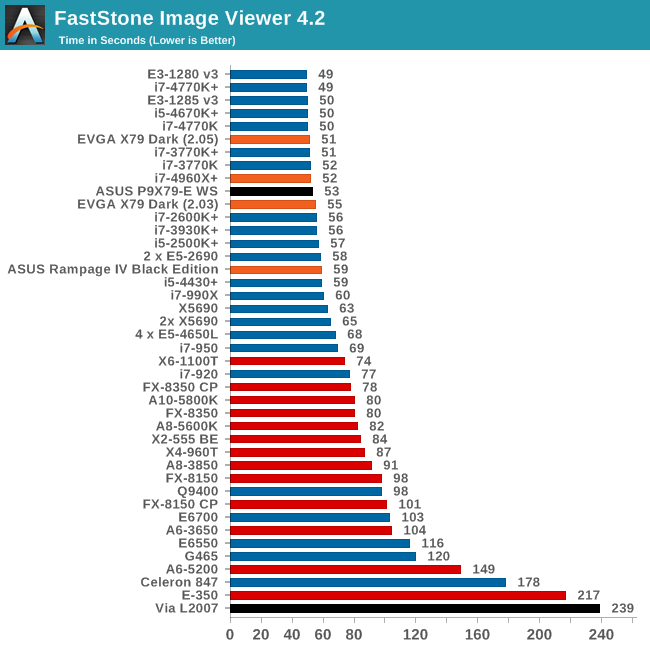
Again, the P9X79-E WS blasts past the RIVBE here due to the turbo issue.
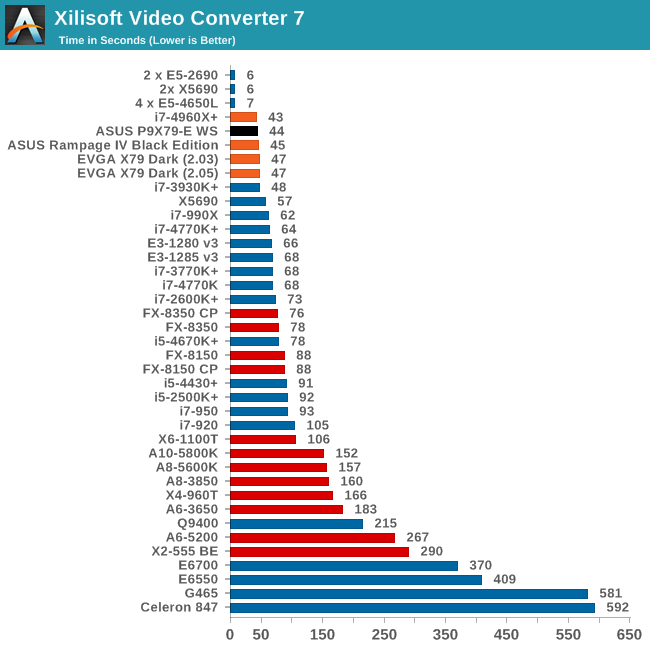
Video Conversion - Xilisoft Video Converter 7
With XVC, users can convert any type of normal video to any compatible format for smartphones, tablets and other devices. By default, it uses all available threads on the system, and in the presence of appropriate graphics cards, can utilize CUDA for NVIDIA GPUs as well as AMD WinAPP for AMD GPUs. For this test, we use a set of 33 HD videos, each lasting 30 seconds, and convert them from 1080p to an iPod H.264 video format using just the CPU. The time taken to convert these videos gives us our result.
Rendering – PovRay 3.7
The Persistence of Vision RayTracer, or PovRay, is a freeware package for as the name suggests, ray tracing. It is a pure renderer, rather than modeling software, but the latest beta version contains a handy benchmark for stressing all processing threads on a platform. We have been using this test in motherboard reviews to test memory stability at various CPU speeds to good effect – if it passes the test, the IMC in the CPU is stable for a given CPU speed. As a CPU test, it runs for approximately 2-3 minutes on high end platforms.

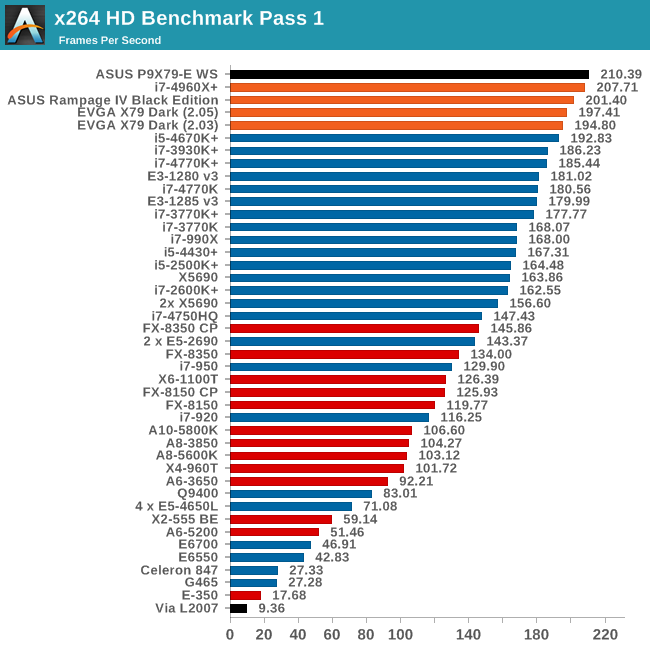
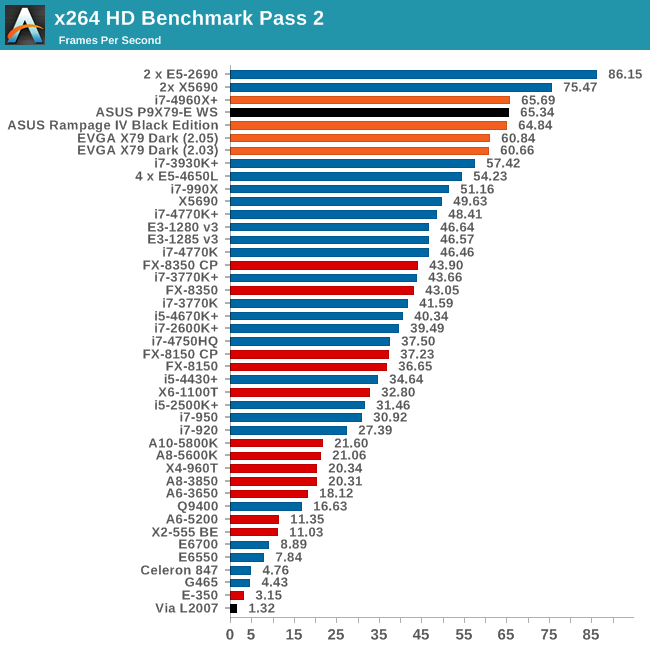
Video Conversion - x264 HD Benchmark
The x264 HD Benchmark uses a common HD encoding tool to process an HD MPEG2 source at 1280x720 at 3963 Kbps. This test represents a standardized result which can be compared across other reviews, and is dependent on both CPU power and memory speed. The benchmark performs a 2-pass encode, and the results shown are the average of each pass performed four times.
Grid Solvers - Explicit Finite Difference
For any grid of regular nodes, the simplest way to calculate the next time step is to use the values of those around it. This makes for easy mathematics and parallel simulation, as each node calculated is only dependent on the previous time step, not the nodes around it on the current calculated time step. By choosing a regular grid, we reduce the levels of memory access required for irregular grids. We test both 2D and 3D explicit finite difference simulations with 2n nodes in each dimension, using OpenMP as the threading operator in single precision. The grid is isotropic and the boundary conditions are sinks. Values are floating point, with memory cache sizes and speeds playing a part in the overall score.


Interestingly something seems to be holding back the 2D Explicit numbers.
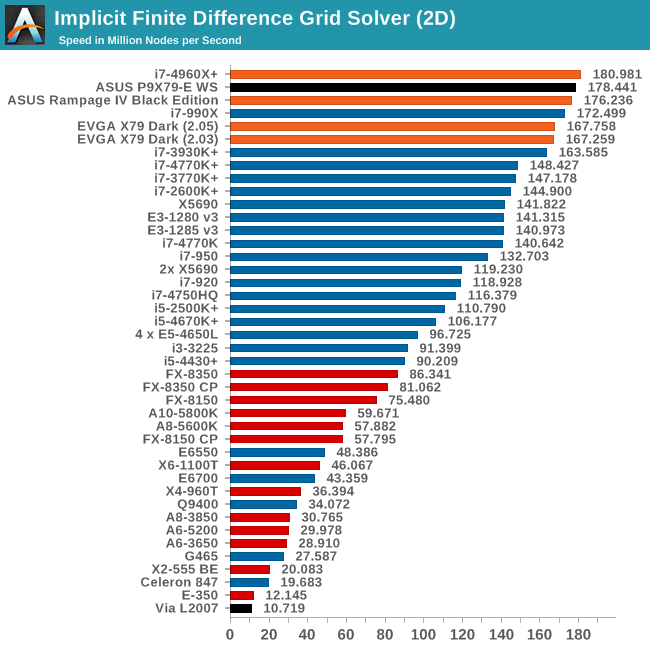
Grid Solvers - Implicit Finite Difference + Alternating Direction Implicit Method
The implicit method takes a different approach to the explicit method – instead of considering one unknown in the new time step to be calculated from known elements in the previous time step, we consider that an old point can influence several new points by way of simultaneous equations. This adds to the complexity of the simulation – the grid of nodes is solved as a series of rows and columns rather than points, reducing the parallel nature of the simulation by a dimension and drastically increasing the memory requirements of each thread. The upside, as noted above, is the less stringent stability rules related to time steps and grid spacing. For this we simulate a 2D grid of 2n nodes in each dimension, using OpenMP in single precision. Again our grid is isotropic with the boundaries acting as sinks. Values are floating point, with memory cache sizes and speeds playing a part in the overall score.
Point Calculations - n-Body Simulation
When a series of heavy mass elements are in space, they interact with each other through the force of gravity. Thus when a star cluster forms, the interaction of every large mass with every other large mass defines the speed at which these elements approach each other. When dealing with millions and billions of stars on such a large scale, the movement of each of these stars can be simulated through the physical theorems that describe the interactions. The benchmark detects whether the processor is SSE2 or SSE4 capable, and implements the relative code. We run a simulation of 10240 particles of equal mass - the output for this code is in terms of GFLOPs, and the result recorded was the peak GFLOPs value.

The PLX Arrangement
The P9X79-E WS has an interesting chipset diagram – in order to power each of the seven PCIe lanes in the specified x16/x8/x8/x8/x16/x8/x8 way, ASUS uses a PLX switch which acts as a FIFO buffer/mux and increase bandwidth to the GPUs that need it most, a sort of ‘fill twice pour once’ approach. We covered the chipset diagram earlier in the review:
In this diagram the thick lines are where x16 lanes are directed, and the thin lanes are x8. So PCIe 3 has 8 lanes from the PLX and 8 lanes from the Quick Switch normally, but when PCIe 2 is populated, the Quick Switch will move the eight lanes over to PCIe 2.
But the effect on gaming can amount to 1-2% per PLX chip, as shown in our previous reviews. This appears again in the P9X79-E WS, but this is a small price to pay for having functionality up to seven PCIe devices.
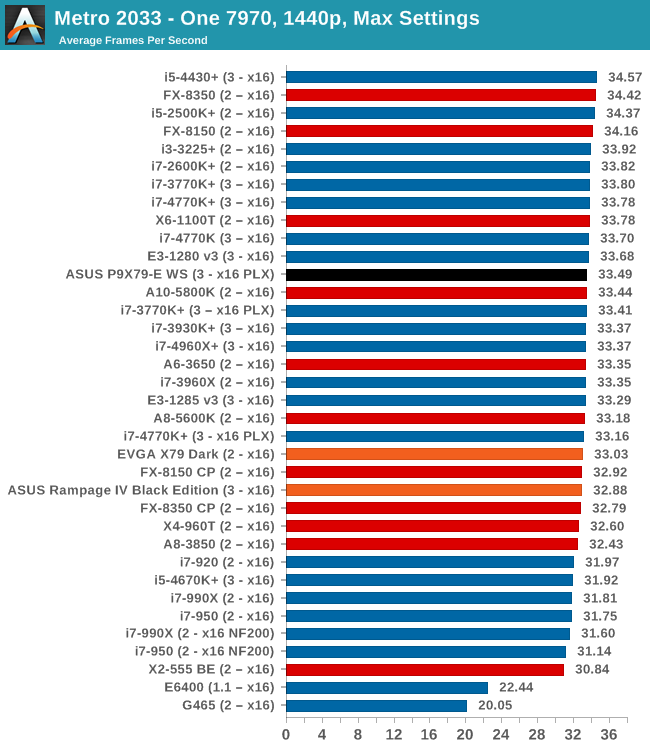
Metro2033
Our first analysis is with the perennial reviewers’ favorite, Metro2033. It occurs in a lot of reviews for a couple of reasons – it has a very easy to use benchmark GUI that anyone can use, and it is often very GPU limited, at least in single GPU mode. Metro2033 is a strenuous DX11 benchmark that can challenge most systems that try to run it at any high-end settings. Developed by 4A Games and released in March 2010, we use the inbuilt DirectX 11 Frontline benchmark to test the hardware at 1440p with full graphical settings. Results are given as the average frame rate from a second batch of 4 runs, as Metro has a tendency to inflate the scores for the first batch by up to 5%.
| Metro 2033 | 1 GPU | 2 GPU | 3 GPU |
| AMD | |||
| NVIDIA |
Dirt 3
Dirt 3 is a rallying video game and the third in the Dirt series of the Colin McRae Rally series, developed and published by Codemasters. Dirt 3 also falls under the list of ‘games with a handy benchmark mode’. In previous testing, Dirt 3 has always seemed to love cores, memory, GPUs, PCIe lane bandwidth, everything. The small issue with Dirt 3 is that depending on the benchmark mode tested, the benchmark launcher is not indicative of game play per se, citing numbers higher than actually observed. Despite this, the benchmark mode also includes an element of uncertainty, by actually driving a race, rather than a predetermined sequence of events such as Metro 2033. This in essence should make the benchmark more variable, but we take repeated in order to smooth this out. Using the benchmark mode, Dirt 3 is run at 1440p with Ultra graphical settings. Results are reported as the average frame rate across four runs.

| Dirt 3 | 1 GPU | 2 GPU | 3 GPU |
| AMD | |||
| NVIDIA |
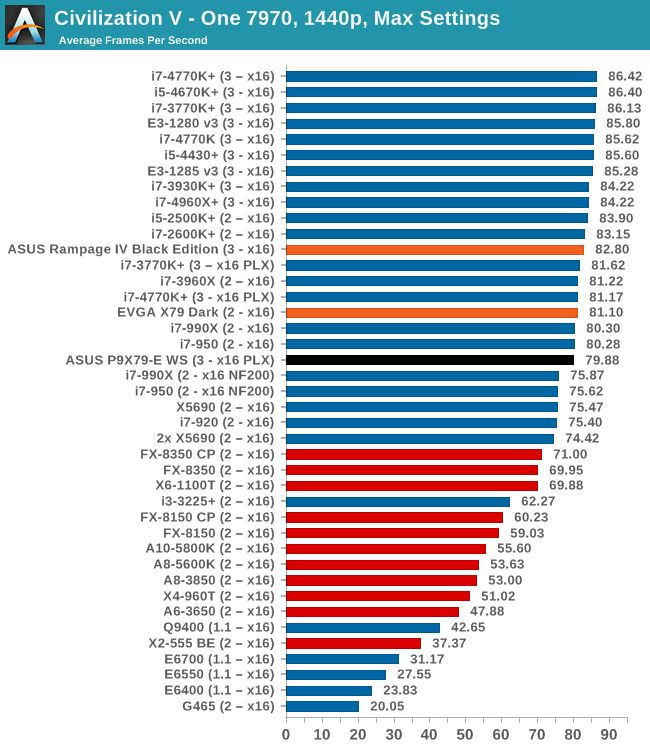
Civilization V
A game that has plagued my testing over the past twelve months is Civilization V. Being on the older 12.3 Catalyst drivers were somewhat of a nightmare, giving no scaling, and as a result I dropped it from my test suite after only a couple of reviews. With the later drivers used for this review, the situation has improved but only slightly, as you will see below. Civilization V seems to run into a scaling bottleneck very early on, and any additional GPU allocation only causes worse performance.
Our Civilization V testing uses Ryan’s GPU benchmark test all wrapped up in a neat batch file. We test at 1080p, and report the average frame rate of a 5 minute test.
| Civilization V | 1 GPU | 2 GPU | 3 GPU |
| AMD | |||
| NVIDIA |
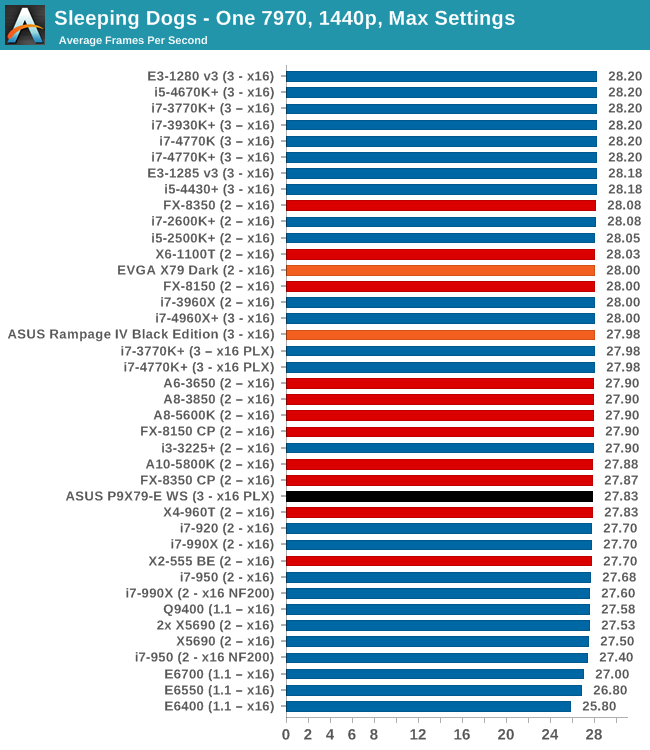
Sleeping Dogs
While not necessarily a game on everybody’s lips, Sleeping Dogs is a strenuous game with a pretty hardcore benchmark that scales well with additional GPU power due to its SSAA implementation. The team over at Adrenaline.com.br is supreme for making an easy to use benchmark GUI, allowing a numpty like me to charge ahead with a set of four 1440p runs with maximum graphical settings.
| Sleeping Dogs | 1 GPU | 2 GPU | 3 GPU |
| AMD | |||
| NVIDIA |
ASUS P9X79-E WS Conclusion
As mentioned in the outset of the review, workstation motherboards have not had much attention on AnandTech of late. They aim at a market almost more straightforward than the consumer market – they have to do a job, do it well, and remain stable. This is why Xeon processors and ECC memory compatibility are paramount, to go along with the extended or business oriented warranties and to be able to power mission critical systems without failure.
The market for prosumer level motherboards is a difficult one to gauge, especially in terms of numbers. ASUS have had WS models for several generations, and their competitors are certainly viewing it as a market with consistent sales – as a business customer the need for something that is powerful and stable is a path on the road to success.
ASUS have taken the standard P9X79 WS and essentially pimped it out with more of everything, as well as updating the package specifically of Intel’s Ivy Bridge-E consumer processors and Xeons. It does support ECC memory, albeit up to 64 GB is listed though it would be interesting to see 16GB ECC modules in place. One of the key features for the P9X79-E WS, and the ASUS WS range, is the level of validation testing of PCIe devices (RAID cards, GPUs, GPGPUs, sound cards, storage, and so on): while a consumer level product might have issues with a particular card, ASUS aim to make the WS series support it.
One of the main draws of the P9X79-E WS will be the numerate PCIe slots. Due to the use of PLX PCIe switches on board, these slots are wired for x16/x16/x16/x16 up to x16/x8/x8/x8/x16/x8/x8, and will accept Xeon Phi processing boards with the relevant BIOS switch activated. ASUS have only placed one 6-pin PCIe VGA power connector on board, which may not be enough for a potential total 525W power draw through these 7 slots (75W per slot). In order to help diagnose this, the Dr. Power circuitry added on board (with software in Windows) is designed to help should the power supply or motherboard be pushed for power draw.
Other functionality includes 12 SATA ports (6 PCH, 4 SATA 6 Gbps via Marvell, 2 eSATA), with the Marvell ports suitable for SSD Caching – whether SSD caching is suitable for 2014 is another matter. ASUS could have used the Intel C606 chipset to add SAS/SATA ports instead, but went down the X79+Marvell route. Despite no native USB 3.0 on X79, there are two USB 3.0 ports on the rear IO and a header on board. Alongside dual Intel I210 NICs we also get the Realtek ALC1150 audio codec, the high end audio codec from Realtek.
Due to the P9X79-E WS implementing MultiCore Turbo, our consumer CPU saw 4.0 GHz on any load, which allowed the P9X79-E WS to hit the top of the charts in many of our benchmarks, like other X79 motherboards that also enable MultiCore Turbo properly. Despite the focus on workstations, Xeons and ECC, there are minor overclock options which set our consumer overclockable CPU to 4.5 GHz with just a flick of a switch.
The BIOS is updated to the new ‘Z87’ generation, using features such as My Favorites, Quick Note and Last Modified as well as a fixed length font to aid user readability. The fan headers on board are designed to be controlled via the BIOS and the OS, with the OS software wrapped up in the X79/Z77 generation of AI Suite. This still includes features like Fan Xpert, USB 3.0 Boost, TurboV Evo, EPU, AI Charger and SSD Caching as mentioned before.
One issue I came across was that USB 3.0 Boost needed updating from the version on the CD (Turbo mode would not disable), and the other is the extended heatsink arrangement – due to the number of extra controllers and PCIe switches used onboard, the heatsink did heat up to be uncomfortable to touch. After speaking with ASUS, it was clear that they recommended a high airflow environment for workstation model products. The P9X79-E WS does come with a 3 year warranty and ASUS Premium Service for North America users.
The P9X79-E WS fits in that high end, prosumer niche. It is perhaps missing some features the high end performance needs (Thunderbolt, native USB 3.0), but that should be at the feet of Intel not updating X79 rather than ASUS. When a user is spending $560 to $3000 on a CPU (4930K or E5-26xx v2), then the motherboard becomes less of a % of the build overall and thus moving to a high end product is less of an overall percentage hit. This is the market ASUS is going for, and the P9X79-E WS goes well for the prosumer that needs as many PCIe slots with all the PCIe lanes as a motherboard can carry.


